Samsung SCH-U350 User Manual (user Manual) (ver.f5) (English) - Page 63
Black&White
 |
UPC - 635753480986
View all Samsung SCH-U350 manuals
Add to My Manuals
Save this manual to your list of manuals |
Page 63 highlights
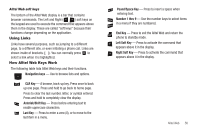
Self Timer in use - Delays the camera shutter from Off [0 seconds (as shown)] to 2 Sec. ( ), 5 Sec. ( ), or 10 Sec. ( ) after you press the Camera key ( ). Quality - Indicates camera's picture quality setting from Super Fine (shown) and Fine ( ), to Normal ( ). (For more information, refer to "Quality" on page 62.) White Balance - Indicates the current photo White Balance setting [Auto (shown), Sunny ( ), Cloudy ( ), Tungsten ( ), and Fluorescent ( )]. (For more information, refer to "White Balance" on page 62.) Color Effect - Replaces the natural colors in the viewfinder screen and in your next picture(s) with shades of a single, selected color (available colors are: Normal, Black&White, Sepia, Negative, Green, Aqua). Memory Counter - Indicates the maximum number of photos you can take at the current Resolution and Quality settings. Zoom - Enlarges the image from 0 up to x7 when you press the Navigation key Up or Down. Brightness - Brightens or darkens the image from -4 to +4 when you press the Navigation key Left or Right. Saving Pictures After you've taken a picture, you can do any of the following: • Save the picture by pressing the Save soft key. The Save Options menu pops-up in the display with the following options: - Save to Default Storage - Saves the picture in the My Images folder in phone memory. (For more information, refer to "The Photo Gallery" on page 66.) - Set As - Saves the picture in the My Images folder and assigns it as Main Wallpaper, Front Wallpaper, or as a Picture ID for one of your Contacts. - Save to AltelMyPics.net Only - Saves the picture to your Wireless Provider's server. • Send the picture to someone else in a Picture message by pressing the Send soft key. Note: Before the Create Pic Msg screen appears, you are prompted to save a copy of the picture to your Wireless Provider's server. For a detailed procedure, see "Send Picture Messages in Camera Mode" on page 44. • Discard the picture by pressing the Cancel soft key. Camera Options The Camera Option buttons let you adjust the default camera settings to suite available lighting, the subject of the photo, or the purpose of the photo. Camera 60
-
 1
1 -
2
-
3
-
4
-
5
-
6
-
7
-
8
-
9
-
10
-
11
-
12
-
13
-
14
-
15
-
16
-
17
-
18
-
19
-
20
-
21
-
22
-
23
-
24
-
25
-
26
-
27
-
28
-
29
-
30
-
31
-
32
-
33
-
34
-
35
-
36
-
37
-
38
-
39
-
40
-
41
-
42
-
43
-
44
-
45
-
46
-
47
-
48
-
49
-
50
-
51
-
52
-
53
-
54
-
55
-
56
-
57
-
 58
58 -
 59
59 -
 60
60 -
 61
61 -
 62
62 -
 63
63 -
 64
64 -
 65
65 -
 66
66 -
 67
67 -
 68
68 -
69
-
70
-
71
-
72
-
73
-
74
-
75
-
76
-
77
-
78
-
79
-
80
-
81
-
82
-
83
-
84
-
85
-
86
-
87
-
88
-
89
-
90
-
91
-
92
-
93
-
94
-
95
-
96
-
97
-
98
-
99
-
100
-
101
-
102
-
103
-
104
-
105
-
106
-
107
-
108
-
109
-
110
-
111
-
112
-
113
-
114
-
115
-
116
-
117
-
118
-
119
-
120
-
121
-
122
-
123
-
124
-
125
-
126
-
127
-
128
-
129
-
130
-
131
-
132
-
133
-
134
-
135
-
136
-
137
 |
 |
