Samsung SCX 6555N User Manual (ENGLISH) - Page 103
Scanning problems, Network Scan problems, SmarThru Configuration
 |
UPC - 635753610314
View all Samsung SCX 6555N manuals
Add to My Manuals
Save this manual to your list of manuals |
Page 103 highlights
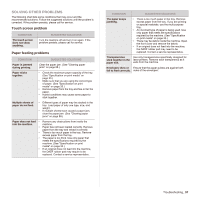
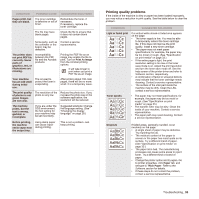
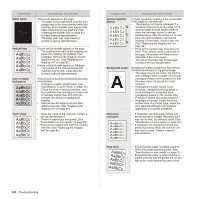
CONDITION SUGGESTED SOLUTIONS Copy image is skewed. • Ensure that the original is face down on the scanner glass or face up in the DADF. • Check that the copy paper is loaded correctly. Blank copies print out. Ensure that the original is face down on the scanner glass or face up in the DADF. Image rubs off the copy easily. • Replace the paper in the tray with paper from a new package. • In high humidity areas, do not leave paper in the machine for extended periods of time. Frequent copy paper • Fan the stack of paper, then turn it over in jams occur. the tray. Replace the paper in the tray with a fresh supply. Check/adjust the paper guides, if necessary. • Ensure that the paper is the proper paper weight. 75 g/m2 bond paper is recommended. • Check for copy paper or pieces of copy paper remaining in the machine after a paper jam has been cleared. Toner cartridge • produces fewer copies than expected before running out of toner. • • Your originals may contain pictures, solids, or heavy lines. For example, your originals may be forms, newsletters, books, or other documents that use more toner. The machine may be turned on and off frequently. The scanner lid may be left open while copies are being made. Scanning problems CONDITION The scanner does not work. SUGGESTED SOLUTIONS • Make sure that you place the original to be scanned face down on the scanner glass, or face up in the DADF. • There may not be enough available memory to hold the document you want to scan. Try the Prescan function to see if that works. Try lowering the scan resolution rate. • Check that the printer cable is connected properly. • Make sure that the printer cable is not defective. Switch the cable with a known good cable. If necessary, replace the cable. • Check that the scanner is configured correctly. Check scan setting in the SmarThru Configuration or the application you want to use to make certain that the scanner job is being sent to the correct port. CONDITION SUGGESTED SOLUTIONS The unit scans very slowly. • Check if the machine is printing received data. If so, scan the document after the received data has been printed. • Graphics are scanned more slowly than text. • Communication speed slows in scan mode because of the large amount of memory required to analyze and reproduce the scanned image. Set your computer to the ECP printer mode through BIOS setting. It will help to increase the speed. For details about how to set BIOS, refer to your computer user's guide. Message appears on • There may be a copying or printing job in your computer progress. Try your job again when that job is screen: finished, try your job again. • "Device can't be • The selected port is currently being used. set to the H/W Restart your computer and try again. mode you want." • The printer cable may be improperly • "Port is being used connected or the power may be off. by another • The scanner driver is not installed or the program." operating environment is not set up properly. • "Port is Disabled." • Ensure that the machine is properly • "Scanner is busy connected and the power is on, then restart receiving or your computer. printing data. • The USB cable may be improperly When the current connected or the power may be off. job is completed, try again." • "Invalid handle." • "Scanning has failed." Network Scan problems CONDITION I cannot find a scanned image file. I cannot find the scanned image file after scanning. I forgot my ID and PIN. I cannot view the Help file. SUGGESTED SOLUTIONS You can check the destination for the scanned file on the Advanced page in the Network Scan program's Properties screen. • Check if the scanned file is on your computer. • Check Send image immediately to the specified folder using an associated default application on the Advanced page in the Properties screen of the Network Scan program to open the scanned image immediately after scanning. Check your ID and PIN in the Server page in the Properties screen of the Network Scan program. To view the Help file, you need to have Internet Explorer 4 service pack 2 or above. 102 _Troubleshooting
-
 1
1 -
2
-
3
-
4
-
5
-
6
-
7
-
8
-
9
-
10
-
11
-
12
-
13
-
14
-
15
-
16
-
17
-
18
-
19
-
20
-
21
-
22
-
23
-
24
-
25
-
26
-
27
-
28
-
29
-
30
-
31
-
32
-
33
-
34
-
35
-
36
-
37
-
38
-
39
-
40
-
41
-
42
-
43
-
44
-
45
-
46
-
47
-
48
-
49
-
50
-
51
-
52
-
53
-
54
-
55
-
56
-
57
-
58
-
59
-
60
-
61
-
62
-
63
-
64
-
65
-
66
-
67
-
68
-
69
-
70
-
71
-
72
-
73
-
74
-
75
-
76
-
77
-
78
-
79
-
80
-
81
-
82
-
83
-
84
-
85
-
86
-
87
-
88
-
89
-
90
-
91
-
92
-
93
-
94
-
95
-
96
-
97
-
 98
98 -
 99
99 -
 100
100 -
 101
101 -
 102
102 -
 103
103 -
 104
104 -
 105
105 -
 106
106 -
 107
107 -
 108
108 -
109
-
110
-
111
-
112
-
113
-
114
-
115
-
116
-
117
-
118
-
119
-
120
-
121
-
122
-
123
-
124
-
125
-
126
-
127
-
128
-
129
-
130
-
131
-
132
-
133
-
134
-
135
-
136
-
137
-
138
-
139
-
140
-
141
-
142
-
143
-
144
-
145
-
146
-
147
-
148
-
149
-
150
-
151
-
152
-
153
-
154
-
155
-
156
-
157
-
158
-
159
-
160
-
161
-
162
-
163
-
164
-
165
-
166
-
167
-
168
-
169
-
170
-
171
-
172
-
173
-
174
-
175
 |
 |
