Samsung SCX 6555N User Manual (ENGLISH) - Page 51
Entering email addresses by the address book, Group, Global
 |
UPC - 635753610314
View all Samsung SCX 6555N manuals
Add to My Manuals
Save this manual to your list of manuals |
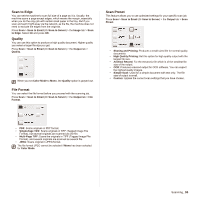
Page 51 highlights
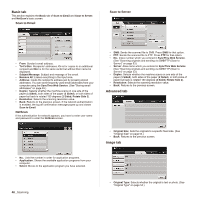
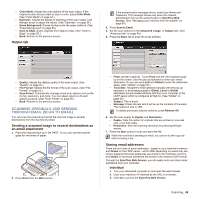
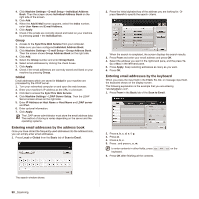
4. Click Machine Settings > E-mail Setup > Individual Address Book. Then the screen shows Individual Address Book on the right side of the screen. 5. Click Add. 6. When the Add E-Mail screen appears, select the Index number, enter User Name and E-mail Address. 7. Click Apply. 8. Check if the emails are correctly stored and listed on your machine by pressing Local > the Individual tab. Group 1. Access to the SyncThru Web Service from your computer. 2. Make sure you have configured Individual Address Book. 3. Click Machine Settings > E-mail Setup > Group Address Book. Then the screen shows Group Address Book on the right side. 4. Click Add. 5. Select the Group number and enter Group Name. 6. Select email addresses by clicking the check boxes. 7. Click Apply. 8. Check if the email addresses are correctly stored and listed on your machine by pressing Group. Global Email addresses which are stored in Global in your machine are processed by the LDAP server. 1. Turn your networked computer on and open the web browser. 2. Enter your machine's IP address as the URL in a browser. 3. Click Go to access the SyncThru Web Service. 4. Click Machine Settings > LDAP Server Setup. Then the LDAP Server screen shows on the right side. 5. Enter IP Address or Host Name or Host Name and LDAP server and Port. 6. Enter optional information. 7. Click Apply. The LDAP server administrator must store the email address data. The method of storing is varies depending on the server and the operating systems. Entering email addresses by the address book Once you have stored the frequently used addresses into the address book, you can simply enter email addresses. 1. Press Local or Global from the Basic tab of Scan to Email. 2. Press the initial alphabet key of the address you are looking for. Or press Search to specify the search criteria. When the search is completed, the screen displays the search results. 3. Press From and enter your email address and press OK. 4. Select the address you want in the right-hand pane, and the press To, Cc or Bcc in the left-hand pane. 5. Press Apply. Keep selecting addresses as many as you want. 6. Press OK. Entering email addresses by the keyboard When you press the input field in the From, To, Cc, or message input field, the keyboard shows on the display screen. The following explanation is the example that you are entering "[email protected]". 1. Press From in the Basic tab of the Scan to Email. 2. Press a, b, c, d, e, f, g. 3. Press @. 4. Press a, b, c. 5. Press . and press c, o, m. to enter contents in other fields, press keyboard. 6. Press OK after finishing all the contents. on the The search window shows. 50 _Scanning
-
 1
1 -
2
-
3
-
4
-
5
-
6
-
7
-
8
-
9
-
10
-
11
-
12
-
13
-
14
-
15
-
16
-
17
-
18
-
19
-
20
-
21
-
22
-
23
-
24
-
25
-
26
-
27
-
28
-
29
-
30
-
31
-
32
-
33
-
34
-
35
-
36
-
37
-
38
-
39
-
40
-
41
-
42
-
43
-
44
-
45
-
 46
46 -
 47
47 -
 48
48 -
 49
49 -
 50
50 -
 51
51 -
 52
52 -
 53
53 -
 54
54 -
 55
55 -
 56
56 -
57
-
58
-
59
-
60
-
61
-
62
-
63
-
64
-
65
-
66
-
67
-
68
-
69
-
70
-
71
-
72
-
73
-
74
-
75
-
76
-
77
-
78
-
79
-
80
-
81
-
82
-
83
-
84
-
85
-
86
-
87
-
88
-
89
-
90
-
91
-
92
-
93
-
94
-
95
-
96
-
97
-
98
-
99
-
100
-
101
-
102
-
103
-
104
-
105
-
106
-
107
-
108
-
109
-
110
-
111
-
112
-
113
-
114
-
115
-
116
-
117
-
118
-
119
-
120
-
121
-
122
-
123
-
124
-
125
-
126
-
127
-
128
-
129
-
130
-
131
-
132
-
133
-
134
-
135
-
136
-
137
-
138
-
139
-
140
-
141
-
142
-
143
-
144
-
145
-
146
-
147
-
148
-
149
-
150
-
151
-
152
-
153
-
154
-
155
-
156
-
157
-
158
-
159
-
160
-
161
-
162
-
163
-
164
-
165
-
166
-
167
-
168
-
169
-
170
-
171
-
172
-
173
-
174
-
175
 |
 |
