Samsung SCX 6555N User Manual (ENGLISH) - Page 66
Printing a report after sending a fax, Sending a fax in toll save time
 |
UPC - 635753610314
View all Samsung SCX 6555N manuals
Add to My Manuals
Save this manual to your list of manuals |
Page 66 highlights
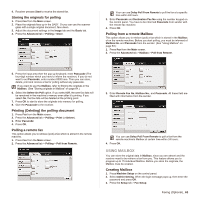
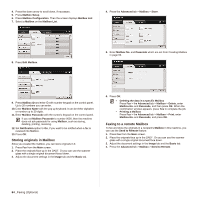
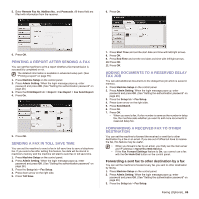
5. Enter Remote Fax No, Mailbox No., and Passcode. All these field are filled with information from the receiver. 6. Press On. 6. Press OK. PRINTING A REPORT AFTER SENDING A FAX You can set the machine to print a report whether a fax transmission is successfully completed or not. The detailed information is available in advanced setup part. (See "Printing a report" on page 79.) 1. Press Machine Setup on the control panel. 2. Press Admin Setting. When the login message pops up, enter password and press OK. (See "Setting the authentication password" on page 28.) 3. Press the Print/Report tab > Report > Fax Report > Fax Send Report. 4. Press On. 5. Press OK. SENDING A FAX IN TOLL SAVE TIME You can set the machine to send a fax in toll save time to save a telephone fee. If you send a fax after setting this feature, fax data will be stored in machine's memory and the machine will start to send fax in toll save time. 1. Press Machine Setup on the control panel. 2. Press Admin Setting. When the login message pops up, enter password and press OK. (See "Setting the authentication password" on page 28.) 3. Press the Setup tab > Fax Setup. 4. Press down arrow on the right side. 5. Press Toll Save. 7. Press Start Time and set the start date and time with left/right arrows. 8. Press OK. 9. Press End Time and set the end date and time with left/right arrows. 10. Press OK. 11. Press OK. ADDING DOCUMENTS TO A RESERVED DELAY FAX JOB You can add additional documents to the delayed fax job which is saved in memory. 1. Press Machine Setup on the control panel. 2. Press Admin Setting. When the login message pops up, enter password and press OK. (See "Setting the authentication password" on page 28.) 3. Press the Setup tab > Fax Setup. 4. Press down arrow on the right side. 5. Press Send Batch. 6. Press On. 7. Press OK. • When you send a fax, if a fax number is same as the number in delay fax, the machine asks whether you want to add more documents to reserved delay fax. FORWARDING A RECEIVED FAX TO OTHER DESTINATION You can set the machine to forward the received or sent fax to other destination by a fax or an email. If you are out of office but have to receive the fax, this feature may be useful. • When you forward a fax by an email, you firstly set the mail server and IP address in SyncThru Web Service. • If this Fax Forward Settings feature to On, you cannot use a fax with the On Hook Dial button on the control panel. Forwarding a sent fax to other destination by a fax You can set the machine to forward every fax you sent to other destination by faxing. 1. Press Machine Setup on the control panel. 2. Press Admin Setting. When the login message pops up, enter password and press OK. (See "Setting the authentication password" on page 28.) 3. Press the Setup tab > Fax Setup. Faxing (Optional)_ 65
-
 1
1 -
2
-
3
-
4
-
5
-
6
-
7
-
8
-
9
-
10
-
11
-
12
-
13
-
14
-
15
-
16
-
17
-
18
-
19
-
20
-
21
-
22
-
23
-
24
-
25
-
26
-
27
-
28
-
29
-
30
-
31
-
32
-
33
-
34
-
35
-
36
-
37
-
38
-
39
-
40
-
41
-
42
-
43
-
44
-
45
-
46
-
47
-
48
-
49
-
50
-
51
-
52
-
53
-
54
-
55
-
56
-
57
-
58
-
59
-
60
-
 61
61 -
 62
62 -
 63
63 -
 64
64 -
 65
65 -
 66
66 -
 67
67 -
 68
68 -
 69
69 -
 70
70 -
 71
71 -
72
-
73
-
74
-
75
-
76
-
77
-
78
-
79
-
80
-
81
-
82
-
83
-
84
-
85
-
86
-
87
-
88
-
89
-
90
-
91
-
92
-
93
-
94
-
95
-
96
-
97
-
98
-
99
-
100
-
101
-
102
-
103
-
104
-
105
-
106
-
107
-
108
-
109
-
110
-
111
-
112
-
113
-
114
-
115
-
116
-
117
-
118
-
119
-
120
-
121
-
122
-
123
-
124
-
125
-
126
-
127
-
128
-
129
-
130
-
131
-
132
-
133
-
134
-
135
-
136
-
137
-
138
-
139
-
140
-
141
-
142
-
143
-
144
-
145
-
146
-
147
-
148
-
149
-
150
-
151
-
152
-
153
-
154
-
155
-
156
-
157
-
158
-
159
-
160
-
161
-
162
-
163
-
164
-
165
-
166
-
167
-
168
-
169
-
170
-
171
-
172
-
173
-
174
-
175
 |
 |
