Samsung SCX 6555N User Manual (ENGLISH) - Page 111
Activating the added memory in the PS printer properties, Replacing the Stapler, properties
 |
UPC - 635753610314
View all Samsung SCX 6555N manuals
Add to My Manuals
Save this manual to your list of manuals |
Page 111 highlights
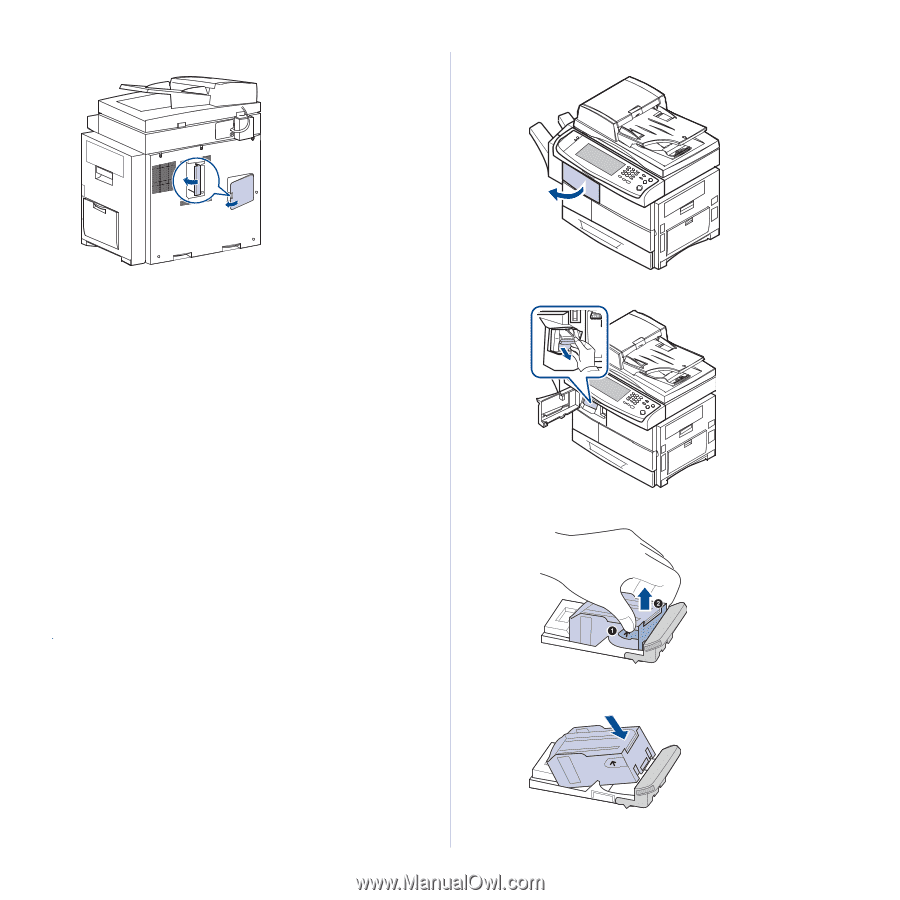
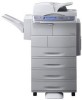
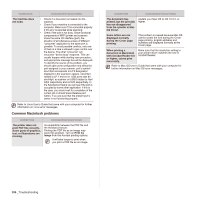
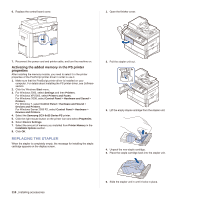
6. Replace the control board cover. 1. Open the finisher cover. 7. Reconnect the power cord and printer cable, and turn the machine on. Activating the added memory in the PS printer properties After installing the memory module, you need to select it in the printer properties of the PostScript printer driver in order to use it. 1. Make sure that the PostScript printer driver is installed on your computer. For details about installing the PS printer driver, see Software section. 2. Click the Windows Start menu. 3. For Windows 2000, select Settings and then Printers. For Windows XP/2003, select Printers and Faxes. For Windows /2008, select Control Panel > Hardware and Sound > Printers. For Windows 7, select Control Panel > Hardware and Sound > Devices and Printers. For Windows Server 2008 R2, select Control Panel > Hardware > Devices and Printers. 4. Select the Samsung SCX-6x55 Series PS printer. 5. Click the right mouse button on the printer icon and select Properties. 6. Select Device Settings. 7. Select the amount of memory you installed from Printer Memory in the Installable Options section. 8. Click OK. REPLACING THE STAPLER When the stapler is completely empty, the message for installing the staple cartridge appears on the display screen. 2. Pull the stapler unit out. 3. Lift the empty staple cartridge from the stapler unit. 4. Unpack the new staple cartridge. 5. Place the staple cartridge back into the stapler unit. 110 _Installing accessories 6. Slide the stapler unit in until it locks in place.
-
 1
1 -
2
-
3
-
4
-
5
-
6
-
7
-
8
-
9
-
10
-
11
-
12
-
13
-
14
-
15
-
16
-
17
-
18
-
19
-
20
-
21
-
22
-
23
-
24
-
25
-
26
-
27
-
28
-
29
-
30
-
31
-
32
-
33
-
34
-
35
-
36
-
37
-
38
-
39
-
40
-
41
-
42
-
43
-
44
-
45
-
46
-
47
-
48
-
49
-
50
-
51
-
52
-
53
-
54
-
55
-
56
-
57
-
58
-
59
-
60
-
61
-
62
-
63
-
64
-
65
-
66
-
67
-
68
-
69
-
70
-
71
-
72
-
73
-
74
-
75
-
76
-
77
-
78
-
79
-
80
-
81
-
82
-
83
-
84
-
85
-
86
-
87
-
88
-
89
-
90
-
91
-
92
-
93
-
94
-
95
-
96
-
97
-
98
-
99
-
100
-
101
-
102
-
103
-
104
-
105
-
 106
106 -
 107
107 -
 108
108 -
 109
109 -
 110
110 -
 111
111 -
 112
112 -
 113
113 -
 114
114 -
 115
115 -
 116
116 -
117
-
118
-
119
-
120
-
121
-
122
-
123
-
124
-
125
-
126
-
127
-
128
-
129
-
130
-
131
-
132
-
133
-
134
-
135
-
136
-
137
-
138
-
139
-
140
-
141
-
142
-
143
-
144
-
145
-
146
-
147
-
148
-
149
-
150
-
151
-
152
-
153
-
154
-
155
-
156
-
157
-
158
-
159
-
160
-
161
-
162
-
163
-
164
-
165
-
166
-
167
-
168
-
169
-
170
-
171
-
172
-
173
-
174
-
175
 |
 |