Samsung SCX 6555N User Manual (ENGLISH) - Page 58
Faxing (Optional), Preparing to fax, Understanding the Fax screen, Basic tab
 |
UPC - 635753610314
View all Samsung SCX 6555N manuals
Add to My Manuals
Save this manual to your list of manuals |
Page 58 highlights
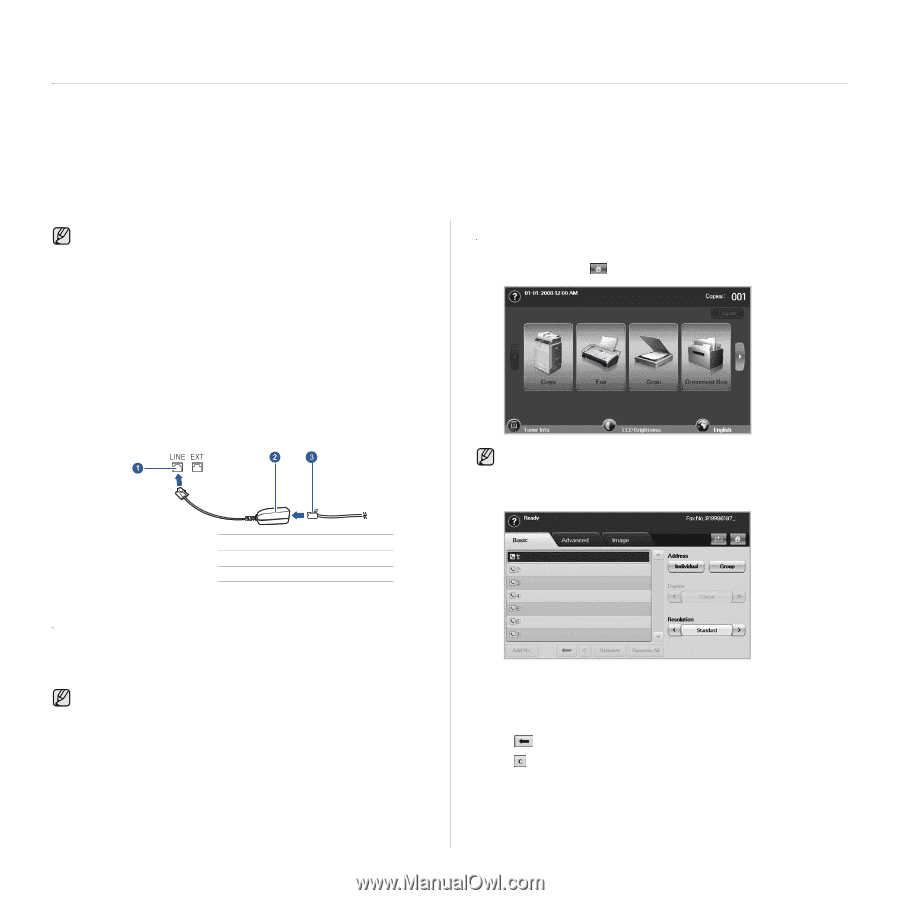
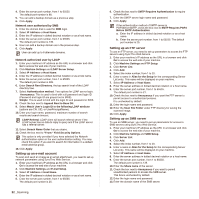
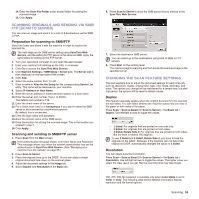
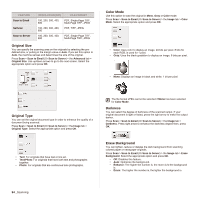
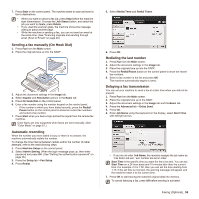
faxing (optional) This chapter gives you information about using your machine as a fax machine. This chapter includes: • Preparing to fax • Understanding the Fax screen • Sending a fax • Receiving a fax • Adjusting the document settings • Setting up a fax phonebook • You cannot use this machine as a fax via the internet phone. For more information ask the internet service provider. • You may experience restrictions on color fax transmmission, slower fax transmmission, poor fax quality and communication failures when faxing over VoIP network. Contact you local network administrator or Internet Service Provider for more details. • To use advanced features of the fax, press Machine Setup on the control panel and Admin Setting > Setup > Fax Setup. (See "Fax Setup" on page 75.) • We recommend you to use traditional analog phone services (PSTN: public switched telephone network) when connecting telephone lines to use Fax. If you use other Internet services (DSL, ISDN, VolP), you can improve the connection quality by using the Micro-filter. The Micro-filter eliminates unnecessary noise signals and improves connection quality or Internet quality. Since the DSL Micro-filter is not provided with the machine, contact your Internet Service provider for use on DSL Micro-filter. • Using the polling option • Using Mailbox • Printing a report after sending a fax • Sending a fax in toll save time • Adding documents to a reserved delay fax job • Forwarding a received fax to other destination UNDERSTANDING THE FAX SCREEN To use the fax feature, press Fax on the Main screen. If the screen displays an other menu, press ( ) to go to the Main screen. If the optional fax feature is not installed the fax icon will not appear on the Main screen. Basic tab 1 Line port 2 Micro filter 3 DSL modem/Telephone line PREPARING TO FAX Before you send or receive a fax, you need to connect the supplied line cord to the wall jack. Refer to the Quick Install Guide how to make a connection. The method of making a telephone connection is varies from one country to another. If you want to add fax feature to the machine, check the option lists (See "Fax option kit" on page 107.) and contact the purchasing point to order. When you purchase a fax kit, install the kit by following the steps described in the Fax Kit Setup Guide which is enclosed in the kit. After installing the fax kit, set the machine to use this feature. (See "Enabling Fax feature after installing the fax option kit" on page 111.) 57 _Faxing (Optional) • Fax number input area: Shows the recipient's fax number using the number keypad on the control panel. If you configured the phone book, press Individual or Group. (See "Setting up a fax phonebook" on page 61.) • Add No.: Lets you add more destinations. • : Deletes the last digit entered. • : Removes all digits of the selected entry. • Remove: Removes the selected fax number entry. • Remove All: Removes all the fax numbers in the input area. • Address: Picks up the frequently used fax numbers directly from your machine or from SyncThru Web Service. (See "Setting up a fax phonebook using SyncThru Web Service" on page 62.)
-
 1
1 -
2
-
3
-
4
-
5
-
6
-
7
-
8
-
9
-
10
-
11
-
12
-
13
-
14
-
15
-
16
-
17
-
18
-
19
-
20
-
21
-
22
-
23
-
24
-
25
-
26
-
27
-
28
-
29
-
30
-
31
-
32
-
33
-
34
-
35
-
36
-
37
-
38
-
39
-
40
-
41
-
42
-
43
-
44
-
45
-
46
-
47
-
48
-
49
-
50
-
51
-
52
-
 53
53 -
 54
54 -
 55
55 -
 56
56 -
 57
57 -
 58
58 -
 59
59 -
 60
60 -
 61
61 -
 62
62 -
 63
63 -
64
-
65
-
66
-
67
-
68
-
69
-
70
-
71
-
72
-
73
-
74
-
75
-
76
-
77
-
78
-
79
-
80
-
81
-
82
-
83
-
84
-
85
-
86
-
87
-
88
-
89
-
90
-
91
-
92
-
93
-
94
-
95
-
96
-
97
-
98
-
99
-
100
-
101
-
102
-
103
-
104
-
105
-
106
-
107
-
108
-
109
-
110
-
111
-
112
-
113
-
114
-
115
-
116
-
117
-
118
-
119
-
120
-
121
-
122
-
123
-
124
-
125
-
126
-
127
-
128
-
129
-
130
-
131
-
132
-
133
-
134
-
135
-
136
-
137
-
138
-
139
-
140
-
141
-
142
-
143
-
144
-
145
-
146
-
147
-
148
-
149
-
150
-
151
-
152
-
153
-
154
-
155
-
156
-
157
-
158
-
159
-
160
-
161
-
162
-
163
-
164
-
165
-
166
-
167
-
168
-
169
-
170
-
171
-
172
-
173
-
174
-
175
 |
 |