Samsung SCX 6555N User Manual (ENGLISH) - Page 45
Clone copying, Book copying, Book Center and Edges Erase
 |
UPC - 635753610314
View all Samsung SCX 6555N manuals
Add to My Manuals
Save this manual to your list of manuals |
Page 45 highlights
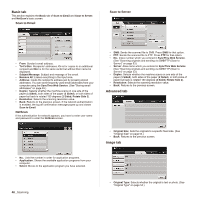
1. Place a single original face down on the scanner glass. (See "Loading originals" on page 31.) 2. Press Copy from the Main screen. 3. Select the tray in Paper Supply. 4. Press the Advanced tab > Poster Copy. This feature is available only when the options in the Basic tab are selected as below; - Duplex to 1 -> 1 Sided - Reduce/Enlarge to Original(100%) - Paper Supply to Tray. 5. Press On to activate this feature. 6. Press OK. 7. Press Start on the control panel to begin copying. Your original is divided into 9 portions. Each portion is scanned and printed one by one in the following order: Clone copying The machine prints multiple original images on a single page. The number of images is automatically determined by the original image and the paper size. This copy feature is available only when you place originals on the scanner glass. 5. Press On to activate this feature. 6. Press OK. 7. Press Start on the control panel to begin copying. Book copying Use this feature to copy a book. If the book is too thick, lift the scanner lid until its hinges are engaged by the stopper and then close the scanner lid. If the book or magazine is thicker than 30 mm(1.18 inches), start copying with the scanner lid open. This copy feature is available only when you place originals on the scanner glass. 1. Place the originals face down on the scanner glass. (See "Loading originals" on page 31.) 2. Press Copy from the Main screen. To remove shadows of a book edge, press the Image tab > Erase Edge > Book Center and Edges Erase. 3. Press the Advanced tab > Book Copy. 4. Select the binding option. • Off: Disables this feature. • Left Page: Prints left page of the book. • Right Page: Prints right page of the book. • Both Page: Prints both facing pages of the book. 5. Press OK. 6. Press Start on the control panel to begin copying. Booklet copying The machine automatically prints on one or both sides of the paper, which are then folded to produce a booklet with all of the pages in the correct sequence. The machine will also reduce and correctly adjust the position of each image to fit on the selected paper. 1. Place a single original face down on the scanner glass. (See "Loading originals" on page 31.) 2. Press Copy from the Main screen. 3. Select the tray in Paper Supply. 4. Press the Advanced tab > Clone Copy. This feature is available only when the options in the Basic tab are selected as below; - Duplex to 1 -> 1 Sided - Reduce/Enlarge to Original(100%) - Paper Supply to Tray. 44 _Copying 1. Place the originals face up in the DADF. Or place a single original face down on the scanner glass. (See "Loading originals" on page 31.) 2. Press Copy from the Main screen. 3. Select the tray in Paper Supply. 4. Press the Advanced tab > Booklet. 5. Press On to use this feature, and select detailed settings for each option. • 1 Sided Original: Copies on one side of the paper. • 2 Sided Original: Copies on both sides of the paper.
-
 1
1 -
2
-
3
-
4
-
5
-
6
-
7
-
8
-
9
-
10
-
11
-
12
-
13
-
14
-
15
-
16
-
17
-
18
-
19
-
20
-
21
-
22
-
23
-
24
-
25
-
26
-
27
-
28
-
29
-
30
-
31
-
32
-
33
-
34
-
35
-
36
-
37
-
38
-
39
-
 40
40 -
 41
41 -
 42
42 -
 43
43 -
 44
44 -
 45
45 -
 46
46 -
 47
47 -
 48
48 -
 49
49 -
 50
50 -
51
-
52
-
53
-
54
-
55
-
56
-
57
-
58
-
59
-
60
-
61
-
62
-
63
-
64
-
65
-
66
-
67
-
68
-
69
-
70
-
71
-
72
-
73
-
74
-
75
-
76
-
77
-
78
-
79
-
80
-
81
-
82
-
83
-
84
-
85
-
86
-
87
-
88
-
89
-
90
-
91
-
92
-
93
-
94
-
95
-
96
-
97
-
98
-
99
-
100
-
101
-
102
-
103
-
104
-
105
-
106
-
107
-
108
-
109
-
110
-
111
-
112
-
113
-
114
-
115
-
116
-
117
-
118
-
119
-
120
-
121
-
122
-
123
-
124
-
125
-
126
-
127
-
128
-
129
-
130
-
131
-
132
-
133
-
134
-
135
-
136
-
137
-
138
-
139
-
140
-
141
-
142
-
143
-
144
-
145
-
146
-
147
-
148
-
149
-
150
-
151
-
152
-
153
-
154
-
155
-
156
-
157
-
158
-
159
-
160
-
161
-
162
-
163
-
164
-
165
-
166
-
167
-
168
-
169
-
170
-
171
-
172
-
173
-
174
-
175
 |
 |
