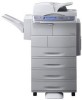
Samsung SCX 6555N User Manual (ENGLISH) - Page 110
Installing accessories, Precautions to take when installing accessories, Installing a memory DIMM,
 |
UPC - 635753610314
View all Samsung SCX 6555N manuals
Add to My Manuals
Save this manual to your list of manuals |
Page 110 highlights
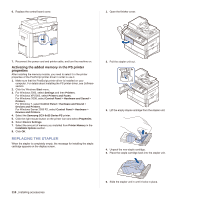
installing accessories Your machine is a full-featured model that has been optimized to meet most of your printing needs. Recognizing that each user may have different requirements, however, Samsung makes several accessories available to enhance your machine's capabilities. This chapter includes • Precautions to take when installing accessories • Installing a memory DIMM • Replacing the Stapler • Enabling Fax feature after installing the fax option kit PRECAUTIONS TO TAKE WHEN INSTALLING ACCESSORIES • Disconnect the power cord Never remove the control board cover while the power is turned on. To avoid the possibility of an electrical shock, always disconnect the power cord when installing or removing ANY internal or external accessories. • Discharge static electricity The control board and internal accessories (network interface card or memory module) are sensitive to static electricity. Before installing or removing any internal accessories, discharge static electricity from your body by touching something metal, such as the metal back plate on any device plugged into a grounded power source. If you walk around before finishing the installation, repeat this procedure to discharge any static electricity again. INSTALLING A MEMORY DIMM Your machine has a dual in-line memory module (DIMM) slot. Use this DIMM slot to install additional memory. Your machine has 256 MB of memory which can be expanded to 512 MB. The order information is provided for optional memory DIMM. (See "Memory module" on page 107.) Installing a memory module 1. Turn the machine off and unplug all cables from the machine. 2. Open the control board cover by grasping it and slide toward you. 4. Holding the memory module by the edges, align the memory module on the slot at about a 30-degree tilt. Make sure that the notches of the module and the grooves on the slot fit each other. The notches and grooves illustrated above may not match those on an actual DIMM and its slot. 5. Press the memory module into the slot with care until you hear a "click". Do not press the memory module strongly or the module may be damaged. If the module does not seem to fit into the slot properly, carefully try the previous procedure again. 1 control board cover 3. Take out a new memory DIMM from the plastic bag. Installing accessories_ 109
-
 1
1 -
2
-
3
-
4
-
5
-
6
-
7
-
8
-
9
-
10
-
11
-
12
-
13
-
14
-
15
-
16
-
17
-
18
-
19
-
20
-
21
-
22
-
23
-
24
-
25
-
26
-
27
-
28
-
29
-
30
-
31
-
32
-
33
-
34
-
35
-
36
-
37
-
38
-
39
-
40
-
41
-
42
-
43
-
44
-
45
-
46
-
47
-
48
-
49
-
50
-
51
-
52
-
53
-
54
-
55
-
56
-
57
-
58
-
59
-
60
-
61
-
62
-
63
-
64
-
65
-
66
-
67
-
68
-
69
-
70
-
71
-
72
-
73
-
74
-
75
-
76
-
77
-
78
-
79
-
80
-
81
-
82
-
83
-
84
-
85
-
86
-
87
-
88
-
89
-
90
-
91
-
92
-
93
-
94
-
95
-
96
-
97
-
98
-
99
-
100
-
101
-
102
-
103
-
104
-
 105
105 -
 106
106 -
 107
107 -
 108
108 -
 109
109 -
 110
110 -
 111
111 -
 112
112 -
 113
113 -
 114
114 -
 115
115 -
116
-
117
-
118
-
119
-
120
-
121
-
122
-
123
-
124
-
125
-
126
-
127
-
128
-
129
-
130
-
131
-
132
-
133
-
134
-
135
-
136
-
137
-
138
-
139
-
140
-
141
-
142
-
143
-
144
-
145
-
146
-
147
-
148
-
149
-
150
-
151
-
152
-
153
-
154
-
155
-
156
-
157
-
158
-
159
-
160
-
161
-
162
-
163
-
164
-
165
-
166
-
167
-
168
-
169
-
170
-
171
-
172
-
173
-
174
-
175
 |
 |
