Samsung SMX-F40LN User Manual (user Manual) (ver.1.0) (English) - Page 67
EV (Exposure Value
 |
View all Samsung SMX-F40LN manuals
Add to My Manuals
Save this manual to your list of manuals |
Page 67 highlights
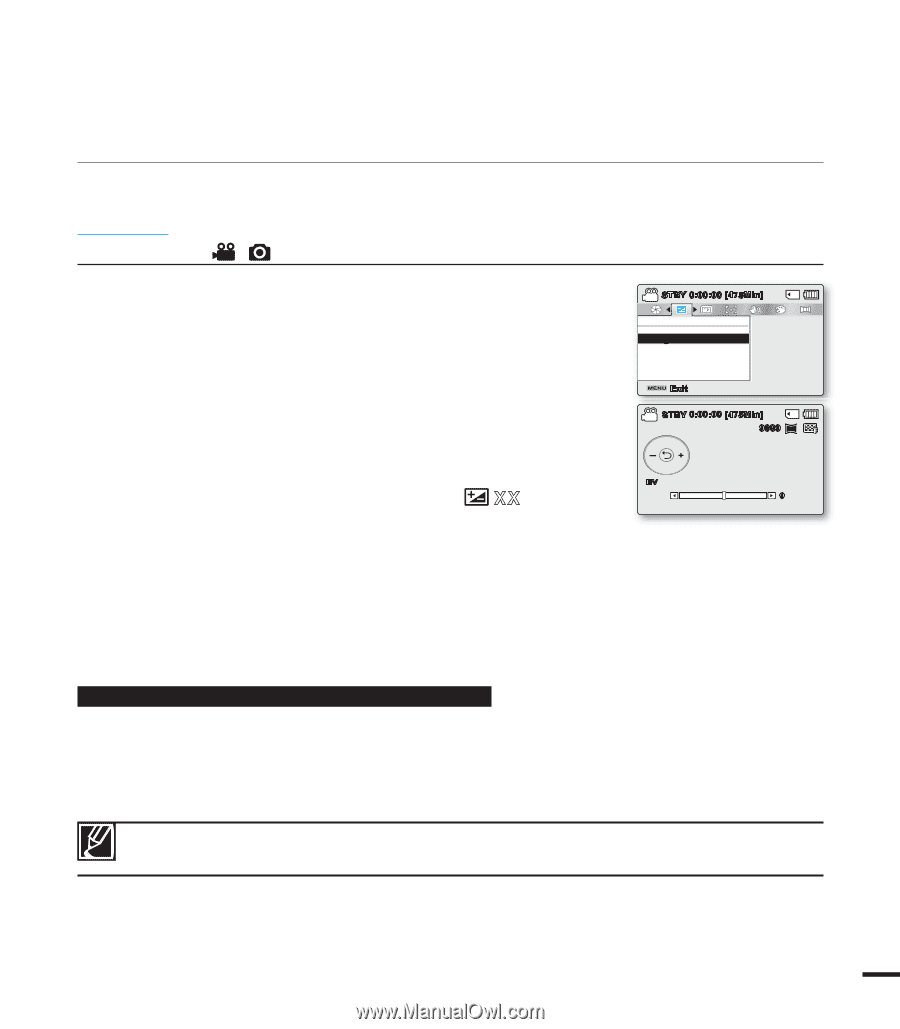
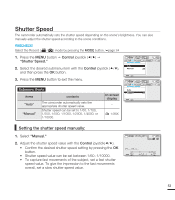
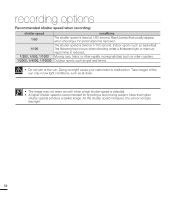
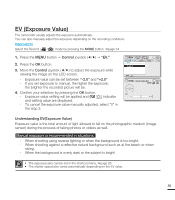
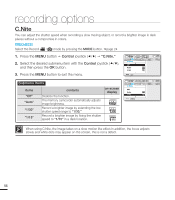
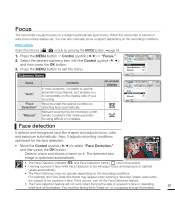
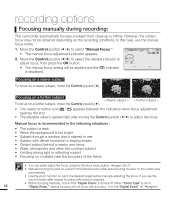
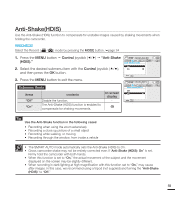
EV (Exposure Value) The camcorder usually adjusts the exposure automatically. You can also manually adjust the exposure depending on the recording conditions. PRECHECK! Select the Record ( / ) mode by pressing the MODE button. page 24 1. Press the MENU button Control joystick EV." 2. Press the OK button. 3. Move the Control joystick (/) to adjust the exposure while viewing the image on the LCD screen. - Exposure value can be set between "-2.0" and "+2.0" - If you set exposure to manual, the higher the exposure, the brighter the recorded picture will be. 4. Confirm your selection by pressing the OK button. - Exposure value setting will be applied and ( ) indicator and setting value are displayed. - To cancel the exposure value manually adjusted, select "0" in the step 3. STBY 0:00:00 [475Min] EV Adjust Exit STBY 0:00:00 [475Min] 9999 1.6M EV 0 Understanding EV(Exposure Value) Exposure value is the total amount of light allowed to fall on the photographic medium (Image sensor) during the process of taking photos or videos as well. Manual exposure is recommended in situations: - When shooting using reverse lighting or when the background is too bright. - When shooting against a reflective natural background such as at the beach or when skiing. - When the background is overly dark or the subject is bright. • The exposure also can be set in the shortcut menu. page 26 • The shutter speed also varies automatically depending on the EV value. 55
-
 1
1 -
2
-
3
-
4
-
5
-
6
-
7
-
8
-
9
-
10
-
11
-
12
-
13
-
14
-
15
-
16
-
17
-
18
-
19
-
20
-
21
-
22
-
23
-
24
-
25
-
26
-
27
-
28
-
29
-
30
-
31
-
32
-
33
-
34
-
35
-
36
-
37
-
38
-
39
-
40
-
41
-
42
-
43
-
44
-
45
-
46
-
47
-
48
-
49
-
50
-
51
-
52
-
53
-
54
-
55
-
56
-
57
-
58
-
59
-
60
-
61
-
 62
62 -
 63
63 -
 64
64 -
 65
65 -
 66
66 -
 67
67 -
 68
68 -
 69
69 -
 70
70 -
 71
71 -
 72
72 -
73
-
74
-
75
-
76
-
77
-
78
-
79
-
80
-
81
-
82
-
83
-
84
-
85
-
86
-
87
-
88
-
89
-
90
-
91
-
92
-
93
-
94
-
95
-
96
-
97
-
98
-
99
-
100
-
101
-
102
-
103
-
104
-
105
-
106
-
107
-
108
-
109
-
110
-
111
-
112
-
113
-
114
-
115
-
116
-
117
-
118
-
119
-
120
-
121
-
122
-
123
-
124
-
125
-
126
-
127
-
128
-
129
-
130
-
131
 |
 |