Sharp VLAH150U Operation Manual - Page 34
Adjusting the Menu Settings
 |
UPC - 074000352735
View all Sharp VLAH150U manuals
Add to My Manuals
Save this manual to your list of manuals |
Page 34 highlights
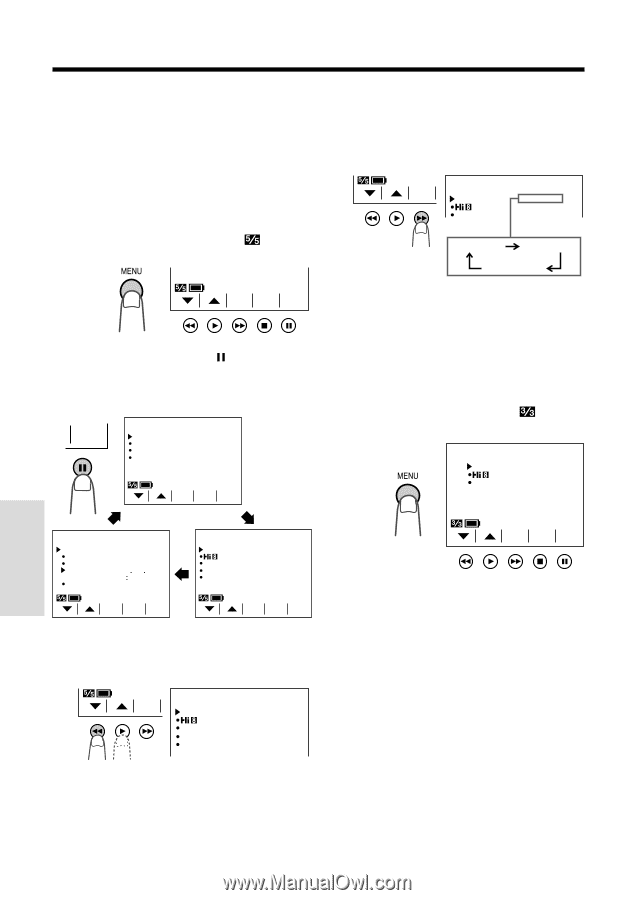
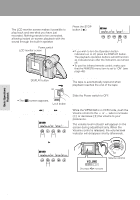
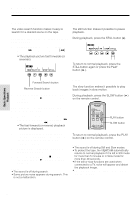
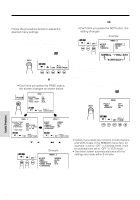
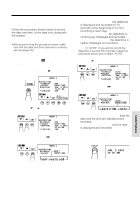
Useful Features Adjusting the Menu Settings Follow the procedure below to adjust the desired menu settings. Camera mode 1 Hold down the Lock button and slide the Power switch to CAMERA. 2 Press the MENU button until appears. 5 Press the SET button (B) to select the desired setting. • Each time you press the SET button, the setting changes. Example MENU 2 SET FADE REMOT E NORMA L AUTO ON NORMAL HO L I DAY B I RTHDAY P I CSET TURE PAGE 6 Press the DISPLAY button to turn off the menu screen. 3 Press the PAGE button ( ) to display the desired menu screen. • Each time you press the PAGE button, the screen changes as shown below. PAGE MENU 1 EXTEND DGT L Z OOM DIS DUAL / SNAP 2X OFF OFF DUAL P I CSET TURE PAGE VCR mode 1 Hold down the Lock button and slide the Power switch to VCR. 2 Press the MENU button until appears. MENU ED I T REMOT E OF F AUTO ON MENU 3 DAT E / T IME D I SPLAY SELECT SETT I NG 12H / 24H OFF DAT E + T I ME JUN 2 2 0 0 1 1 0 3 0 AM 12H P I CSET TURE PAGE MENU 2 FADE REMOT E DEMO MODE L ANGUA GE NORMA L AUTO ON OFF P I CSET TURE PAGE 4 Press the ĭ or İ button (C or D) to select the desired menu item. Example MENU 2 SET FADE NORMA L AUTO REMOT E ON DEMO MODE O F F L ANGUA GE 33 P I CSET TURE 3 Perform steps 4 to 6 above. Notes: • Certain menu items are common in both Camera and VCR modes. If the REMOTE menu item, for example, is set to "OFF" in Camera mode, it will be automatically set to "OFF" in VCR mode. • The menu screen automatically turns off if no settings are made within 5 minutes. Useful Features 25
-
 1
1 -
2
-
3
-
4
-
5
-
6
-
7
-
8
-
9
-
10
-
11
-
12
-
13
-
14
-
15
-
16
-
17
-
18
-
19
-
20
-
21
-
22
-
23
-
24
-
25
-
26
-
27
-
28
-
 29
29 -
 30
30 -
 31
31 -
 32
32 -
 33
33 -
 34
34 -
 35
35 -
 36
36 -
 37
37 -
 38
38 -
 39
39 -
40
-
41
-
42
-
43
-
44
-
45
-
46
-
47
-
48
-
49
-
50
-
51
-
52
-
53
-
54
-
55
-
56
-
57
-
58
-
59
-
60
-
61
-
62
-
63
-
64
-
65
-
66
-
67
-
68
-
69
-
70
-
71
-
72
-
73
-
74
-
75
-
76
-
77
-
78
-
79
-
80
 |
 |