Sharp VLAH150U Operation Manual - Page 60
Digital Dual Picture
 |
UPC - 074000352735
View all Sharp VLAH150U manuals
Add to My Manuals
Save this manual to your list of manuals |
Page 60 highlights
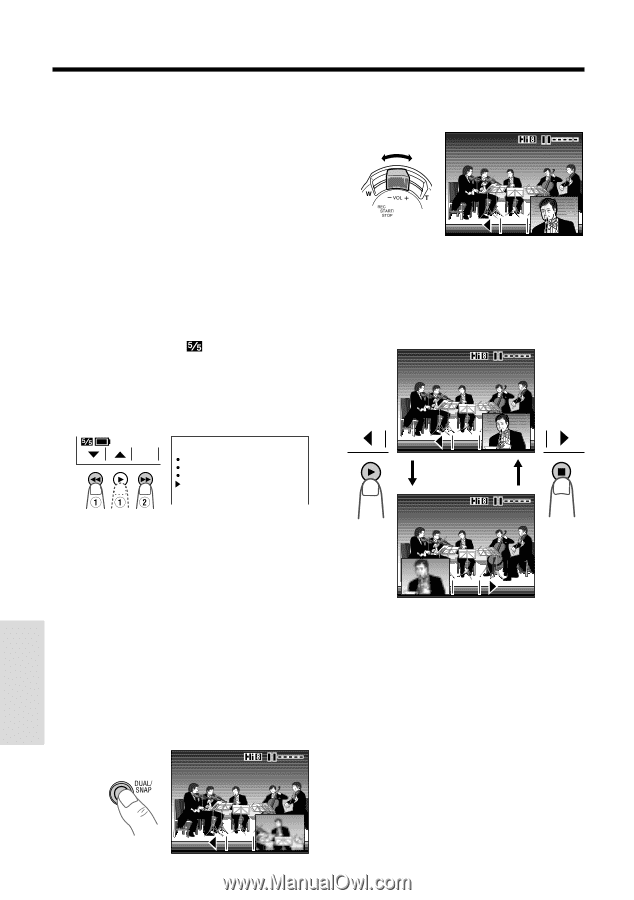
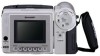
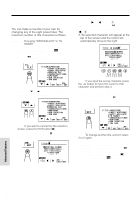
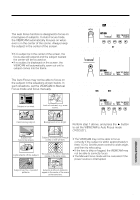
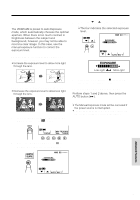
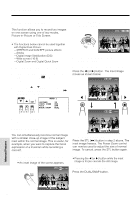
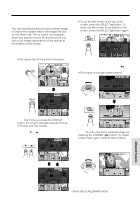
Advanced Features Digital Dual Picture This function allows you to record two images on one screen using one of two modes, Picture-in-Picture or Title Screen. Note: • The functions below cannot be used together with Digital Dual Picture: -STRETCH and SLIM EFF. picture effects -Strobe -Digital Image Stabilization (DIS) -Wide screen (16:9) -Digital Zoom and Digital Quick Zoom Selecting Digital Dual Picture 1 In Recording Standby mode, press the MENU button until (MENU 1) appears. 2 Press the İ or ĭ button to select "DUAL/SNAP", then press the SET (B) button to select "DUAL". MENU 1 SET EXTEND 2X DGT L Z OOM O F F DIS OFF DUAL / SNAP DUAL 2 Push the Power Zoom control to frame the inset subject. STL 3 Press the REC START/STOP button to begin recording. To change the position of the inset image Press the ̇ (or ̈) button. The inset image moves as shown below. STL 3 Press the DISPLAY button to turn off the menu screen. Picture-in-Picture You can simultaneously record a normal image with a smaller close-up image of the subject inset within the normal image. This is useful, for example, when you want to capture the facial expression of a musician while recording a concert. 1 In Recording Standby mode, press the DUAL/SNAP button. • An inset image of the scene appears. STL To freeze the inset image Press the STL (B) button in step 2 above. The inset image freezes. The Power Zoom control can now be used to adjust the size of normal image. To cancel, press the STL button again. Note: • Pressing the ̇ (or ̈) button while the inset image is frozen cancels the still image. To return to normal picture Press the DUAL/SNAP button. Advanced Features STL 51
-
 1
1 -
2
-
3
-
4
-
5
-
6
-
7
-
8
-
9
-
10
-
11
-
12
-
13
-
14
-
15
-
16
-
17
-
18
-
19
-
20
-
21
-
22
-
23
-
24
-
25
-
26
-
27
-
28
-
29
-
30
-
31
-
32
-
33
-
34
-
35
-
36
-
37
-
38
-
39
-
40
-
41
-
42
-
43
-
44
-
45
-
46
-
47
-
48
-
49
-
50
-
51
-
52
-
53
-
54
-
 55
55 -
 56
56 -
 57
57 -
 58
58 -
 59
59 -
 60
60 -
 61
61 -
 62
62 -
 63
63 -
 64
64 -
 65
65 -
66
-
67
-
68
-
69
-
70
-
71
-
72
-
73
-
74
-
75
-
76
-
77
-
78
-
79
-
80
 |
 |