Sony DCR-TRV70 Network Function/Application Operating Instructions - Page 45
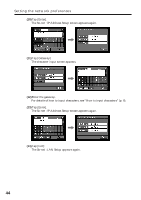
Setting the DNS server, The So-net : DNS Server Setup screen appears again.
 |
View all Sony DCR-TRV70 manuals
Add to My Manuals
Save this manual to your list of manuals |
Page 45 highlights
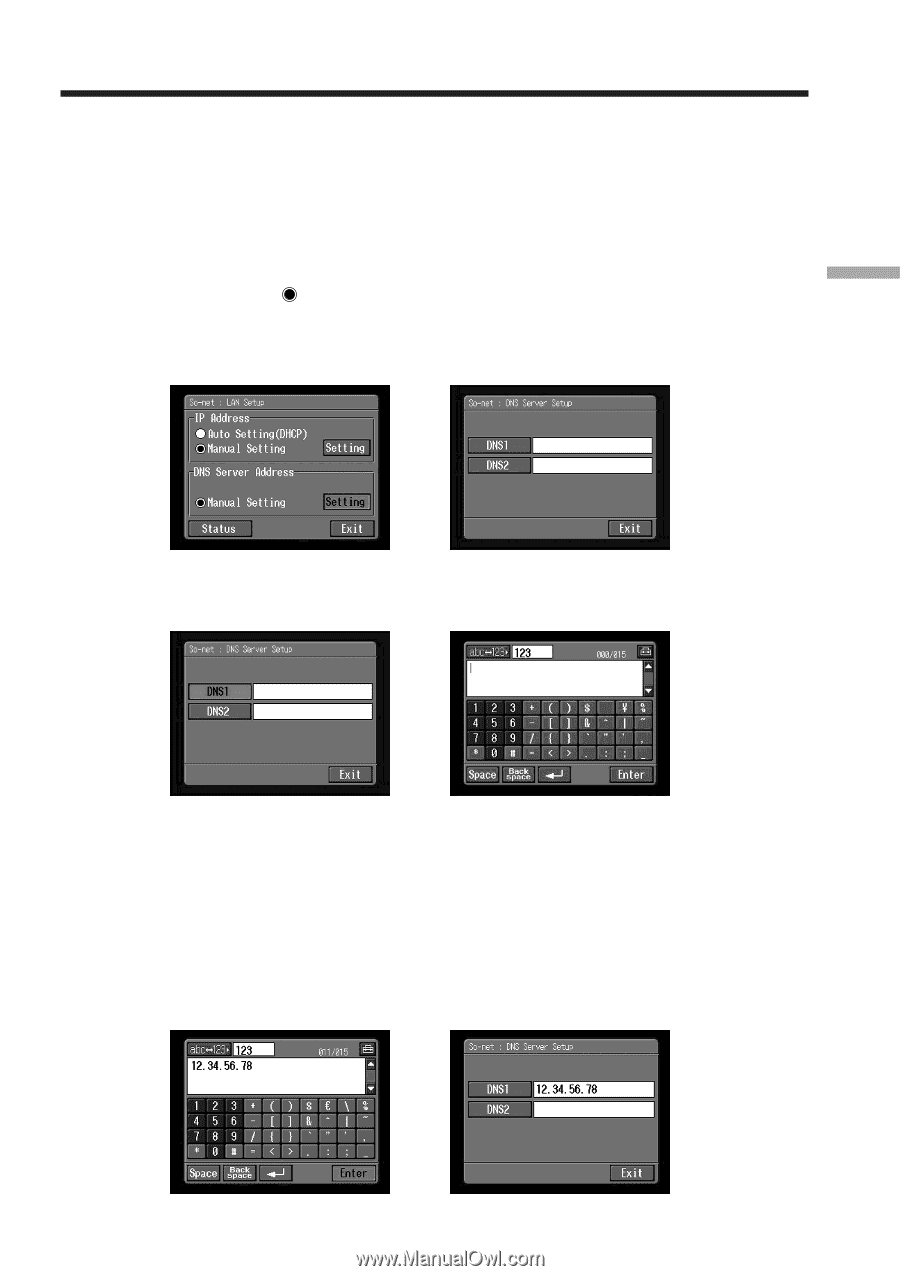
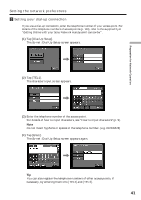
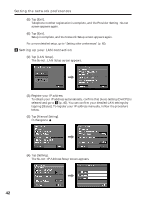
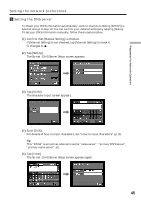
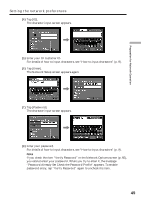
Preparation for Network Operation Setting the network preferences 5 Setting the DNS server To obtain your DNS information automatically, confirm that [Auto Setting (DHCP)] is selected and go to step 10. You can confirm your detailed settings by tapping [Status]. To set your DNS information manually, follow the procedure below. (1) Confirm that [Manual Setting] is checked. If [Manual Setting] is not checked, tap [Manual Setting] to check it. a changes to . (2) Tap [Setting]. The So-net : DNS Server Setup screen appears. , (3) Tap [DNS1]. The character input screen appears. , (4) Enter DNS1. For details of how to input characters, see "How to input characters" (p. 9). Tip This "DNS1" is sometimes referred to as the "name server", "primary DNS server", "primary name server", etc. (5) Tap [Enter]. The So-net : DNS Server Setup screen appears again. , 45
-
 1
1 -
2
-
3
-
4
-
5
-
6
-
7
-
8
-
9
-
10
-
11
-
12
-
13
-
14
-
15
-
16
-
17
-
18
-
19
-
20
-
21
-
22
-
23
-
24
-
25
-
26
-
27
-
28
-
29
-
30
-
31
-
32
-
33
-
34
-
35
-
36
-
37
-
38
-
39
-
 40
40 -
 41
41 -
 42
42 -
 43
43 -
 44
44 -
 45
45 -
 46
46 -
 47
47 -
 48
48 -
 49
49 -
 50
50 -
51
-
52
-
53
-
54
-
55
-
56
-
57
-
58
-
59
-
60
-
61
-
62
-
63
-
64
-
65
-
66
-
67
-
68
-
69
-
70
-
71
-
72
-
73
-
74
-
75
-
76
-
77
-
78
-
79
-
80
-
81
-
82
-
83
-
84
-
85
-
86
-
87
-
88
-
89
-
90
-
91
-
92
-
93
-
94
-
95
-
96
-
97
-
98
-
99
-
100
-
101
-
102
-
103
-
104
-
105
-
106
-
107
-
108
-
109
-
110
-
111
-
112
-
113
-
114
-
115
-
116
-
117
-
118
-
119
-
120
-
121
-
122
-
123
-
124
-
125
-
126
-
127
-
128
-
129
-
130
-
131
-
132
-
133
-
134
-
135
-
136
-
137
-
138
-
139
-
140
-
141
-
142
-
143
-
144
-
145
-
146
-
147
-
148
-
149
-
150
-
151
-
152
-
153
-
154
-
155
-
156
-
157
-
158
-
159
-
160
-
161
-
162
-
163
-
164
-
165
-
166
-
167
-
168
 |
 |