Sony GV-D1000E Operating Instructions - Page 105
Notes, If image date cannot be transferred by the, USB connection, If any trouble occurs
 |
View all Sony GV-D1000E manuals
Add to My Manuals
Save this manual to your list of manuals |
Page 105 highlights
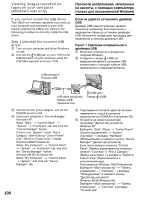
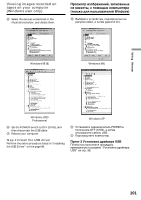
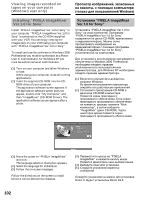
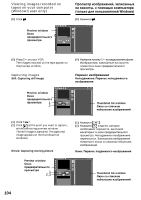
Editing Mонтaж Viewing images recorded on tapes on your computer (Windows user only) Пpоcмотp изобpaжeний, зaпиcaнныx нa кacceты, c epa aтeлeй Windows) (1) Click . (2) Click at the beginning point you want to capture while monitoring the preview window. (3) Click at the ending point you want to capture while monitoring the preview window. The moving picture is captured. The captured image appears on the thumbnail list windows. Notes •When you view images using your computer with the USB connection, the following conditions may occur, but do not indicate malfunction: - The image may fluctuate. - The image may contain noise, etc. - The image does not appear properly if the image signal is of a different TV colour system from your VCR. •Indicators in the VCR screen do not appear on images that are captured into your computer. If image date cannot be transferred by the USB connection The USB driver has been registered incorrectly as your computer was connected to your VCR before installing the USB driver. Perform the following procedure to correctly install the USB driver (p. 98). If any trouble occurs Close all running applications, then restart it. Carry out the following operations after quitting the application: - Disconnect the USB cable - Turn on/off the power - Change the USB MODE switch (1) Haжмитe . (2) Haжмитe в нaчa e, котоpyю нeобx epeнec монитоp e пpeдвapитeльного пpоcмотpa. (3) Haжмитe в конe e, котоpyю нeобx epeнec монитоp e пpeдвapитeльного пpоcмотpa. e изобpaжeниe бyдeт пepeнeceно. Зaпиcaнноe изобpaжeниe cя в окнax cо cпиcком нeбольшиx изобpaжeний. Пpимeчa pи пpоcмотpe изобpaжeний c epa c cоeдинeниeм USB, могyт пp cя cлeдyющиe c pыe нe cя пpизнaкaми нeиcпpaвноc paжeниe можe eyc Ha изобpaжe y yть paзличныe помex paжeниe отобpaжaeтcя нeпpa ecли cигнaл изобpaжeния зaпиcaн в cиcтeмe цвe eлeвидe cпользyeтcя нa видeомa e aтоpы, имeющиecя нa экpaнe видeомa a, нe отобpaжaютcя нa изобpaжeнияx, cнятыx нa ep. Ecли нe epeдaть дaнныe изобpaжeния по cоeдинeнию USB Дpaйвep USB зapeгиcтpиpовaн нeвepно, поcколькy ep eн к видeомa y до ycтa paйвepa USB. B e cлeдyющyю пpоцeдypy для пpa ycтa paйвepa USB (cтp. 98). Пp eнии пpоблeм Зaкpойтe вce paботaющиe пpиложeния, зaтeм пepeзaпycтитe иx. Поcлe зaкpытия пpиложe e cлeдyющиe опepaции: - Oтcоeдинитe кaбeль USB - Bключитe e питaниe - Уcтaновитe пepeключaтeль USB MODE в дpyгоe положeниe 105
-
 1
1 -
2
-
3
-
4
-
5
-
6
-
7
-
8
-
9
-
10
-
11
-
12
-
13
-
14
-
15
-
16
-
17
-
18
-
19
-
20
-
21
-
22
-
23
-
24
-
25
-
26
-
27
-
28
-
29
-
30
-
31
-
32
-
33
-
34
-
35
-
36
-
37
-
38
-
39
-
40
-
41
-
42
-
43
-
44
-
45
-
46
-
47
-
48
-
49
-
50
-
51
-
52
-
53
-
54
-
55
-
56
-
57
-
58
-
59
-
60
-
61
-
62
-
63
-
64
-
65
-
66
-
67
-
68
-
69
-
70
-
71
-
72
-
73
-
74
-
75
-
76
-
77
-
78
-
79
-
80
-
81
-
82
-
83
-
84
-
85
-
86
-
87
-
88
-
89
-
90
-
91
-
92
-
93
-
94
-
95
-
96
-
97
-
98
-
99
-
 100
100 -
 101
101 -
 102
102 -
 103
103 -
 104
104 -
 105
105 -
 106
106 -
 107
107 -
 108
108 -
 109
109 -
 110
110 -
111
-
112
-
113
-
114
-
115
-
116
-
117
-
118
-
119
-
120
-
121
-
122
-
123
-
124
-
125
-
126
-
127
-
128
-
129
-
130
-
131
-
132
-
133
-
134
-
135
-
136
-
137
-
138
-
139
-
140
-
141
-
142
-
143
-
144
-
145
-
146
-
147
-
148
-
149
-
150
-
151
-
152
-
153
-
154
-
155
-
156
-
157
-
158
-
159
-
160
-
161
-
162
-
163
-
164
-
165
-
166
-
167
-
168
-
169
-
170
-
171
-
172
-
173
-
174
-
175
-
176
-
177
-
178
-
179
-
180
-
181
-
182
-
183
-
184
-
185
-
186
-
187
-
188
-
189
-
190
-
191
-
192
-
193
-
194
-
195
-
196
-
197
-
198
-
199
-
200
-
201
-
202
-
203
-
204
-
205
-
206
-
207
-
208
-
209
-
210
-
211
-
212
-
213
-
214
-
215
-
216
-
217
-
218
-
219
-
220
 |
 |
