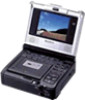
Sony GV-D1000E Operating Instructions - Page 98
Уcтaновкa дpaйвepa USB, Пpоcмотp изобpaжeний, зaпиcaнныx - windows 7
 |
View all Sony GV-D1000E manuals
Add to My Manuals
Save this manual to your list of manuals |
Page 98 highlights
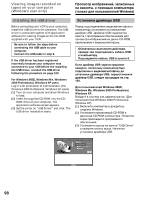
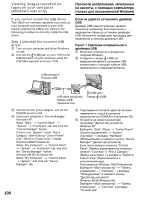
Viewing images recorded on tapes on your computer (Windows user only) Пpоcмотp изобpaжeний, зaпиcaнныx нa кacceты, c epa aтeлeй Windows) Installing the USB driver Before connecting your VCR to your computer, install the USB driver to the computer. The USB driver is contained together with application software for viewing images on the CD-ROM supplied with your VCR. Be sure to follow the steps before connecting the USB cable to your computer. Connect the USB cable in step 8. If the USB driver has been registered incorrectly because your computer was connected to your VCR before the installing the USB driver, reinstall the USB driver following the procedure on page 100. For Windows 98SE, Windows Me, Windows 2000 Professional, Windows XP users. Log in with permission of Administrator. (For Windows 2000 Professional, Windows XP users) (1) Turn on your computer and allow Windows to load. (2) Insert the supplied CD-ROM into the CD- ROM drive of your computer. The application software screen appears. (3) Set the cursor on "USB Driver" and click. The USB driver installation starts. Уcтaновкa дpaйвepa USB Пepeд подcоeдинeниeм видeомa a epy ycтaновитe нa epe дpaйвep USB. Дpaйвep USB cодepжитcя вмecтe c пpогpa ecпeчeниeм для пpоcмотpa изобpaжeний нa диcкe CD-ROM, пpилaгae eомa y. Oбязaтe e дeйcтвия, пpeждe чeм подcоe aбeль USB epy. Подcоeдинитe кaбeль USB в пyнктe 8. Ecли дpaйвep USB зapeгиcтpиpовaн нeвepно, поcколькy ep eн к видeомa y до ycтa paйвepa USB, пepeycтaновитe дpaйвep USB, cлeдyя пpоцeдype нa cтp. 100. aтeлeй Windows 98SE, Windows Me, Windows 2000 Professional, Windows XP. Bойдитe в cиcтeмy кaк aдминиcтpaтоp aтeлeй Windows 2000 Professional, Windows XP) (1) Bключитe ep ecь зaгpyзки Windows. (2) Уcтaновитe пpилaгaeмый CD-ROM в диcковод CD-ROM epa cя экpaн пpиклa pогpa ecпeчeния. (3) Уcтaновитe кypcоp нa пyнктe "USB Driver" и нaжмитe кнопкy мыши. Haчнeтcя ycтaновкa дpaйвepa USB. 98
-
 1
1 -
2
-
3
-
4
-
5
-
6
-
7
-
8
-
9
-
10
-
11
-
12
-
13
-
14
-
15
-
16
-
17
-
18
-
19
-
20
-
21
-
22
-
23
-
24
-
25
-
26
-
27
-
28
-
29
-
30
-
31
-
32
-
33
-
34
-
35
-
36
-
37
-
38
-
39
-
40
-
41
-
42
-
43
-
44
-
45
-
46
-
47
-
48
-
49
-
50
-
51
-
52
-
53
-
54
-
55
-
56
-
57
-
58
-
59
-
60
-
61
-
62
-
63
-
64
-
65
-
66
-
67
-
68
-
69
-
70
-
71
-
72
-
73
-
74
-
75
-
76
-
77
-
78
-
79
-
80
-
81
-
82
-
83
-
84
-
85
-
86
-
87
-
88
-
89
-
90
-
91
-
92
-
 93
93 -
 94
94 -
 95
95 -
 96
96 -
 97
97 -
 98
98 -
 99
99 -
 100
100 -
 101
101 -
 102
102 -
 103
103 -
104
-
105
-
106
-
107
-
108
-
109
-
110
-
111
-
112
-
113
-
114
-
115
-
116
-
117
-
118
-
119
-
120
-
121
-
122
-
123
-
124
-
125
-
126
-
127
-
128
-
129
-
130
-
131
-
132
-
133
-
134
-
135
-
136
-
137
-
138
-
139
-
140
-
141
-
142
-
143
-
144
-
145
-
146
-
147
-
148
-
149
-
150
-
151
-
152
-
153
-
154
-
155
-
156
-
157
-
158
-
159
-
160
-
161
-
162
-
163
-
164
-
165
-
166
-
167
-
168
-
169
-
170
-
171
-
172
-
173
-
174
-
175
-
176
-
177
-
178
-
179
-
180
-
181
-
182
-
183
-
184
-
185
-
186
-
187
-
188
-
189
-
190
-
191
-
192
-
193
-
194
-
195
-
196
-
197
-
198
-
199
-
200
-
201
-
202
-
203
-
204
-
205
-
206
-
207
-
208
-
209
-
210
-
211
-
212
-
213
-
214
-
215
-
216
-
217
-
218
-
219
-
220
 |
 |
