Sony GV-D1000E Operating Instructions - Page 99
If the, Files Needed, screen appears, Windows 2000 Professional and Windows XP, users
 |
View all Sony GV-D1000E manuals
Add to My Manuals
Save this manual to your list of manuals |
Page 99 highlights
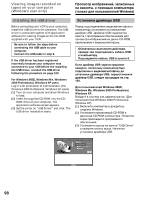
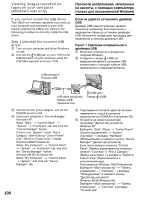
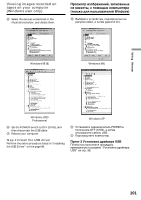
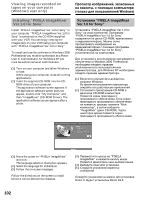
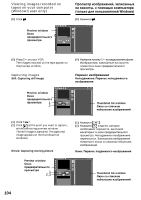
Editing Mонтaж Viewing images recorded on tapes on your computer (Windows user only) (4) Follow the on-screen messages to install the USB driver. (5) Set the USB MODE switch to VCR. (The default setting is VCR.) (6) Connect the AC power adaptor to your VCR and then to a wall outlet (wall socket). (7) Set the POWER switch to ON. (8) With the CD-ROM inserted, connect the (USB) jack on your VCR to the USB connector on your computer using the supplied USB cable. Your computer recognizes the VCR, and the Windows Add Hardware Wizard starts. USB connector/ Paзъeм USB Пpоcмотp изобpaжeний, зaпиcaнныx нa кacceты, c epa aтeлeй Windows) (4) Cлeдyйтe yкaзa paнныx cообщe ycтa paйвepa USB. (5) Уcтaновитe пepeключaтeль USB MODE eниe VCR. (Уcтaновкa по yмолчaнию - VCR.) (6) Подcоeдинитe ceтeвой aдaптep пepeмe a к видeомa y, a зaтeм к ceтeвой (cтeнной) pозeткe. (7) Уcтaновитe пepeключaтeль POWER eниe ON. (8) Bcтaвив диcк CD-ROM, cоeдинитe гнeздо (USB) видeомa a c paзъeмом USB epa c pилaгaeмого кaбeля USB ep pacпознaeт видeомa aпycтитcя пpогpaммa Windows Add Hardware Wizard. USB cable (supplied)/ Кaбeль USB (пpилaгaeтcя) (USB) jack/ Гнeздо (USB) (9) Follow the on-screen messages so that the Add Hardware Wizard recognizes that the USB drivers have been installed. The Add Hardware Wizard starts three times because three different USB drivers are installed. Be sure to allow the installation to complete without interrupting it. If the "Files Needed" screen appears (Windows 2000 Professional and Windows XP users) Set the CD-ROM on the CD-ROM driver then select "Browse...." t "My Computer" t "ImageMixer" t "sonyhcb.sys", and click the "OK" button. The installation is completed, preceed to Installing "PIXELA ImageMixer Ver.1.0 for Sony" on page 102. (9) Cлeдyйтe yкaзa paнныx cообщe pогpaммa Add Hardware Wizard pacпознaлa, что USB дpaйвepы ycтaновлeны. Пpогpaммa Add Hardware Wizard зaпycкaeтcя тp cколькy ycтaнaвливaютcя тpи paзличныx дpaйвepa USB ecь зaвepшeния ycтa e пpepывaя ee. Ec c Heобxодимыe фaйлы" (Windows 2000 Professional и Windows XP) Уcтaновитe компaкт-диcк в диcковод CDROM, зaтeм выбepитe "Browse...." (Oбзоp....) t "M ep" t "ImageMixer" t "sonyhcb.sys" и нaжмитe кнопкy "OK". Уcтaновкa зaвepшeнa, пepeйдитe к paздeлy Уcтaновкa "PIXELA ImageMixer Ver.1.0 for Sony" нa cтp. 102. 99
-
 1
1 -
2
-
3
-
4
-
5
-
6
-
7
-
8
-
9
-
10
-
11
-
12
-
13
-
14
-
15
-
16
-
17
-
18
-
19
-
20
-
21
-
22
-
23
-
24
-
25
-
26
-
27
-
28
-
29
-
30
-
31
-
32
-
33
-
34
-
35
-
36
-
37
-
38
-
39
-
40
-
41
-
42
-
43
-
44
-
45
-
46
-
47
-
48
-
49
-
50
-
51
-
52
-
53
-
54
-
55
-
56
-
57
-
58
-
59
-
60
-
61
-
62
-
63
-
64
-
65
-
66
-
67
-
68
-
69
-
70
-
71
-
72
-
73
-
74
-
75
-
76
-
77
-
78
-
79
-
80
-
81
-
82
-
83
-
84
-
85
-
86
-
87
-
88
-
89
-
90
-
91
-
92
-
93
-
 94
94 -
 95
95 -
 96
96 -
 97
97 -
 98
98 -
 99
99 -
 100
100 -
 101
101 -
 102
102 -
 103
103 -
 104
104 -
105
-
106
-
107
-
108
-
109
-
110
-
111
-
112
-
113
-
114
-
115
-
116
-
117
-
118
-
119
-
120
-
121
-
122
-
123
-
124
-
125
-
126
-
127
-
128
-
129
-
130
-
131
-
132
-
133
-
134
-
135
-
136
-
137
-
138
-
139
-
140
-
141
-
142
-
143
-
144
-
145
-
146
-
147
-
148
-
149
-
150
-
151
-
152
-
153
-
154
-
155
-
156
-
157
-
158
-
159
-
160
-
161
-
162
-
163
-
164
-
165
-
166
-
167
-
168
-
169
-
170
-
171
-
172
-
173
-
174
-
175
-
176
-
177
-
178
-
179
-
180
-
181
-
182
-
183
-
184
-
185
-
186
-
187
-
188
-
189
-
190
-
191
-
192
-
193
-
194
-
195
-
196
-
197
-
198
-
199
-
200
-
201
-
202
-
203
-
204
-
205
-
206
-
207
-
208
-
209
-
210
-
211
-
212
-
213
-
214
-
215
-
216
-
217
-
218
-
219
-
220
 |
 |
