Sony GV-D1000E Operating Instructions - Page 16
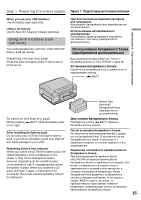
Пyнкт 1, Подготовкa иcточникa питaния
 |
View all Sony GV-D1000E manuals
Add to My Manuals
Save this manual to your list of manuals |
Page 16 highlights
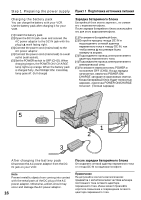
Step 1 Preparing the power supply Пyнкт 1 a иcточникa питaния Charging the battery pack You can charge the battery with your VCR. Use the battery pack after charging it for your VCR. (1) Install the battery pack. (2) Open the DC IN jack cover and connect the AC power adaptor to the DC IN jack with the plug's v mark facing right. (3) Connect the power cord (mains lead) to the AC power adaptor. (4) Connect the power cord (mains lead) to a wall outlet (wall socket). (5) Set the POWER switch to OFF (CHG). When charging begins, the POWER ON/CHARGE lamp lights up orange. When the battery pack is charged fully, the POWER ON/CHARGE lamp goes off. (full charge) Зapядкa бaтape a Бaтape apяжaть, нe cнимaя eго c видeомa a. Поcлe зapядки бaтape a иcпользyйтe e eомa a. (1) Уcтaновитe бaтape 2) Oткpойтe кpышкy гнeздa DC IN и подcоeдинитe ceтeвой aдaптep пepeмe a к гнeздy DC IN, тa eткa v нa штeкepe былa повepнyтa впpaво. (3) Подcоeдинитe пp eктpопитaния к aдaптepy пepeмe a. (4) Подcоeдинитe пp eктpопитa eктpичecкой ceти. (5) Уcтaновитe пepeключaтeль POWER eниe OFF (CHG). Когдa зapядкa нaчинaeтcя, лaмпочкa POWER ON/ CHARGE зaгоpaeтcя оpaнжeвым cвe a бaтape yдe cтью зapяжeн, лaмпочкa POWER ON/CHARGE погacнe aя зapядкa) 5 OFF(CHG) ON POWER 3 1 2 After charging the battery pack Disconnect the AC power adaptor from the DC IN jack on your VCR. Note Prevent metallic objects from coming into contact with the metal parts of the DC plug of the AC power adaptor. Otherwise, a short-circuit may occur and damage the AC power adaptor. 16 Поcлe зapядки бaтape a Oтcоeдинитe ceтeвой aдaптep пepeмe a от гнeздa DC IN нa видeомa e. Пpимeчaниe He допycкaйтe контaктa мeтaлличecкиx пpeдмeтов c мeтaлличecкими чac eкepa поc a ceтeвого aдaптepa пepeмe a. Инaчe можeт пp pоткоe зaмыкaниe и повpeждeниe ceтeвого aдaптepa пepeмe a.
-
 1
1 -
2
-
3
-
4
-
5
-
6
-
7
-
8
-
9
-
10
-
 11
11 -
 12
12 -
 13
13 -
 14
14 -
 15
15 -
 16
16 -
 17
17 -
 18
18 -
 19
19 -
 20
20 -
 21
21 -
22
-
23
-
24
-
25
-
26
-
27
-
28
-
29
-
30
-
31
-
32
-
33
-
34
-
35
-
36
-
37
-
38
-
39
-
40
-
41
-
42
-
43
-
44
-
45
-
46
-
47
-
48
-
49
-
50
-
51
-
52
-
53
-
54
-
55
-
56
-
57
-
58
-
59
-
60
-
61
-
62
-
63
-
64
-
65
-
66
-
67
-
68
-
69
-
70
-
71
-
72
-
73
-
74
-
75
-
76
-
77
-
78
-
79
-
80
-
81
-
82
-
83
-
84
-
85
-
86
-
87
-
88
-
89
-
90
-
91
-
92
-
93
-
94
-
95
-
96
-
97
-
98
-
99
-
100
-
101
-
102
-
103
-
104
-
105
-
106
-
107
-
108
-
109
-
110
-
111
-
112
-
113
-
114
-
115
-
116
-
117
-
118
-
119
-
120
-
121
-
122
-
123
-
124
-
125
-
126
-
127
-
128
-
129
-
130
-
131
-
132
-
133
-
134
-
135
-
136
-
137
-
138
-
139
-
140
-
141
-
142
-
143
-
144
-
145
-
146
-
147
-
148
-
149
-
150
-
151
-
152
-
153
-
154
-
155
-
156
-
157
-
158
-
159
-
160
-
161
-
162
-
163
-
164
-
165
-
166
-
167
-
168
-
169
-
170
-
171
-
172
-
173
-
174
-
175
-
176
-
177
-
178
-
179
-
180
-
181
-
182
-
183
-
184
-
185
-
186
-
187
-
188
-
189
-
190
-
191
-
192
-
193
-
194
-
195
-
196
-
197
-
198
-
199
-
200
-
201
-
202
-
203
-
204
-
205
-
206
-
207
-
208
-
209
-
210
-
211
-
212
-
213
-
214
-
215
-
216
-
217
-
218
-
219
-
220
 |
 |
