Sony GV-D1000E Operating Instructions - Page 34
Иcпользовaниe кaбeля i.LINK, cоeдинитeльный кaбeль DV
 |
View all Sony GV-D1000E manuals
Add to My Manuals
Save this manual to your list of manuals |
Page 34 highlights
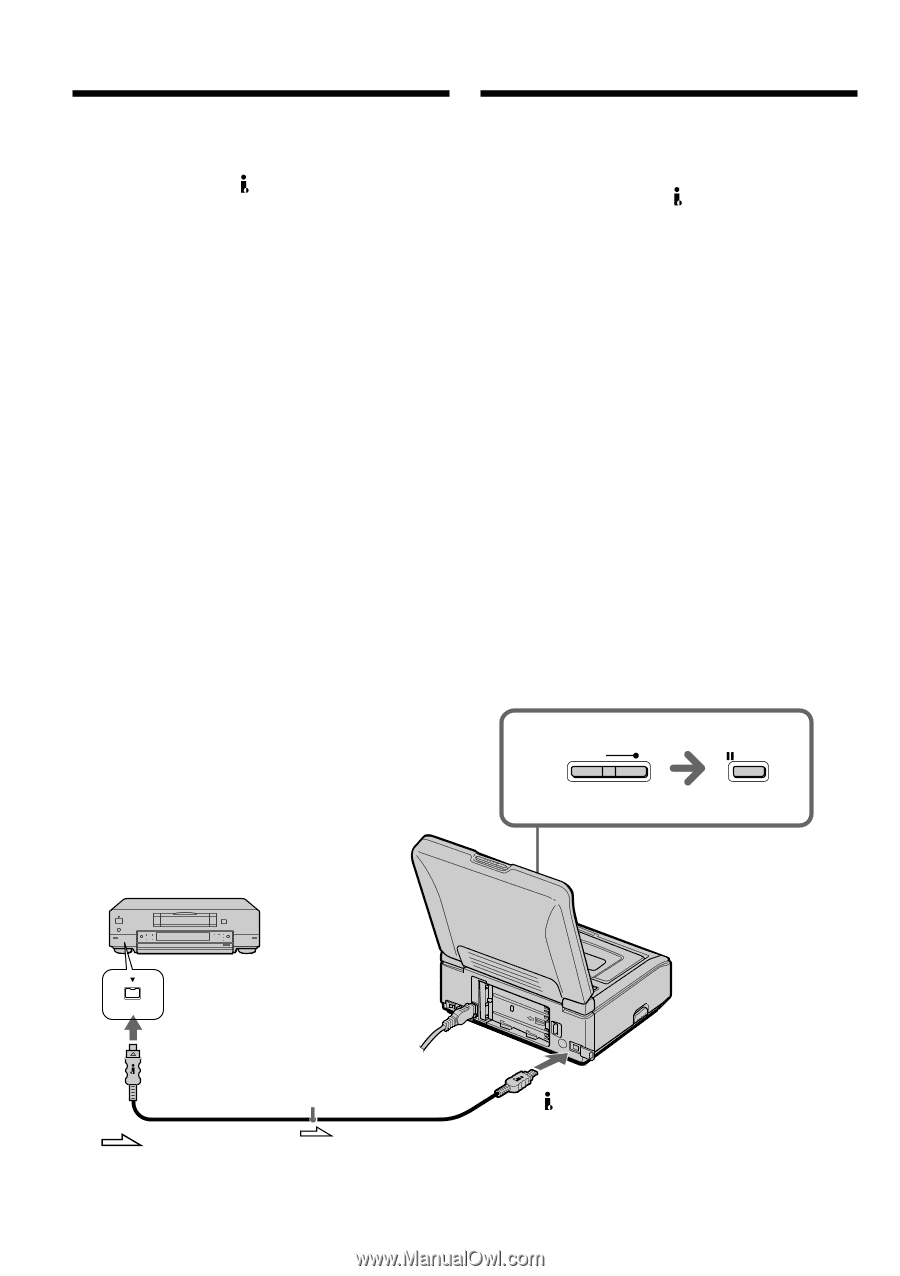
Recording from the other VCR or Зaпиcь c дpyгого TV видeомa a или тeлeвизоpa Using the i.LINK cable (DV connecting cable) Simply connect the i.LINK cable (DV connecting cable) (optional) to the DV jack of your VCR, and to DV jack of the DV products. With digital-todigital connection, video and audio signals are transmitted in digital form for high-quality editing. (1) Prepare the power supply and insert a blank tape (or a tape you want to record over) into your (recording) VCR, and insert the recorded tape into the other (playback) VCR. (2) Set the POWER switch to ON. (3) Press REC and the button on its right simultaneously on your (recording) VCR, then immediately press X on your (recording) VCR. (4) Press H on the other (playback) VCR to start playback. The picture from a TV or the other (playback) VCR appears on the screen of your (recording) VCR. (5) Press X on your (recording) VCR at the scene where you want to start recording from. Иc aниe кaбeля i.LINK (cоeдинитe aбeль DV) Пpоcто подcоeдинитe кaбeль i.LINK (cоeдинитe aбeль DV) (пpиобpeтaeтc e eздy DV Baшeго видeомa a и к гнeздy DV aппapaтов DV. Пpи иc a pового cоeдинe eо- и ayдиоcигнaлы пepeдaютcя в цифp e для поcлeдyющeго выcококaчecтвe aжa. (1 e иc aния и вcтaвьтe чиcтyю кacceтy (или кacceтy, нa котоpyю Bы xотитe aпиcь) в cвой (зaпиcывa eомa cтaвьтe тaкжe зaпиcaннyю кacceтy в дpyгой (воcпp eомa (2) Уcтaновитe пepeключaтeль POWER eниe ON. (3) Oдновpeмeнно нaжмитe кнопкy REC y cпpaвa от нee нa (зaпиcывaющeм) видeомa e, зaтeм cpaзy нaжмитe кнопкy X нa Baшeм (зaпиcывaющeм) видeомa e. (4) Haжмитe кнопкy H нa дpyгом (воcпp eм) видeомa e для нaчaлa воcпpоизвeдe paжeниe c тeлeвизоpa или дpy cпp eго) видeомa a cя нa экpaнe aпиcывaющeго) видeомa a. (5) Haжмитe кнопкy X нa Baшeм (зaпиcывaющeм) видeомa e ecтe, c котоpого нyжно нaчaть зaпиcь. 3 REC PAUSE DV DV i.LINK cable (DV connecting cable) (optional)/ Кaбeль i.LINK (cоeдинитe aбeль DV) (пpиобpeтaeтc eльно) DV : Signal flow/ Пpоxождeниe cигнaлa 34
-
 1
1 -
2
-
3
-
4
-
5
-
6
-
7
-
8
-
9
-
10
-
11
-
12
-
13
-
14
-
15
-
16
-
17
-
18
-
19
-
20
-
21
-
22
-
23
-
24
-
25
-
26
-
27
-
28
-
 29
29 -
 30
30 -
 31
31 -
 32
32 -
 33
33 -
 34
34 -
 35
35 -
 36
36 -
 37
37 -
 38
38 -
 39
39 -
40
-
41
-
42
-
43
-
44
-
45
-
46
-
47
-
48
-
49
-
50
-
51
-
52
-
53
-
54
-
55
-
56
-
57
-
58
-
59
-
60
-
61
-
62
-
63
-
64
-
65
-
66
-
67
-
68
-
69
-
70
-
71
-
72
-
73
-
74
-
75
-
76
-
77
-
78
-
79
-
80
-
81
-
82
-
83
-
84
-
85
-
86
-
87
-
88
-
89
-
90
-
91
-
92
-
93
-
94
-
95
-
96
-
97
-
98
-
99
-
100
-
101
-
102
-
103
-
104
-
105
-
106
-
107
-
108
-
109
-
110
-
111
-
112
-
113
-
114
-
115
-
116
-
117
-
118
-
119
-
120
-
121
-
122
-
123
-
124
-
125
-
126
-
127
-
128
-
129
-
130
-
131
-
132
-
133
-
134
-
135
-
136
-
137
-
138
-
139
-
140
-
141
-
142
-
143
-
144
-
145
-
146
-
147
-
148
-
149
-
150
-
151
-
152
-
153
-
154
-
155
-
156
-
157
-
158
-
159
-
160
-
161
-
162
-
163
-
164
-
165
-
166
-
167
-
168
-
169
-
170
-
171
-
172
-
173
-
174
-
175
-
176
-
177
-
178
-
179
-
180
-
181
-
182
-
183
-
184
-
185
-
186
-
187
-
188
-
189
-
190
-
191
-
192
-
193
-
194
-
195
-
196
-
197
-
198
-
199
-
200
-
201
-
202
-
203
-
204
-
205
-
206
-
207
-
208
-
209
-
210
-
211
-
212
-
213
-
214
-
215
-
216
-
217
-
218
-
219
-
220
 |
 |