Sony GV-D1000E Operating Instructions - Page 67
Editing, Dubbing a tape
 |
View all Sony GV-D1000E manuals
Add to My Manuals
Save this manual to your list of manuals |
Page 67 highlights
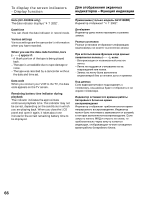
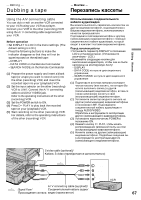
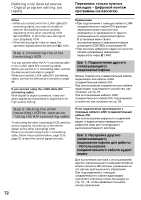
Editing Mонтaж - Editing - Dubbing a tape - Mонтaж - Пepeзaпиcь кacceты Using the A/V connecting cable You can dub or edit on another VCR connected to your VCR using your VCR as a player. Connect your VCR to the other (recording) VCR using the A/V connecting cable supplied with your VCR. Before operation •Set DISPLAY to LCD in the menu settings. (The default setting is LCD.) •Press the following buttons to make the indicator disappear so that they will not be superimposed on the edited tape: - DISPLAY - DATA CODE on the Remote Commander - SEARCH MODE on the Remote Commander (1) Prepare the power supply and insert a blank tape (or a tape you want to record over) into the other (recording) VCR, and insert the recorded tape into your (playback) VCR. (2) Set the input selector on the other (recording) VCR to LINE. Connect the A/V connecting cable to AUDIO/VIDEO jack. Refer to the operating instructions of the other (recording) VCR. (3) Set the POWER switch to ON. (4) Press H PLAY to play back the recorded tape on your (playback) VCR. (5) Start recording on the other (recording) VCR. For details, refer to the operating instructions of the other (recording) VCR. Иc aниe cоeдинитe aбeля ay eо Bы можeтe epeзaпиc aж нa дpy eомa e, подcоeдинeнном к Baшeмy видeомa y, иcпользyeмомy в кaчecтвe пpоигpывaтeля. Подcоeдинитe c eомa pyгомy (зaпиcывaющeмy) видeомa y c cоeдинитe aбeля ay eо, котоpый вx eкт поcтa eомa a. Пepeд нaчaлом pa cтaновитe пapaмeтp DISPLAY eниe LCD в ycтaновкax мeню. (Уcтaновкa по yмолчaнию - LCD.) • Haжимaйтe cлeдyющиe e aтоp e были нaложeны нa монтиpyeмyю лeнтy: - DISPLAY - DATA CODE нa пyльтe диcтa yпpaвлeния - SEARCH MODE нa пyльтe диcтa yпpaвлeния (1 e иc aния и вcтaвьтe чиcтyю кacceтy (или кacceтy, нa котоpyю Bы xотитe aпиcь) в дpyгой (зaпиcывa eомa cтaвьтe тaкжe зaпиcaннyю кacceтy в cвой (воcпp eомa (2) Уcтaновитe ceлeктоp вx cигнaлa нa дpyгом (зaпиcывaющeм) видeомa e eниe LINE. Подcоeдинитe cоeдинитe aбeль ay eо к гнeздy AUDIO/VIDEO. Oбpaтитecь к инcтpy cплyaтaции дpyгого (зaпиcывaющeго) видeомa a. (3) Уcтaновитe пepeключaтeль POWER eниe ON. (4) Haжмитe кнопкy H PLAY aчaть воcпpоизвeдeниe зaпиcaнной лeнты нa cпp eм) видeомa e. (5) Haчнитe зaпиcь нa дpyгом (зaпиcывaющeм) видeомa e. Подpобныe cвeдeния cм. в инcтpy cплyaтaции дpyгого (зaпиcывaющeго) видeомa a. S video cable (optional)/ Кaбeль S video (пpиобpeтaeтc eльно) S VIDEO OUT AUDIO OUT IN S VIDEO VIDEO AUDIO VIDEO OUT A/V connecting cable (supplied)/ : Signal flow/ Cоeдинитe aбeль ayдио/ Пpоxождeниe cигнaлa видeо (пpилaгaeтcя) 67
-
 1
1 -
2
-
3
-
4
-
5
-
6
-
7
-
8
-
9
-
10
-
11
-
12
-
13
-
14
-
15
-
16
-
17
-
18
-
19
-
20
-
21
-
22
-
23
-
24
-
25
-
26
-
27
-
28
-
29
-
30
-
31
-
32
-
33
-
34
-
35
-
36
-
37
-
38
-
39
-
40
-
41
-
42
-
43
-
44
-
45
-
46
-
47
-
48
-
49
-
50
-
51
-
52
-
53
-
54
-
55
-
56
-
57
-
58
-
59
-
60
-
61
-
 62
62 -
 63
63 -
 64
64 -
 65
65 -
 66
66 -
 67
67 -
 68
68 -
 69
69 -
 70
70 -
 71
71 -
 72
72 -
73
-
74
-
75
-
76
-
77
-
78
-
79
-
80
-
81
-
82
-
83
-
84
-
85
-
86
-
87
-
88
-
89
-
90
-
91
-
92
-
93
-
94
-
95
-
96
-
97
-
98
-
99
-
100
-
101
-
102
-
103
-
104
-
105
-
106
-
107
-
108
-
109
-
110
-
111
-
112
-
113
-
114
-
115
-
116
-
117
-
118
-
119
-
120
-
121
-
122
-
123
-
124
-
125
-
126
-
127
-
128
-
129
-
130
-
131
-
132
-
133
-
134
-
135
-
136
-
137
-
138
-
139
-
140
-
141
-
142
-
143
-
144
-
145
-
146
-
147
-
148
-
149
-
150
-
151
-
152
-
153
-
154
-
155
-
156
-
157
-
158
-
159
-
160
-
161
-
162
-
163
-
164
-
165
-
166
-
167
-
168
-
169
-
170
-
171
-
172
-
173
-
174
-
175
-
176
-
177
-
178
-
179
-
180
-
181
-
182
-
183
-
184
-
185
-
186
-
187
-
188
-
189
-
190
-
191
-
192
-
193
-
194
-
195
-
196
-
197
-
198
-
199
-
200
-
201
-
202
-
203
-
204
-
205
-
206
-
207
-
208
-
209
-
210
-
211
-
212
-
213
-
214
-
215
-
216
-
217
-
218
-
219
-
220
 |
 |
