Sony GV-D1000E Operating Instructions - Page 93
Audio dubbing
 |
View all Sony GV-D1000E manuals
Add to My Manuals
Save this manual to your list of manuals |
Page 93 highlights
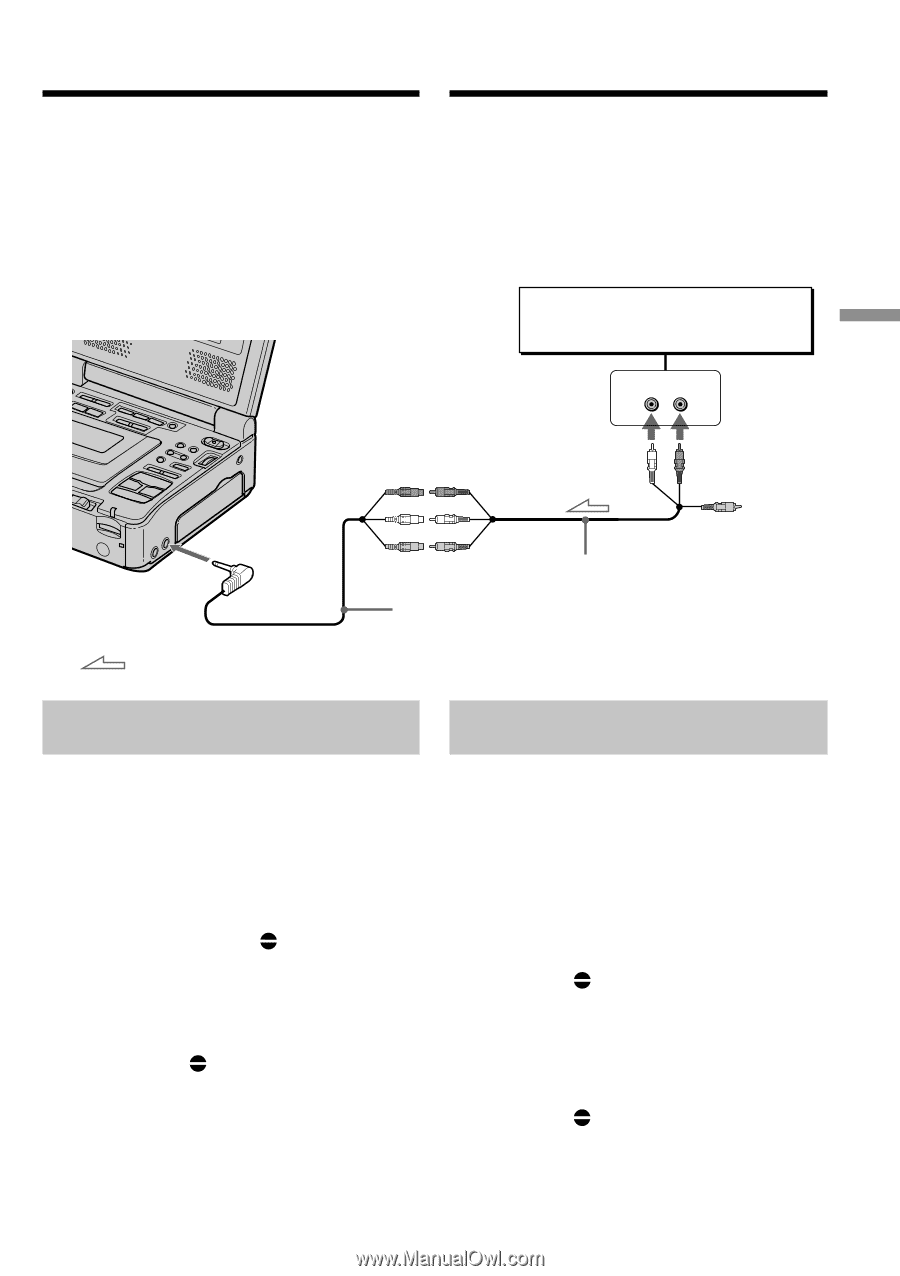
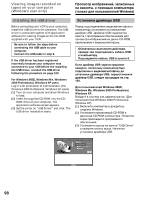
Audio dubbing Ayдиопepeзaпиcь You can dub additional sound on your recorded tape by specifying starting and ending points. The original sound will not be erased. Use the Remote Commander for this operation. Do not connect the video (yellow) plug. Bы можeтe пepeзaпиcывa e yк нa Baшy зaпиcaннyю кacceтy пyтeм yкaзa eк нaчaлa aния. Пepвонaчa yк нe бyдeт cтepт пp cпользyйтe пyльт диcтa yпpaвлe epaции. He подcоeдиняйтe видeо (жe eкep. Audio equipment LINE OUT L R AUDIO L AUDIO R Editing Mонтaж AUDIO/VIDEO INPUT A/V connecting cable (supplied A/V converting cable (supplied)/ Пpeобpaзовaтe aбeль ay eо (пpилaгaeтcя) : Signal flow Adding audio on a recorded tape (1) Prepare the power supply and insert your recorded tape into your VCR. (2) Set the POWER switch to ON. (3) Locate the recording start point by pressing H. Then press X at the point where you want to start recording to set your VCR to the playback pause mode. (4) Press AUDIO DUB on the Remote Commander. The green X indicator appears on the screen. (5) Press X and start playing back the audio you want to record at the same time. The additional audio is recorded in stereo 2 (ST2) during playback. While recording new sound, the red appears on the screen. (6) Press x at the point where you want to stop recording. Добaвлeниe звy cигнaлa нa зaпиcaннyю кacceтy (1 e иc aния и вcтaвьтe зaпиcaннyю кacceтy в c eомa (2) Уcтaновитe пepeключaтeль POWER eниe ON. (3) Haйдитe мecто нaчaлa зaпиcи, нaжa y H. Зaтeм нaжмитe кнопкy X ecтe, гдe нyжно нaчaть зaпиcь, для ycтa eомa a в peжим пayзы воcпpоизвeдeния. (4) Haжмитe кнопкy AUDIO DUB нa пyльтe диcтa yпpaвлeния. Зeлe aтоp X cя нa экpaнe. (5) Haжмитe кнопкy X peмeнно нaчнитe воcпpоизвeдeниe звyкa, котоpый нyжно зaпиca e yк бyдeт зaпиcaн в peжимe cтepeо 2 (ST2) во вpeмя воcпpоизвeдeния. Bо вpeмя зaпиc yкa нa экpaнe eтcя кpac aтоp . (6) Haжмитe кнопкy x ecтe, гдe нyжно зa aпиcь. 93
-
 1
1 -
2
-
3
-
4
-
5
-
6
-
7
-
8
-
9
-
10
-
11
-
12
-
13
-
14
-
15
-
16
-
17
-
18
-
19
-
20
-
21
-
22
-
23
-
24
-
25
-
26
-
27
-
28
-
29
-
30
-
31
-
32
-
33
-
34
-
35
-
36
-
37
-
38
-
39
-
40
-
41
-
42
-
43
-
44
-
45
-
46
-
47
-
48
-
49
-
50
-
51
-
52
-
53
-
54
-
55
-
56
-
57
-
58
-
59
-
60
-
61
-
62
-
63
-
64
-
65
-
66
-
67
-
68
-
69
-
70
-
71
-
72
-
73
-
74
-
75
-
76
-
77
-
78
-
79
-
80
-
81
-
82
-
83
-
84
-
85
-
86
-
87
-
 88
88 -
 89
89 -
 90
90 -
 91
91 -
 92
92 -
 93
93 -
 94
94 -
 95
95 -
 96
96 -
 97
97 -
 98
98 -
99
-
100
-
101
-
102
-
103
-
104
-
105
-
106
-
107
-
108
-
109
-
110
-
111
-
112
-
113
-
114
-
115
-
116
-
117
-
118
-
119
-
120
-
121
-
122
-
123
-
124
-
125
-
126
-
127
-
128
-
129
-
130
-
131
-
132
-
133
-
134
-
135
-
136
-
137
-
138
-
139
-
140
-
141
-
142
-
143
-
144
-
145
-
146
-
147
-
148
-
149
-
150
-
151
-
152
-
153
-
154
-
155
-
156
-
157
-
158
-
159
-
160
-
161
-
162
-
163
-
164
-
165
-
166
-
167
-
168
-
169
-
170
-
171
-
172
-
173
-
174
-
175
-
176
-
177
-
178
-
179
-
180
-
181
-
182
-
183
-
184
-
185
-
186
-
187
-
188
-
189
-
190
-
191
-
192
-
193
-
194
-
195
-
196
-
197
-
198
-
199
-
200
-
201
-
202
-
203
-
204
-
205
-
206
-
207
-
208
-
209
-
210
-
211
-
212
-
213
-
214
-
215
-
216
-
217
-
218
-
219
-
220
 |
 |