Sony RM-AX4000 Operating Instructions - Page 6

Table of Contents, Getting Started, Operating, Unit Settings - driver

Page 6 highlights

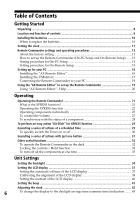
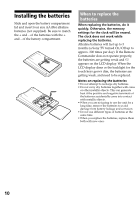
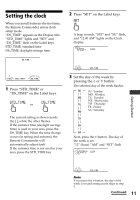
Table of Contents Getting Started Unpacking ...8 Location and function of controls 8 Installing the batteries ...10 When to replace the batteries 10 Setting the clock ...11 Remote Commander settings and operating procedures 13 About the factory setting 13 How to set up the Remote Commander (On-PC Setup and On-Remote Setup) ...... 13 Setting procedure for On-PC Setup 14 Setting procedure for On-Remote Setup 15 Setting up for your PC ...16 Installing the "AX Remote Editor 16 Installing the USB driver 17 Connecting the Remote Commander to your PC 19 Using the "AX Remote Editor" to set up the Remote Commander 19 Using "AX Remote Editor"- Help 20 Operating Operating the Remote Commander 21 What is the XPRESS function 21 Operating the XPRESS function 22 Operating components individually 25 To control the volume ...27 To synchronize with the status of a component 28 To perform an easy action "Air-Slide" for XPRESS function 29 Executing a series of actions at a scheduled time 29 To quickly switch the Timer on or off 30 Executing a series of actions with just one button 31 Other useful functions ...32 To operate the Remote Commander in the dark 32 Locking the controls - Hold function 33 To turn off all the components at one time 33 Unit Settings Setting the backlight ...34 Setting the LCD display ...37 Setting the automatic-off time of the LCD display 37 Calibrating the alignment of the LCD display 39 Setting the contrast of the LCD display 40 Setting the beep ...41 Adjusting the clock ...42 6 To change the display to the daylight savings time (summer time) indication ........ 43

  • 1
  • 2
  • 3
  • 4
  • 5
  • 6
  • 7
  • 8
  • 9
  • 10
  • 11
  • 12
  • 13
  • 14
  • 15
  • 16
  • 17
  • 18
  • 19
  • 20
  • 21
  • 22
  • 23
  • 24
  • 25
  • 26
  • 27
  • 28
  • 29
  • 30
  • 31
  • 32
  • 33
  • 34
  • 35
  • 36
  • 37
  • 38
  • 39
  • 40
  • 41
  • 42
  • 43
  • 44
  • 45
  • 46
  • 47
  • 48
  • 49
  • 50
  • 51
  • 52
  • 53
  • 54
  • 55
  • 56
  • 57
  • 58
  • 59
  • 60
  • 61
  • 62
  • 63
  • 64
  • 65
  • 66
  • 67
  • 68
  • 69
  • 70
  • 71
  • 72
  • 73
  • 74
  • 75
  • 76
  • 77
  • 78
  • 79
  • 80
  • 81
  • 82
  • 83
  • 84
  • 85
  • 86
  • 87
  • 88
  • 89
  • 90
  • 91
  • 92
  • 93
  • 94
  • 95
  • 96

6
Table of Contents
Getting Started
Unpacking
.............................................................................................................................
8
Location and function of controls
........................................................................................
8
Installing the batteries
.......................................................................................................
10
When to replace the batteries
............................................................................................
10
Setting the clock
.................................................................................................................
11
Remote Commander settings and operating procedures
...................................................
13
About the factory setting
...................................................................................................
13
How to set up the Remote Commander (On-PC Setup and On-Remote Setup)
......
13
Setting procedure for On-PC Setup
.................................................................................
14
Setting procedure for On-Remote Setup
.........................................................................
15
Setting up for your PC
........................................................................................................
16
Installing the “AX Remote Editor”
..................................................................................
16
Installing the USB driver
...................................................................................................
17
Connecting the Remote Commander to your PC
..........................................................
19
Using the “AX Remote Editor” to set up the Remote Commander
....................................
19
Using “AX Remote Editor”– Help
...................................................................................
20
Operating
Operating the Remote Commander
....................................................................................
21
What is the XPRESS function?
..........................................................................................
21
Operating the XPRESS function
.......................................................................................
22
Operating components individually
...............................................................................
25
To control the volume
........................................................................................................
27
To synchronize with the status of a component
.............................................................
28
To perform an easy action “Air-Slide” for XPRESS function
...............................................
29
Executing a series of actions at a scheduled time
.............................................................
29
To quickly switch the Timer on or off
..............................................................................
30
Executing a series of actions with just one button
............................................................
31
Other useful functions
........................................................................................................
32
To operate the Remote Commander in the dark
............................................................
32
Locking the controls – Hold function
..............................................................................
33
To turn off all the components at one time
.....................................................................
33
Unit Settings
Setting the backlight
..........................................................................................................
34
Setting the LCD display
......................................................................................................
37
Setting the automatic-off time of the LCD display
........................................................
37
Calibrating the alignment of the LCD display
...............................................................
39
Setting the contrast of the LCD display
..........................................................................
40
Setting the beep
.................................................................................................................
41
Adjusting the clock
.............................................................................................................
42
To change the display to the daylight savings time (summer time) indication
........
43