Symphonic CWR20V5 Owner's Manual - Page 31
Basic recording
 |
View all Symphonic CWR20V5 manuals
Add to My Manuals
Save this manual to your list of manuals |
Page 31 highlights
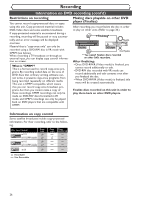
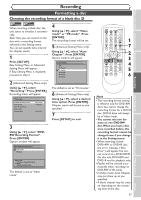
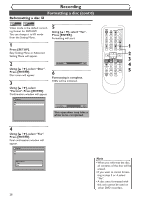
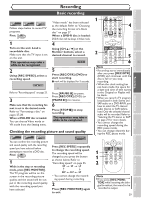
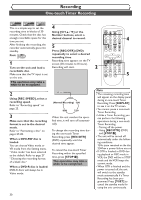
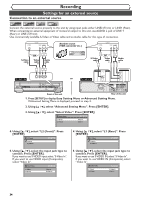
Recording Basic recording Video DVD-RW VR DVD-RW DVD-R Follow steps below to record TV programs. First: DVD 1 Turn on the unit. Load a recordable disc. Make sure that the TV input is set on the unit. This operation may take a while to be recognized. 2 Using [REC SPEED], select a recording speed. XP 0:58 Refer to "Recording speed" on page 25. 3 Make sure that the recording format is set to the desired mode. Refer to "Formatting a disc" on pages 27-28. When a DVD-RW disc is loaded: You can choose Video mode or VR mode from the Setting menu. "Video mode" has been selected as the default. Refer to "Choosing the recording format of a blank disc" on page 27. When a DVD-R disc is loaded: DVD-R discs will be always in Video mode. 4 Using [CH K / L] or the Number buttons, select a desired channel to record. CH 12 5 Press [REC/OTR] (DVD) to start recording. I mark will be displayed for 5 seconds. I Press [PAUSE F] to pause. Press [REC/OTR] (DVD) (or [PAUSE F]) to resume. 6 Press [STOP C] to stop recording. This operation may take a while to be completed. Checking the recording picture and sound quality Video DVD-RW VR DVD-RW DVD-R You can confirm the recording picture and sound quality with the recording speed you have selected before attempting to record to a DVD disc. First: DVD 1 While in the stop or recording mode, press [REC MONITOR]. The TV program will be on the screen in the recording picture quality and the sound will be output in the recording sound quality with the recording speed you have selected. Rec Monitor XP 0:58 Press [REC SPEED] repeatedly to change the recording speed. The recording speed will be changed as you press the button as shown below. Refer to "Recording speed" on page 25. XP SP LP SEP SLP EP • You cannot change the recording speed during recording. 2 Press [REC MONITOR] again to exit. 1 POWER OPEN/CLOSE T-SET TIMER PROG. .@/: ABC DEF 1 2 3 GHI JKL MNO CH 4 5 6 PQRS TUV WXYZ VIDEO/TV 7 8 9 DISPLAY SPACE 0 CLEAR SETUP TOP MENU MENU/LIST RETURN ENTER 4 REC/OTR VCR DVD REC/OTR 2 REC SPEED PLAY REC MONITOR SKIP PAUSE SKIP SLOW CM SKIP STOP SEARCH DUBBING ZOOM AUDIO 5 6 Note • Recording starts immediately after you press [REC/OTR] (DVD) and continues until the disc is full or you stop recording. • When the clock setting has not been made, the space for a date and time of title names in the Original or Playlist will be blank. • When you record a TV program broadcasted in both Stereo and SAP-audio on a DVD-RW/R, you have to select the TV channel audio (Stereo or SAP) beforehand. Only the selected channel audio will be recorded. Refer to "Selecting the TV stereo or SAP" on page 21 for more details. • You cannot change the recording speed during the REC pause mode. • You can change channels during the REC pause mode. 1 1 2 REC/OTR VCR DVD REC/OTR REC SPEED PLAY REC MONITOR SKIP PAUSE SKIP SLOW CM SKIP STOP SEARCH DUBBING ZOOM AUDIO Note • If you press [REC MONI- TOR] while receiving the bilingual broadcast, the sound to be recorded is output. 29 Others Changing the Setting menu VCR functions Editing Disc Playback Before you start Connections Getting started Recording
-
 1
1 -
2
-
3
-
4
-
5
-
6
-
7
-
8
-
9
-
10
-
11
-
12
-
13
-
14
-
15
-
16
-
17
-
18
-
19
-
20
-
21
-
22
-
23
-
24
-
25
-
 26
26 -
 27
27 -
 28
28 -
 29
29 -
 30
30 -
 31
31 -
 32
32 -
 33
33 -
 34
34 -
 35
35 -
 36
36 -
37
-
38
-
39
-
40
-
41
-
42
-
43
-
44
-
45
-
46
-
47
-
48
-
49
-
50
-
51
-
52
-
53
-
54
-
55
-
56
-
57
-
58
-
59
-
60
-
61
-
62
-
63
-
64
-
65
-
66
-
67
-
68
-
69
-
70
-
71
-
72
-
73
-
74
-
75
-
76
-
77
-
78
-
79
-
80
-
81
-
82
-
83
-
84
-
85
-
86
-
87
-
88
-
89
-
90
-
91
-
92
-
93
-
94
-
95
-
96
-
97
-
98
-
99
-
100
-
101
-
102
-
103
-
104
-
105
-
106
-
107
-
108
-
109
-
110
-
111
-
112
-
113
-
114
-
115
-
116
-
117
-
118
-
119
-
120
-
121
-
122
-
123
-
124
-
125
-
126
-
127
-
128
-
129
-
130
-
131
-
132
-
133
-
134
-
135
-
136
-
137
-
138
-
139
-
140
-
141
-
142
-
143
-
144
-
145
-
146
-
147
-
148
-
149
-
150
-
151
-
152
-
153
-
154
-
155
-
156
-
157
-
158
-
159
-
160
-
161
-
162
-
163
-
164
-
165
-
166
-
167
-
168
-
169
-
170
 |
 |
