Symphonic CWR20V5 Owner's Manual - Page 40
Dubbing Mode
 |
View all Symphonic CWR20V5 manuals
Add to My Manuals
Save this manual to your list of manuals |
Page 40 highlights
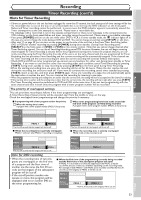
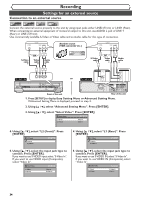
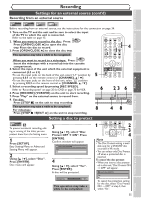
Recording Dubbing Mode Video VR DVD-RW DVD-RW DVD-R 3 VCR Using [K / L], select You can copy a DVD disc to a videotape or copy a videotape to a DVD disc.This function will be possible only if the DVD disc or the "Recording". Press [ENTER]. Recording menu will appear. Recording DVD POWER OPEN/CLOSE T-SET TIMER PROG. .@/: ABC DEF 1 2 3 GHI JKL MNO CH 4 5 6 videotape is not copy protected. Before starting this function, prepare for the recording on the DVDRW/R disc or the videotape. Refer to pages 29 and 75. DVD-RW Recording Format Auto Chapter Timer Programming Auto Finalize Dubbing Mode Video mode 10 minutes VCR DVD 1 PQRS TUV WXYZ VIDEO/TV 7 8 9 DISPLAY SPACE 0 CLEAR SETUP TOP MENU MENU/LIST RETURN ENTER REC/OTR VCR DVD REC/OTR 2 3 4 Make sure: • Insert a recordable disc and a videotape with a record tab. Note for recording to a videotape: 4 Using [K / L], select "Dubbing Mode". Press REC SPEED PLAY REC MONITOR SKIP PAUSE SKIP SLOW CM SKIP STOP SEARCH DUBBING ZOOM AUDIO • The videotape's record tab is [ENTER]. intact. Option window will appear. • The remaining time of the videotape is long enough. Recording VCR DVD Note for recording to a disc: DVD-RW Recording Format Auto Chapter Video mode 10 minutes • Make sure that the disc is Timer Programming recordable. Refer to pages 25 and 26. Auto Finalize Dubbing Mode VCR DVD 1 Press [SETUP]. Easy Setting Menu or Advanced Setting Menu will appear. If Advanced Setting Menu is displayed, proceed to step 3. 2 Using [K / L], select "Advanced Setting Menu". Press [ENTER]. Advanced Setting Menu will appear. Note For VCR to DVD duplication: • After starting VCR to DVD duplication, the picture may be distorted because of the auto tracking function. This is not a malfunction. Be advised to playback the videotape until the picture is stabilized, then set the starting point which you wish to start recording, and start VCR to DVD duplication. 38
-
 1
1 -
2
-
3
-
4
-
5
-
6
-
7
-
8
-
9
-
10
-
11
-
12
-
13
-
14
-
15
-
16
-
17
-
18
-
19
-
20
-
21
-
22
-
23
-
24
-
25
-
26
-
27
-
28
-
29
-
30
-
31
-
32
-
33
-
34
-
 35
35 -
 36
36 -
 37
37 -
 38
38 -
 39
39 -
 40
40 -
 41
41 -
 42
42 -
 43
43 -
 44
44 -
 45
45 -
46
-
47
-
48
-
49
-
50
-
51
-
52
-
53
-
54
-
55
-
56
-
57
-
58
-
59
-
60
-
61
-
62
-
63
-
64
-
65
-
66
-
67
-
68
-
69
-
70
-
71
-
72
-
73
-
74
-
75
-
76
-
77
-
78
-
79
-
80
-
81
-
82
-
83
-
84
-
85
-
86
-
87
-
88
-
89
-
90
-
91
-
92
-
93
-
94
-
95
-
96
-
97
-
98
-
99
-
100
-
101
-
102
-
103
-
104
-
105
-
106
-
107
-
108
-
109
-
110
-
111
-
112
-
113
-
114
-
115
-
116
-
117
-
118
-
119
-
120
-
121
-
122
-
123
-
124
-
125
-
126
-
127
-
128
-
129
-
130
-
131
-
132
-
133
-
134
-
135
-
136
-
137
-
138
-
139
-
140
-
141
-
142
-
143
-
144
-
145
-
146
-
147
-
148
-
149
-
150
-
151
-
152
-
153
-
154
-
155
-
156
-
157
-
158
-
159
-
160
-
161
-
162
-
163
-
164
-
165
-
166
-
167
-
168
-
169
-
170
 |
 |
