Toshiba 32HLX95 Owners Manual - Page 12
Connecting your TV - will not power on
 |
View all Toshiba 32HLX95 manuals
Add to My Manuals
Save this manual to your list of manuals |
Page 12 highlights
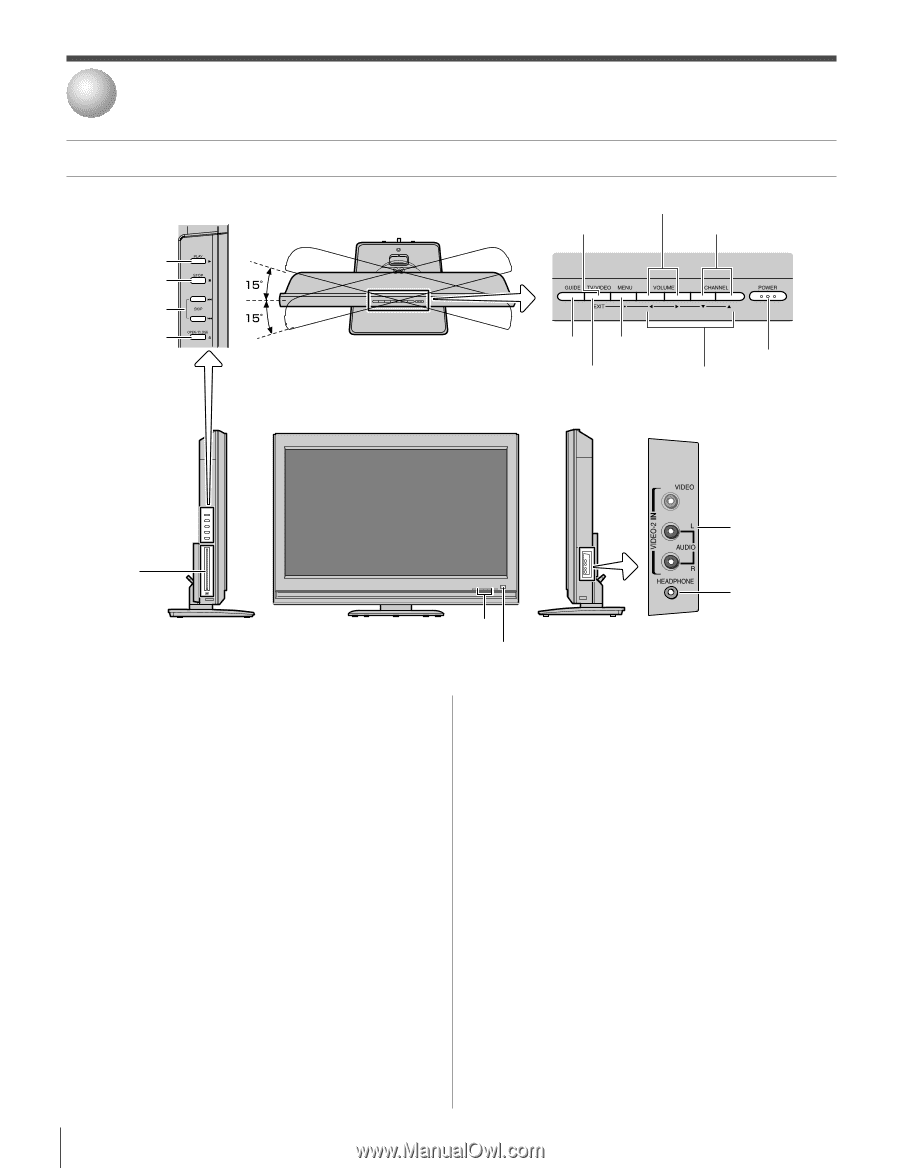
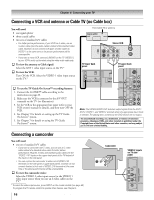
2 Connecting your TV TV top panel and side panel controls and connections !¡ PLAY !™ STOP !£ SKIP !¢ OPEN/ CLOSE * * * Swivel angle TV top 9 VOLUME x • 3 TV/VIDEO 8 CHANNEL zy Top panel 0 6 MENU GUIDE 4 EXIT 7 POWER 5 x •zy TV front TV side panel !¶ DVD disc slot TIMER REC POWER 2 Red/Green LEDs 1 Remote sensor !∞ VIDEO-2 IN !§ Headphone jack 1 Remote sensor - Point the remote control toward this remote sensor. See "Remote control effective range" on page 25. 2 Red and Green LEDs Red - Power indicator Green - Timer recording indicator 3 TV/VIDEO - Repeatedly press to change the source you are viewing (ANT 1, DVD, VIDEO 1, VIDEO 2, ColorStream HD 1, ColorStream HD 2, HDMI, PC, ANT2). 4 EXIT - Press to close an on-screen menu instantly. 5 ARROWS x •yz - When a menu is on-screen, these buttons function as left/right/up/down menu navigation buttons. 6 MENU - Press to access the menu system (see page 33). 7 POWER - Press to turn the TV on and off. Note: If the TV stops responding to the controls on the remote control or TV top panel and you cannot turn off the TV, press and hold the POWER button on the TV top panel for 5 or more seconds to reset the TV. 8 CHANNEL zy - When no menu is on-screen, these buttons change the channel (programmed channels only; see page 40). When a menu is on-screen, these buttons function as up/down menu navigation buttons. 9 VOLUME x • - When no menu is on-screen, these buttons adjust the volume level. When a menu is on-screen, these buttons function as left/right menu navigation buttons. 0 GUIDE - Press to access the TV Guide On Screen™ program guide. (See page 46 for details on using the program guide.) !¡ PLAY - Press to play a DVD video disc, or other playable disc. !™ STOP - Press to stop a DVD video disc, or other playable disc. !£ SKIP - Press to skip DVD chapter, or CD track. !¢ OPEN/CLOSE - Press to eject a disc. !∞ VIDEO-2 IN - Standard composite video and standard audio inputs for connecting a device with composite video. !§ Headphone jack - For use with headphones. Note: When the Headphone jack is being used, the sound from all speakers will be muted, and normal sound will be output to the headphones only. !¶ DVD disc slot - Insert a playable disc to play. 12 Copyright © 2005 TOSHIBA CORPORATION. All rights reserved.
-
 1
1 -
2
-
3
-
4
-
5
-
6
-
 7
7 -
 8
8 -
 9
9 -
 10
10 -
 11
11 -
 12
12 -
 13
13 -
 14
14 -
 15
15 -
 16
16 -
 17
17 -
18
-
19
-
20
-
21
-
22
-
23
-
24
-
25
-
26
-
27
-
28
-
29
-
30
-
31
-
32
-
33
-
34
-
35
-
36
-
37
-
38
-
39
-
40
-
41
-
42
-
43
-
44
-
45
-
46
-
47
-
48
-
49
-
50
-
51
-
52
-
53
-
54
-
55
-
56
-
57
-
58
-
59
-
60
-
61
-
62
-
63
-
64
-
65
-
66
-
67
-
68
-
69
-
70
-
71
-
72
-
73
-
74
-
75
-
76
-
77
-
78
-
79
-
80
-
81
-
82
-
83
-
84
-
85
-
86
-
87
-
88
-
89
-
90
-
91
-
92
-
93
-
94
-
95
-
96
-
97
-
98
-
99
-
100
-
101
-
102
 |
 |