Toshiba 32HLX95 Owners Manual - Page 33
Menu layout and navigation - close caption
 |
View all Toshiba 32HLX95 manuals
Add to My Manuals
Save this manual to your list of manuals |
Page 33 highlights
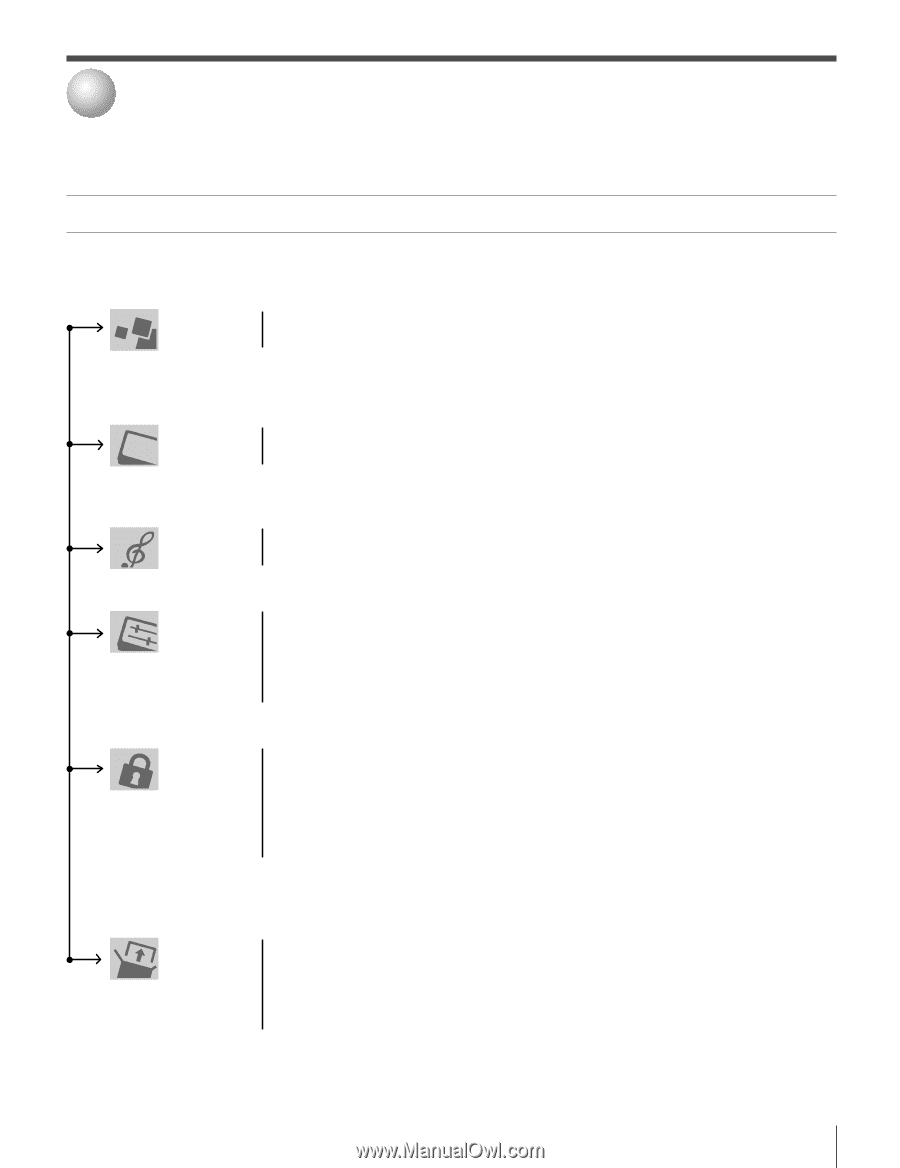
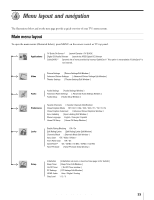
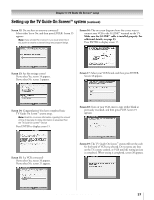
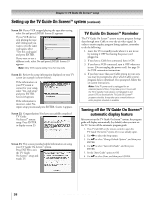
4 Menu layout and navigation The illustrations below and on the next page provide a quick overview of your TV's menu system. Main menu layout To open the main menus (illustrated below), press MENU on the remote control or TV top panel. Applications ➞ TV Guide On Screen™ ➞ Launch Gemstar / TV GUIDE ➞ Digital CC/Audio Selector ➞ Launch the ATSC Digital CC Selector ➞ CableCARD™ ➞ Dynamic list of items provided by inserted CableCard™. This option is not available if CableCard™ is not inserted. Video ➞ Picture Settings ➞ [ Picture Settings Edit Window ] ➞ Advanced Picture Settings ➞ [ Advanced Picture Settings Edit Window ] ➞ Theater Settings ➞ [ Theater Settings Edit Window ] Audio ➞ Audio Settings ➞ [ Audio Settings Window ] ➞ Advanced Audio Settings ➞ [ Advanced Audio Settings Window ] ➞ Audio Setup ➞ [ Audio Setup Window ] Preferences ➞ Favorite Channels ➞ [ Favorite Channels Edit Window ] ➞ Closed Caption Mode ➞ Off / CC1 / CC2 / CC3 / CC4 / T1 / T2 / T3 / T4 ➞ Closed Caption Advanced ➞ [ Advanced Closed Captions Window ] ➞ Input Labeling ➞ [ Input Labeling Edit Window ] ➞ Menu Language ➞ English / Français / Español ➞ Home CH Setup ➞ [ Home CH Setup Window ] Locks ➞ Enable Rating Blocking ➞ Off / On ➞ Edit Rating Limits ➞ [ Edit Rating Limits Edit Window ] ➞ Channels Block ➞ [ Channels Block Edit Window ] ➞ Input Lock ➞ Off / Video / Video + ➞ Front Panel Lock ➞ Off / On ➞ GameTimer™ ➞ Off / 30 Min / 60 Min / 90 Min / 120 Min ➞ New PIN Code ➞ [ New PIN Code Entry Window ] Setup ➞ Installation ➞ [ Installation sub menu is launched (see page 34 for defails) ] ➞ Sleep Timer ➞ [ Sleep Timer Edit Window ] ➞ On/Off Timer ➞ [ On/Off Timer window ] ➞ PC Settings ➞ [ PC Settings Edit Window ] ➞ HDMI Audio ➞ Auto / Digital / Analog ➞ Gray Level ➞ 1 / 2 / 3 Copyright © 2005 TOSHIBA CORPORATION. All rights reserved. 33
-
 1
1 -
2
-
3
-
4
-
5
-
6
-
7
-
8
-
9
-
10
-
11
-
12
-
13
-
14
-
15
-
16
-
17
-
18
-
19
-
20
-
21
-
22
-
23
-
24
-
25
-
26
-
27
-
 28
28 -
 29
29 -
 30
30 -
 31
31 -
 32
32 -
 33
33 -
 34
34 -
 35
35 -
 36
36 -
 37
37 -
 38
38 -
39
-
40
-
41
-
42
-
43
-
44
-
45
-
46
-
47
-
48
-
49
-
50
-
51
-
52
-
53
-
54
-
55
-
56
-
57
-
58
-
59
-
60
-
61
-
62
-
63
-
64
-
65
-
66
-
67
-
68
-
69
-
70
-
71
-
72
-
73
-
74
-
75
-
76
-
77
-
78
-
79
-
80
-
81
-
82
-
83
-
84
-
85
-
86
-
87
-
88
-
89
-
90
-
91
-
92
-
93
-
94
-
95
-
96
-
97
-
98
-
99
-
100
-
101
-
102
 |
 |