Toshiba 52HM95 Owner's Manual - English - Page 68
Labeling the video input sources
 |
UPC - 022265251157
View all Toshiba 52HM95 manuals
Add to My Manuals
Save this manual to your list of manuals |
Page 68 highlights
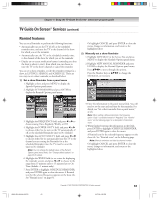
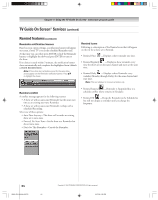
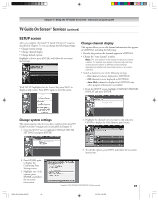
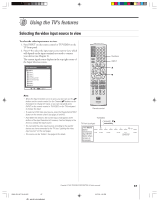
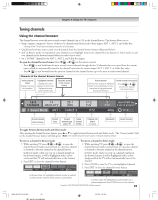
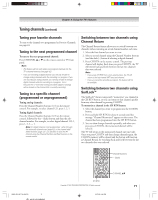
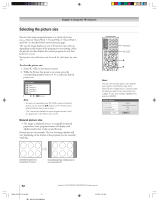
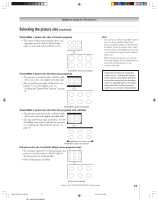
Chapter 8: Using the TV's features Labeling the video input sources You can label each video input source according to the type of device you connected to each source, from the following preset list of labels: - - (default label) Hide (to hide an unused input in the Input Selection window) Audio Receiver VCR Video Recorder Laser Disk Compact Disc DVD DTV Satellite/DSS Cable Game Console Note: • If you set up devices in TheaterNet,™ the associated inputs are automatically labeled and cannot be relabeled until you remove the device from TheaterNet (see page 45). • If you set up a cable box in VIDEO 1, that input will be labeled automatically and cannot be relabeled until you remove the device from the TV Guide On Screen® setup. • You cannot select IEEE1394 devices through the Input Selection window; however, you can select and control IEEE1394 devices through TheaterNet (see page 45). To label the video input sources: 1. Press MENU and open the Preferences menu. 2. Highlight Input Labeling and press ENTER. 3. Press y or z to highlight the video source you want to label. Preferences Favorite Channels Closed Caption Mode Off Closed Caption Advanced Input Labeling Menu Language English Home CH Setup Navigate Select CH RTN Back EXIT Exit Input Labeling Video 1 Video 2 Video 3 ColorStream HD 1 ColorStream HD 2 HDMI 1 HDMI 2 ANT 2 Reset DVD Cable Audio Receiver Video Receiver Hide DTV Satellite/DSS -- Done 4. Press x or • to select the desired label for that input source. If a particular input is not used, you can select "Hide" as the label, which will cause that input to be "grayed out" in the input list and skipped over when you press the INPUT button on the remote control. Note: If you select "Hide" for all of the input labels, the POP feature will be disabled. If you then attempt to access the POP feature, the message "Not available" will appear on-screen. 5. To save the new input labels, highlight Done and press ENTER. To revert to the factory default labels, highlight Reset and press ENTER. Input labeling example: The screen below left shows the default Input Selection screen (with none of the inputs labeled). The screen below right is an example of how you could label the inputs if you had connected a DVD player to VIDEO 1, Cable TV to VIDEO 2, an audio receiver to VIDEO 3, a video recorder to ColorStream HD1, a DTV set-top box to HDMI 1, and a satellite/DSS set-top box to HDMI 2. Also note that the ColorStream HD2 input is labeled "Hidden," which means that the input will be skipped over when INPUT or TV/VIDEO is pressed. Input Selection 0 ANT 1 1 Video 1 2 Video 2 3 Video 3 4 ColorStream HD1 5 ColorStream HD2 6 HDMI 1 7 HDMI 2 8 ANT 2 ANT 1 0 - 8 / INPUT to Select Input Selection screen with no inputs labeled Input Selection 0 ANT 1 1 DVD 2 Cable 3 Audio Receiver 4 Video Recorder 5 ColorStream HD2 (Hidden) 6 DTV 7 Satellite/DSS 8 ANT 2 ANT 1 0 - 8 / INPUT to Select Input Selection screen with all inputs labeled except input 5, which has been hidden. To clear the input labels: 1. Press MENU and open the Preferences menu. 2. Highlight Input Labeling and press ENTER. 3. Highlight Reset and press ENTER. 4. Highlight Done and press ENTER. Note: If you set up a device in TheaterNet, its input label will not be cleared unless you remove the device from TheaterNet (see page 45). 68 HM95_R2_067-78_061505 68 Copyright © 2005 TOSHIBA CORPORATION. All rights reserved. 6/27/05, 4:32 PM
-
 1
1 -
2
-
3
-
4
-
5
-
6
-
7
-
8
-
9
-
10
-
11
-
12
-
13
-
14
-
15
-
16
-
17
-
18
-
19
-
20
-
21
-
22
-
23
-
24
-
25
-
26
-
27
-
28
-
29
-
30
-
31
-
32
-
33
-
34
-
35
-
36
-
37
-
38
-
39
-
40
-
41
-
42
-
43
-
44
-
45
-
46
-
47
-
48
-
49
-
50
-
51
-
52
-
53
-
54
-
55
-
56
-
57
-
58
-
59
-
60
-
61
-
62
-
 63
63 -
 64
64 -
 65
65 -
 66
66 -
 67
67 -
 68
68 -
 69
69 -
 70
70 -
 71
71 -
 72
72 -
 73
73 -
74
-
75
-
76
-
77
-
78
-
79
-
80
-
81
-
82
-
83
-
84
-
85
-
86
-
87
-
88
-
89
-
90
-
91
-
92
-
93
-
94
-
95
-
96
-
97
-
98
-
99
-
100
-
101
-
102
-
103
-
104
-
105
-
106
-
107
-
108
-
109
-
110
-
111
-
112
 |
 |