Toshiba 52HM95 Owner's Manual - English - Page 8
Overview of steps for installing, setting up, and using your new TV - dlp lamps
 |
UPC - 022265251157
View all Toshiba 52HM95 manuals
Add to My Manuals
Save this manual to your list of manuals |
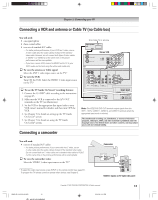
Page 8 highlights
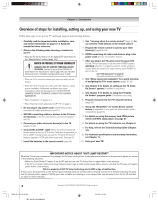
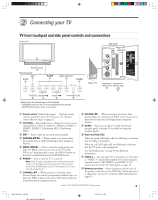
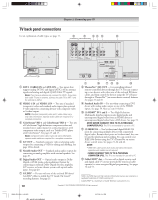
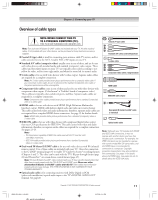
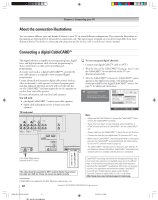
Chapter 1: Introduction Overview of steps for installing, setting up, and using your new TV Follow these steps to set up your TV and begin using its many exciting features. 1. Carefully read the important safety, installation, care, and service information on pages 2-5. Keep this manual for future reference. 2. Observe the following when choosing a location for the TV: • Place the TV on the floor or on the optional TV stand listed in the "Specifications" section (page 106). NOTICE OF POSSIBLE TV STAND INSTABILITY DANGER: RISK OF SERIOUS PERSONAL INJURY OR DEATH! Use this TV only with the TOSHIBA TV stand listed in the "Specifications" section (page 106). Use with other stands may result in instability, causing possible injury or death. • Place the TV in a location where light does not reflect on the screen. • Place the TV far enough from walls and other objects to allow proper ventilation. Inadequate ventilation may cause overheating, which will damage the TV. THIS TYPE OF DAMAGE IS NOT COVERED UNDER THE TOSHIBA WARRANTY. • Read "Installation" on pages 3-4. • Read "Important notes about your DLP™ TV" on page 5. 3. Do not plug in any power cords until AFTER you have connected all cables and devices to your TV. 4. BEFORE connecting cables or devices to the TV, learn the functions of the TV's connections and controls (pages 9 and 10). 5. Connect your other electronic device(s) to the TV (pages 12-25). 6. Connect the G-LINK® cable (either one of the enclosed IR blaster cables) from your VCR and/or Cable box (if applicable) to the G-LINK® terminal so you can use the TV Guide On Screen® features (applies to VCRs and cable boxes only). See page 25. 7. Install the batteries in the remote control (page 28). 8. See "Learning about the remote control" (page 26) for an overview of the buttons on the remote control. 9. Program the remote control to operate your other device(s) (pages 28-34). 10. AFTER connecting all cables and devices, plug in the power cords for your TV and other devices. 11. After you plug in the TV power cord, the green LED (on the TV front touchpad, to the left of the POWER button) will blink while the TV is booting until the remote control is usable. When the green LED stops blinking, press POWER to turn on the TV. See "LED indications" on page 99. 12. See "Menu layout and navigation" for a quick overview of navigating the TV's menu system (pages 35-36). 13. See Chapter 5 for details on setting up the TV Guide On Screen® system (if available in your area). 14. See Chapter 7 for details on using the TV Guide On Screen® program guide (if available in your area). 15. Program channels into the TV's channel memory (page 42). 16. Set up the TheaterNet™ on-screen device control feature (if applicable to your particular home theater system components) (page 45). 17. For details on using the memory card JPEG picture viewer and MP3 audio player, see page 87. 18. For details on using the TV's features, see Chapter 8. 19. For help, refer to the Troubleshooting Guide (Chapter 10). 20. For technical specifications and warranty information, see Chapter 11. 21. Enjoy your new TV! IMPORTANT NOTICE ABOUT "HOT LAMP RESTART" When the TV has been powered on long enough for the lamp unit to get hot, it may take several minutes for the picture to appear on-screen in the following situations: • When the Quick Restart™ feature is set to OFF and you turn the TV off and then on again within a few minutes. • If the TV is on when a short-term power failure, power surge, or other similar power failure occurs, such that the TV loses and regains power within a few minutes. This is a property of DLP TV lamp technology and is NOT a sign of malfunction. If this occurs, the green LED on the TV front panel will blink (and the red LED will be lit solid) until the TV is finished restarting the lamp and the normal picture appears. If BOTH green and red LEDs are blinking at a one-second rate, you will need to turn the TV off and then on again to restart the lamp. 8 Copyright © 2005 TOSHIBA CORPORATION. All rights reserved. HM95_R1_007-08_061505 8 6/24/05, 8:46 PM
-
 1
1 -
2
-
 3
3 -
 4
4 -
 5
5 -
 6
6 -
 7
7 -
 8
8 -
 9
9 -
 10
10 -
 11
11 -
 12
12 -
 13
13 -
14
-
15
-
16
-
17
-
18
-
19
-
20
-
21
-
22
-
23
-
24
-
25
-
26
-
27
-
28
-
29
-
30
-
31
-
32
-
33
-
34
-
35
-
36
-
37
-
38
-
39
-
40
-
41
-
42
-
43
-
44
-
45
-
46
-
47
-
48
-
49
-
50
-
51
-
52
-
53
-
54
-
55
-
56
-
57
-
58
-
59
-
60
-
61
-
62
-
63
-
64
-
65
-
66
-
67
-
68
-
69
-
70
-
71
-
72
-
73
-
74
-
75
-
76
-
77
-
78
-
79
-
80
-
81
-
82
-
83
-
84
-
85
-
86
-
87
-
88
-
89
-
90
-
91
-
92
-
93
-
94
-
95
-
96
-
97
-
98
-
99
-
100
-
101
-
102
-
103
-
104
-
105
-
106
-
107
-
108
-
109
-
110
-
111
-
112
 |
 |