Xerox 3600B User Guide - Page 29
Setting Ethernet speed, Restoring the network configuration, Printing a network configuration - default password
 |
UPC - 095205742640
View all Xerox 3600B manuals
Add to My Manuals
Save this manual to your list of manuals |
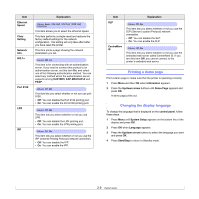
Page 29 highlights
Setting Ethernet speed You can select the communication speed for Ethernet connections. 1 Press Menu until Network appears on the bottom line of the display and press OK. 2 Press the Up/down arrow buttons until Ethernet Speed appears and press OK. 3 Press the Up/down arrow buttons until the speed you want appears and press OK. 4 Press Start/Stop to return to Standby mode. Restoring the network configuration You can return the network configuration to its default settings. 1 Press Menu until Network appears on the bottom line of the display and press OK. 2 Press the Up/down arrow buttons until Clear Setting appears and press OK. 3 Press OK when Yes appears to restore the network configuration. 4 Power the printer off and back on. Printing a network configuration page The network configuration page shows how the network interface card on your printer is configured. 1 Press Menu until Network appears on the bottom line of the display and press OK. 2 Press the Up/down arrow buttons until Network Info. appears and press OK. 3 Press OK when Yes appears. The network configuration page prints out. Configuring 802.1x Your printer has 802.1x protocol on its network. 802.1x is a security standard for port based network access control. It secures your network against unauthorized access by requiring authentication before network access and data transmission are allowed. There are 3 mutually exclusive options for 802.1x authentication. To use 802.1x, take the following steps: 1 Press Menu until Network appears on the bottom line of the display and press OK. 2 Press the Up/down arrow buttons until 802.1x appears and press OK. 3 Press the Up/down arrow buttons until On appears and press OK. 4 Press the Up/down arrow buttons until the desired authentication method appears. • EAP-MD5: EAP-MD5 (Extensible Authentication Protocol Message Digest algorithm 5) is a message hashing scheme between client and server to allow the transfer of user data in a secure fashion. • EAP-MSCHAPv2: EAP-MSCHAP (Extensible Authentication Protocol Microsoft version of the Challenge-Handshake Authentication Protocol). MSCHAP v2 is a one-way encrypted password, mutual authentication process. MS-CHAPv2 uses different hashing/encryption algorithms to encode the UserID and passwords. • PEAP: PEAP (Protected EAP). 5 Enter user name and passcode using Up/down arrow button. 6 Press OK to save the selection. 7 Press Start/Stop to return to Standby mode. Configuring Port 9100 Your printer can use port 9100. To enable port 9100, take the following steps: 1 Press Menu until Network appears on the bottom line of the display and press OK. 2 Press the Up/down arrow buttons until Port 9100 appears and press OK. 3 Press the Up/down arrow buttons until On appears and press OK. 4.3
-
 1
1 -
2
-
3
-
4
-
5
-
6
-
7
-
8
-
9
-
10
-
11
-
12
-
13
-
14
-
15
-
16
-
17
-
18
-
19
-
20
-
21
-
22
-
23
-
 24
24 -
 25
25 -
 26
26 -
 27
27 -
 28
28 -
 29
29 -
 30
30 -
 31
31 -
 32
32 -
 33
33 -
 34
34 -
35
-
36
-
37
-
38
-
39
-
40
-
41
-
42
-
43
-
44
-
45
-
46
-
47
-
48
-
49
-
50
-
51
-
52
-
53
-
54
-
55
-
56
-
57
-
58
-
59
-
60
-
61
-
62
-
63
-
64
-
65
-
66
-
67
-
68
-
69
-
70
-
71
-
72
-
73
-
74
-
75
-
76
-
77
-
78
-
79
-
80
-
81
-
82
-
83
-
84
-
85
-
86
-
87
-
88
-
89
-
90
-
91
-
92
-
93
-
94
-
95
-
96
-
97
-
98
-
99
-
100
-
101
-
102
-
103
-
104
-
105
-
106
-
107
-
108
-
109
 |
 |
