Xerox 3600B User Guide - Page 61
AaBbCc, Toner smear - 80
 |
UPC - 095205742640
View all Xerox 3600B manuals
Add to My Manuals
Save this manual to your list of manuals |
Page 61 highlights
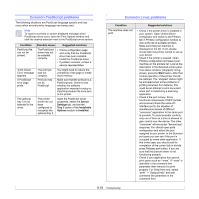
Condition Vertical lines AaBBbbCCcc AaBBbbCCcc AaBBbbCCcc AaBBbbCCcc AaBBbbCCcc Gray background AaBbCc AaBbCc AaBbCc AaBbCc AaBbCc Toner smear Suggested solutions If black vertical streaks appear on the page: • The drum inside the print cartridge has probably been scratched. Install a new print cartridge. If the amount of background shading becomes unacceptable, the procedures below may fix the problem. • Change to lighter weight pages. See page 5.3. • Check the printer's environment; very dry (low humidity) or high humidity (higher than 80% RH) conditions can increase the amount of background shading. • Remove the old print cartridge and install a new one. See page 8.4. • Clean the inside of the printer. See page 8.1. • Check the type and quality. See page 5.2. • Remove the print cartridge and install a new one. See page 8.4. Vertical repetitive defects AaBbCc AaBbCc AaBbCc AaBbCc AaBbCc If marks repeatedly appear on the printed side of the page at even intervals: • The print cartridge may be damaged. If a repetitive mark occurs on the page, print a cleaning sheet several times to clean the cartridge; see page 8.2. After the printout, if you still have the same problems, install a new print cartridge. See page 8.4. • Parts of the printer may have toner on them. If the defects occur on the back of the page, the problem will likely correct itself after a few more pages. • The fusing assembly may be damaged. Contact a service representative. Condition Background scatter A Misformed characters Page skew AAAAaAaaaBaBBBbBbbbCbCCCCccccc Curl or wave Suggested solutions Background scatter results from bits of toner distributed on the printed page. • The paper may be too damp. Try printing with a different batch of paper. Do not open packages of paper until necessary so that the paper does not absorb too much moisture. • If background scatter occurs on an envelope, change the printing layout to avoid printing over areas that have overlapping seams on the reverse side. Printing on seams can cause problems. • If background scatter covers the entire surface area of a printed page, adjust the print resolution through your software application or via the printer properties window. • If characters are improperly formed and producing hollowed images, the paper stock may be too slick. Try a different paper. See page 5.3. • If characters are improperly formed and producing a wavy effect, the scanner unit may need service. Verify that it also occurs on a demo page (see page 2.9). For service, contact a service representative. • Ensure that the paper is loaded properly. • Check the paper type and quality. See page 5.2. • Ensure that the paper or other material is loaded correctly and the guides are not too tight or too loose against the paper stack. • Ensure that the paper is loaded properly. • Check the type and quality. Both high temperature and humidity can cause paper curl. See page 5.2. • Turn over the stack of paper in the tray. Also try rotating the paper 180° in tray. • Try printing to the rear cover (face-up). Wrinkles or creases • Ensure that the paper is loaded properly. • Check the paper type and quality. See page 5.2. • Open the rear cover and try printing to the rear cover (face-up). • Turn over the stack of paper in tray. Also try rotating the paper 180° in tray. 9.14
-
 1
1 -
2
-
3
-
4
-
5
-
6
-
7
-
8
-
9
-
10
-
11
-
12
-
13
-
14
-
15
-
16
-
17
-
18
-
19
-
20
-
21
-
22
-
23
-
24
-
25
-
26
-
27
-
28
-
29
-
30
-
31
-
32
-
33
-
34
-
35
-
36
-
37
-
38
-
39
-
40
-
41
-
42
-
43
-
44
-
45
-
46
-
47
-
48
-
49
-
50
-
51
-
52
-
53
-
54
-
55
-
 56
56 -
 57
57 -
 58
58 -
 59
59 -
 60
60 -
 61
61 -
 62
62 -
 63
63 -
 64
64 -
 65
65 -
 66
66 -
67
-
68
-
69
-
70
-
71
-
72
-
73
-
74
-
75
-
76
-
77
-
78
-
79
-
80
-
81
-
82
-
83
-
84
-
85
-
86
-
87
-
88
-
89
-
90
-
91
-
92
-
93
-
94
-
95
-
96
-
97
-
98
-
99
-
100
-
101
-
102
-
103
-
104
-
105
-
106
-
107
-
108
-
109
 |
 |
