Xerox 3600B User Guide - Page 46
Clearing the Toner Low Replace Toner message, Cautions
 |
UPC - 095205742640
View all Xerox 3600B manuals
Add to My Manuals
Save this manual to your list of manuals |
Page 46 highlights
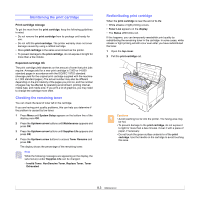
Cautions • If toner gets on your clothing, wipe it off with a dry cloth and wash clothing in cold water. Hot water sets toner into fabric. • To prevent damage to the print cartridge, do not expose it to light for more than a few minutes. Cover it with a piece of paper, if necessary. • Do not touch the green surface underside of the print cartridgeprint cartridge. Use the handle on the cartridge to avoid touching this area. 5 At the end of the print cartridge, the sealing tape is located. Carefully pull the tape out of the cartridge and discard it. 8 Tabs on the sides of the cartridge and corresponding grooves within the printer will guide the cartridge into the correct position until it locks into place completely. Notes • The sealing tape should be longer than 60 cm when correctly removed. • Holding the print cartridge, pull the sealing tape straight to remove it from the cartridge. Be careful not to cut the tape. If this happens, you cannot use the print cartridge. • Refer to the helpful pictures on the cartridge wrapping paper. 6 There is a flexible plastic holder. Remove the holder from the print cartridge. 7 Hold the print cartridge by the handle and slowly insert the cartridge into the opening in the printer. 9 Close the top cover. Make sure that the cover is securely closed. Clearing the Toner Low Replace Toner message When the Toner Low Replace Toner message appears you can configure the machine so it does not display the message. 1 Press Menu until System Setup appears on the bottom line of the display and press OK. 2 Press the Scroll buttons until Maintenance appears and press OK. 3 Press the Scroll buttons until CLR Empty Msg. appears and press OK. 4 Select On and press OK. 5 Now the Toner Low Replace Toner message does not appear but the Replace Toner message will remain for reminding you that a new cartridge needs to be installed for quality. Caution Once you have selected On, this setting will be permanently written to the memory of the cartridge, and this menu item will be removed from the Maintenance menu. 8.5
-
 1
1 -
2
-
3
-
4
-
5
-
6
-
7
-
8
-
9
-
10
-
11
-
12
-
13
-
14
-
15
-
16
-
17
-
18
-
19
-
20
-
21
-
22
-
23
-
24
-
25
-
26
-
27
-
28
-
29
-
30
-
31
-
32
-
33
-
34
-
35
-
36
-
37
-
38
-
39
-
40
-
 41
41 -
 42
42 -
 43
43 -
 44
44 -
 45
45 -
 46
46 -
 47
47 -
 48
48 -
 49
49 -
 50
50 -
 51
51 -
52
-
53
-
54
-
55
-
56
-
57
-
58
-
59
-
60
-
61
-
62
-
63
-
64
-
65
-
66
-
67
-
68
-
69
-
70
-
71
-
72
-
73
-
74
-
75
-
76
-
77
-
78
-
79
-
80
-
81
-
82
-
83
-
84
-
85
-
86
-
87
-
88
-
89
-
90
-
91
-
92
-
93
-
94
-
95
-
96
-
97
-
98
-
99
-
100
-
101
-
102
-
103
-
104
-
105
-
106
-
107
-
108
-
109
 |
 |
