Xerox 3600B User Guide - Page 43
Printing a cleaning sheet - transfer roller
 |
UPC - 095205742640
View all Xerox 3600B manuals
Add to My Manuals
Save this manual to your list of manuals |
Page 43 highlights
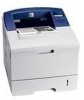
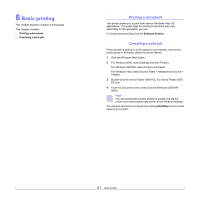
3 With a dry lint-free cloth, wipe away any dust and spilled toner from the print cartridge area and the print cartridge cavity. Caution While cleaning the inside of the printer, be careful not to touch the transfer roller, located underneath the print cartridge. Oil from your fingers can cause print scan quality problems. 4 Locate the long strip of glass of LSU (Laser Scanning Unit) inside the top of the cartridge compartment, and gently swab the glass to see if dirt turns the white cotton black. Printing a cleaning sheet If you are experiencing blurred, faded, or smeared printouts, you can clear the problem by printing a cleaning sheet, provided by your printer. You can print: • OPC (Organic Photo Conductor) Cleaning sheet: cleans the OPC drum of the print cartridge. • Fuser Cleaning sheet: cleans the fuser unit inside the printer. 1 Make sure that the printer is turned on with paper loaded in tray. 2 Press Menu until System Setup appears on the bottom line of the display and press OK. 3 Press the Up/down arrow buttons until Maintenance appears and press OK. 4 When Clean Drum appears, press OK. Or, press the Up/down arrow buttons until Clean Drum or Clean Fuser appears and press OK. Your printer automatically picks up a sheet of paper from the tray and prints out a cleaning sheet with dust or toner particles on it. 5 Reinsert the print cartridge and close the top cover. 6 Plug in the power cord and turn the printer on. 8.2
-
 1
1 -
2
-
3
-
4
-
5
-
6
-
7
-
8
-
9
-
10
-
11
-
12
-
13
-
14
-
15
-
16
-
17
-
18
-
19
-
20
-
21
-
22
-
23
-
24
-
25
-
26
-
27
-
28
-
29
-
30
-
31
-
32
-
33
-
34
-
35
-
36
-
37
-
 38
38 -
 39
39 -
 40
40 -
 41
41 -
 42
42 -
 43
43 -
 44
44 -
 45
45 -
 46
46 -
 47
47 -
 48
48 -
49
-
50
-
51
-
52
-
53
-
54
-
55
-
56
-
57
-
58
-
59
-
60
-
61
-
62
-
63
-
64
-
65
-
66
-
67
-
68
-
69
-
70
-
71
-
72
-
73
-
74
-
75
-
76
-
77
-
78
-
79
-
80
-
81
-
82
-
83
-
84
-
85
-
86
-
87
-
88
-
89
-
90
-
91
-
92
-
93
-
94
-
95
-
96
-
97
-
98
-
99
-
100
-
101
-
102
-
103
-
104
-
105
-
106
-
107
-
108
-
109
 |
 |
