Xerox 3600B User Guide - Page 45
Replacing the print cartridge - boxes
 |
UPC - 095205742640
View all Xerox 3600B manuals
Add to My Manuals
Save this manual to your list of manuals |
Page 45 highlights
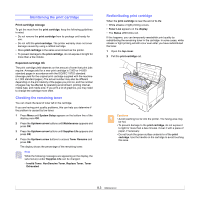
3 Thoroughly roll the cartridge 5 or 6 times to distribute the toner evenly inside the cartridge. 2 Pull the print cartridge out. Note If toner gets on your clothing, wipe it off with a dry cloth and wash clothing in cold water. Hot water sets toner into fabric. 4 Hold the print cartridge by the handle and slowly insert the cartridge into the opening in the printer. 5 Tabs on the sides of the cartridge and corresponding grooves within the printer will guide the cartridge into the correct position until it locks into place completely. 3 Remove the new print cartridge from its bag. Caution Do not use sharp objects, such as a knife or scissors, to open the print cartridge package. They might scratch the drum of the cartridge. 4 Roll the cartridge 5 or 6 times to distribute the toner. 6 Close the top cover. Make sure that the cover is securely closed. Replacing the print cartridge When the print cartridge is completely empty: • Toner Low Replace Toner appears on the display. • The Status LED lights red. At this stage, the print cartridge needs to be replaced. For order information for print cartridges, see page 7.1. 1 Open the top cover. Thoroughly roll the cartridge to assure maximum copies per cartridge. Save the box and the plastic bag for shipping. 8.4
-
 1
1 -
2
-
3
-
4
-
5
-
6
-
7
-
8
-
9
-
10
-
11
-
12
-
13
-
14
-
15
-
16
-
17
-
18
-
19
-
20
-
21
-
22
-
23
-
24
-
25
-
26
-
27
-
28
-
29
-
30
-
31
-
32
-
33
-
34
-
35
-
36
-
37
-
38
-
39
-
 40
40 -
 41
41 -
 42
42 -
 43
43 -
 44
44 -
 45
45 -
 46
46 -
 47
47 -
 48
48 -
 49
49 -
 50
50 -
51
-
52
-
53
-
54
-
55
-
56
-
57
-
58
-
59
-
60
-
61
-
62
-
63
-
64
-
65
-
66
-
67
-
68
-
69
-
70
-
71
-
72
-
73
-
74
-
75
-
76
-
77
-
78
-
79
-
80
-
81
-
82
-
83
-
84
-
85
-
86
-
87
-
88
-
89
-
90
-
91
-
92
-
93
-
94
-
95
-
96
-
97
-
98
-
99
-
100
-
101
-
102
-
103
-
104
-
105
-
106
-
107
-
108
-
109
 |
 |
