Asus DiGiMatrix User Guide - Page 65
Setup
 |
View all Asus DiGiMatrix manuals
Add to My Manuals
Save this manual to your list of manuals |
Page 65 highlights
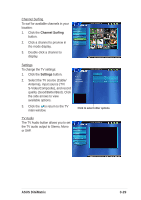
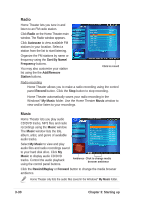
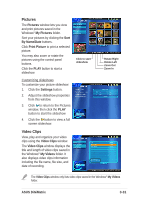
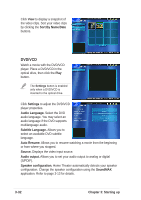
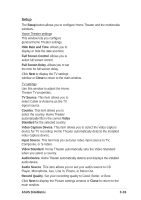
Setup The Setup button allows you to configure Home Theater and the multimedia windows. Home Theater settings This window lets you configure general Home Theater settings. Hide Date and Time. Allows you to display or hide the date and time. Full Screen Control. Allows you to select full screen control. Full Screen Delay. Allows you to set the time for full screen delay. Click Next to display the TV settings window or Close to return to the main window. TV settings Use this window to adjust the Home Theater TV properties. TV Source. This item allows you to select Cable or Antenna as the TV signal source. Country. This item allows you to select the country. Home Theater automatically fills in the correct Video Standard for the selected country. Video Capture Device. This item allows you to select the video capture device for TV recording. Home Theater automatically detects the installed video capture device. Input Source. This item lets you set your video input source to TV, Composite, or S-Video. Video Standard. Home Theater automatically sets the Video Standard when you select a country. Audio Device. Home Theater automatically detects and displays the installed audio device. Audio Source. This item allows you to set your audio source to CD Player, Microphone, Aux, Line In, Phone, or Mono Out. Record Quality. Set your recording quality to Good, Better, or Best. Click Next to display the Picture settings window or Close to return to the main window. ASUS DiGiMatrix 3-33
-
 1
1 -
2
-
3
-
4
-
5
-
6
-
7
-
8
-
9
-
10
-
11
-
12
-
13
-
14
-
15
-
16
-
17
-
18
-
19
-
20
-
21
-
22
-
23
-
24
-
25
-
26
-
27
-
28
-
29
-
30
-
31
-
32
-
33
-
34
-
35
-
36
-
37
-
38
-
39
-
40
-
41
-
42
-
43
-
44
-
45
-
46
-
47
-
48
-
49
-
50
-
51
-
52
-
53
-
54
-
55
-
56
-
57
-
58
-
59
-
 60
60 -
 61
61 -
 62
62 -
 63
63 -
 64
64 -
 65
65 -
 66
66 -
 67
67 -
 68
68 -
 69
69 -
 70
70 -
71
-
72
-
73
-
74
-
75
-
76
-
77
-
78
-
79
-
80
-
81
-
82
-
83
-
84
-
85
-
86
-
87
-
88
-
89
-
90
-
91
-
92
-
93
-
94
-
95
-
96
-
97
-
98
-
99
-
100
-
101
-
102
-
103
-
104
-
105
-
106
-
107
-
108
-
109
-
110
-
111
-
112
-
113
-
114
-
115
-
116
-
117
-
118
-
119
-
120
-
121
-
122
-
123
-
124
-
125
-
126
-
127
-
128
-
129
-
130
-
131
-
132
-
133
-
134
-
135
-
136
-
137
-
138
-
139
-
140
-
141
-
142
-
143
-
144
-
145
-
146
-
147
-
148
-
149
-
150
-
151
-
152
-
153
-
154
-
155
-
156
-
157
-
158
 |
 |