Autodesk 05726-091452-9060 User Guide - Page 117
Objects Separation by Type and Size
 |
UPC - 606121590040
View all Autodesk 05726-091452-9060 manuals
Add to My Manuals
Save this manual to your list of manuals |
Page 117 highlights
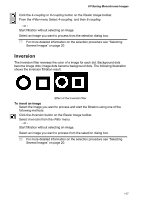
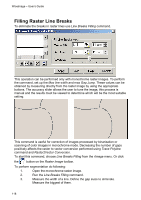
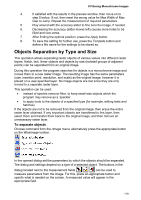
8 Filtering Monochrome Images 4. If satisfied with the results in the preview window, then move on to step 5 below. If not, then reset the wrong value for Max Width of Max Gap to Jump. Repeat the measurement of required parameters. 5. Play around with the accuracy slider to fine tune the image, if needed. 6. Decreasing the accuracy (slider moves left) causes more holes to be filled and vice-versa. 7. After finding the optimal position, press the Apply button. 8. To save the setting for further use, press the Template button and define a file name for the settings to be stored as. Objects Separation by Type and Size This operation allows separating raster objects of various values into different raster layers. Hatch, text, linear objects and objects by size (isolated groups of adjacent points) can be separated from an original image. During this operation the program searches for objects in a monochrome image and moves them to a new raster image. The resulting image has the same parameters (size, insertion point, resolution, and scale) as the original image; however it is placed on a user-specified layer. No image objects are lost since they are only moved to a separate raster layer. This operation can be used: · instead of speckle remover filter, to keep small-size objects which the program may remove as a 'speckle'. · to apply tools to the objects of a specified type (for example, editing texts and hatches). If the objects are not to be removed from the original image, then erase the entire raster layer obtained. If any important objects are transferred to this layer, then select them and transfer them back to the original image, and then remove an unnecessary raster layer. To separate objects Choose command from the rImage menu; alternatively press the appropriate button on the WiseImage toolbar: In the opened dialog set the parameters by which the objects should be separated. The dialog and settings depend on a type of a selected object. The buttons in the dialog located next to the measurement fields can be used to measure parameters from the image. For this, press an appropriate button and specify what is needed on the screen. A measured value will appear in the appropriate field. 119
-
 1
1 -
2
-
3
-
4
-
5
-
6
-
7
-
8
-
9
-
10
-
11
-
12
-
13
-
14
-
15
-
16
-
17
-
18
-
19
-
20
-
21
-
22
-
23
-
24
-
25
-
26
-
27
-
28
-
29
-
30
-
31
-
32
-
33
-
34
-
35
-
36
-
37
-
38
-
39
-
40
-
41
-
42
-
43
-
44
-
45
-
46
-
47
-
48
-
49
-
50
-
51
-
52
-
53
-
54
-
55
-
56
-
57
-
58
-
59
-
60
-
61
-
62
-
63
-
64
-
65
-
66
-
67
-
68
-
69
-
70
-
71
-
72
-
73
-
74
-
75
-
76
-
77
-
78
-
79
-
80
-
81
-
82
-
83
-
84
-
85
-
86
-
87
-
88
-
89
-
90
-
91
-
92
-
93
-
94
-
95
-
96
-
97
-
98
-
99
-
100
-
101
-
102
-
103
-
104
-
105
-
106
-
107
-
108
-
109
-
110
-
111
-
 112
112 -
 113
113 -
 114
114 -
 115
115 -
 116
116 -
 117
117 -
 118
118 -
 119
119 -
 120
120 -
 121
121 -
 122
122 -
123
-
124
-
125
-
126
-
127
-
128
-
129
-
130
-
131
-
132
-
133
-
134
-
135
-
136
-
137
-
138
-
139
-
140
-
141
-
142
-
143
-
144
-
145
-
146
-
147
-
148
-
149
-
150
-
151
-
152
-
153
-
154
-
155
-
156
-
157
-
158
-
159
-
160
-
161
-
162
-
163
-
164
-
165
-
166
-
167
-
168
-
169
-
170
-
171
-
172
-
173
-
174
-
175
-
176
-
177
-
178
-
179
-
180
-
181
-
182
-
183
-
184
-
185
-
186
-
187
-
188
-
189
-
190
-
191
-
192
-
193
-
194
-
195
-
196
-
197
-
198
-
199
-
200
-
201
-
202
-
203
-
204
-
205
-
206
-
207
-
208
-
209
-
210
-
211
-
212
-
213
-
214
-
215
-
216
-
217
-
218
-
219
-
220
-
221
-
222
-
223
-
224
-
225
-
226
-
227
-
228
-
229
-
230
-
231
-
232
-
233
-
234
-
235
 |
 |
