Autodesk 05726-091452-9060 User Guide - Page 20
Selecting an Image with WiseImage Commands
 |
UPC - 606121590040
View all Autodesk 05726-091452-9060 manuals
Add to My Manuals
Save this manual to your list of manuals |
Page 20 highlights
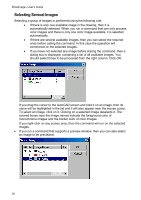
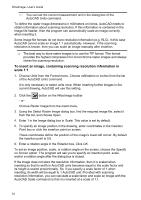
3 Basics Selecting an Image with WiseImage Commands You can insert an unlimited number of raster images into an AutoCAD drawing. Most WiseImage commands require that a user select the images to be operated on. Some commands can work on one image only. However, other commands that operate on several raster images at once. So two standard selection procedures are provided: selecting one image and selecting a group of images. There is a general rule, which applies to the selection of both types. You can only choose available images - i.e. they must be visible and located on unlocked layers. This means that a user can easily change the set of selected images. It is particularly useful when you work with raster layers, when images of the same size are placed precisely one on top of another and their boundaries coincide. In this case it is difficult to select by picking, so you should place such raster images on different AutoCAD layers and turn on/off image display by manipulating the visibility of layers. All WiseImage commands, creating new raster images, have the means of image separation onto different AutoCAD layers. Selecting a Single Image Selecting a single image is performed according to the following rule: · If there is only one available image in the drawing, then it is automatically selected. · To select a single image, click on its border. · If there are several available images, then you can select the required one after selecting the command in the following dialog box: To facilitate the selection of an image from the list by its name, the following mechanism of visual identification is provided. If you drag the cursor to the AutoCAD screen and hold it on an image, then its name will be highlighted in the list and it will also appear near the mouse cursor. To select the image, click on it. If there are several images under the cursor, then you can select the one you need from the dialog box. Click OK to confirm the selection and close the Select Image window. 19
-
 1
1 -
2
-
3
-
4
-
5
-
6
-
7
-
8
-
9
-
10
-
11
-
12
-
13
-
14
-
 15
15 -
 16
16 -
 17
17 -
 18
18 -
 19
19 -
 20
20 -
 21
21 -
 22
22 -
 23
23 -
 24
24 -
 25
25 -
26
-
27
-
28
-
29
-
30
-
31
-
32
-
33
-
34
-
35
-
36
-
37
-
38
-
39
-
40
-
41
-
42
-
43
-
44
-
45
-
46
-
47
-
48
-
49
-
50
-
51
-
52
-
53
-
54
-
55
-
56
-
57
-
58
-
59
-
60
-
61
-
62
-
63
-
64
-
65
-
66
-
67
-
68
-
69
-
70
-
71
-
72
-
73
-
74
-
75
-
76
-
77
-
78
-
79
-
80
-
81
-
82
-
83
-
84
-
85
-
86
-
87
-
88
-
89
-
90
-
91
-
92
-
93
-
94
-
95
-
96
-
97
-
98
-
99
-
100
-
101
-
102
-
103
-
104
-
105
-
106
-
107
-
108
-
109
-
110
-
111
-
112
-
113
-
114
-
115
-
116
-
117
-
118
-
119
-
120
-
121
-
122
-
123
-
124
-
125
-
126
-
127
-
128
-
129
-
130
-
131
-
132
-
133
-
134
-
135
-
136
-
137
-
138
-
139
-
140
-
141
-
142
-
143
-
144
-
145
-
146
-
147
-
148
-
149
-
150
-
151
-
152
-
153
-
154
-
155
-
156
-
157
-
158
-
159
-
160
-
161
-
162
-
163
-
164
-
165
-
166
-
167
-
168
-
169
-
170
-
171
-
172
-
173
-
174
-
175
-
176
-
177
-
178
-
179
-
180
-
181
-
182
-
183
-
184
-
185
-
186
-
187
-
188
-
189
-
190
-
191
-
192
-
193
-
194
-
195
-
196
-
197
-
198
-
199
-
200
-
201
-
202
-
203
-
204
-
205
-
206
-
207
-
208
-
209
-
210
-
211
-
212
-
213
-
214
-
215
-
216
-
217
-
218
-
219
-
220
-
221
-
222
-
223
-
224
-
225
-
226
-
227
-
228
-
229
-
230
-
231
-
232
-
233
-
234
-
235
 |
 |
