Behringer DEEPMIND 12 Manual - Page 34

Calibrate Voices, Voice Check, Vcf Fine, Cal Mod Wheel, System Settings Menu.

Page 34 highlights

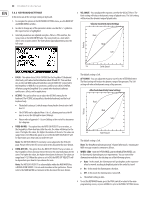
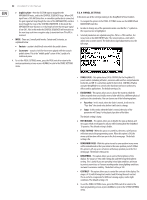
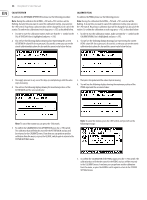
34 DeepMind 12 User Manual CALIBRATE VOICES Overview of the calibration routines: • ALL - This will initiate all of the routines. • VOICE CHECK - This performs a series of functionality tests on each voice. • VCF - This routine puts the voice into self oscillation and tunes to 1 kHz in order to calibrate the resonance of the VCF for that voice. The routine then puts the voice into self oscillation and checks the tuning at 50 Hz, 220 Hz, 880 Hz and 10 kHz to ensure the VCF is performing as expected. The test is repeated for all voices. • VCF FINE - This routine tests the scale and offset for all voices. • OSC - This routine adjusts the slope of the sawtooth at octave intervals. This ensures the precision of the slope so that it performs as designed. The test is repeated for all voices. • PW - This routine adjusts the pulse width (mark to space ratio) of the pulsewave. This ensures the precision of the ratio so that it performs as designed. The test is repeated for all voices. • VCA - The Voltage Controlled Amplifier (VCA) uses a bias voltage to set its operating level. This bias voltage is balanced so that the VCA responds as designed. The test is repeated for all voices. To start the calibration routine, please follow the procedure below: 1. In order to start the calibration routine, make sure that the '

  • 1
  • 2
  • 3
  • 4
  • 5
  • 6
  • 7
  • 8
  • 9
  • 10
  • 11
  • 12
  • 13
  • 14
  • 15
  • 16
  • 17
  • 18
  • 19
  • 20
  • 21
  • 22
  • 23
  • 24
  • 25
  • 26
  • 27
  • 28
  • 29
  • 30
  • 31
  • 32
  • 33
  • 34
  • 35
  • 36
  • 37
  • 38
  • 39
  • 40
  • 41
  • 42
  • 43
  • 44
  • 45
  • 46
  • 47
  • 48
  • 49
  • 50
  • 51
  • 52
  • 53
  • 54
  • 55
  • 56
  • 57
  • 58
  • 59
  • 60
  • 61
  • 62
  • 63
  • 64
  • 65
  • 66
  • 67
  • 68
  • 69
  • 70
  • 71
  • 72
  • 73
  • 74
  • 75
  • 76
  • 77
  • 78
  • 79
  • 80
  • 81
  • 82
  • 83
  • 84
  • 85
  • 86
  • 87
  • 88
  • 89
  • 90
  • 91
  • 92
  • 93
  • 94
  • 95
  • 96
  • 97
  • 98
  • 99
  • 100
  • 101
  • 102
  • 103
  • 104
  • 105
  • 106
  • 107
  • 108
  • 109
  • 110
  • 111
  • 112
  • 113
  • 114
  • 115
  • 116
  • 117
  • 118
  • 119
  • 120
  • 121
  • 122
  • 123
  • 124
  • 125
  • 126
  • 127
  • 128
  • 129
  • 130
  • 131
  • 132
  • 133
  • 134
  • 135
  • 136
  • 137
  • 138
  • 139
  • 140
  • 141
  • 142
  • 143
  • 144
  • 145
  • 146
  • 147
  • 148
  • 149
  • 150
  • 151
  • 152
  • 153
  • 154
  • 155
  • 156
  • 157
  • 158
  • 159
  • 160
  • 161
  • 162
  • 163
  • 164
  • 165
  • 166

34
DeepMind 12 User Manual
CALIBRATE VOICES
Overview of the calibration routines:
ALL
- This will initiate all of the routines.
VOICE CHECK
- This performs a series of functionality tests on each voice.
VCF
- This routine puts the voice into self oscillation and tunes to 1 kHz in
order to calibrate the resonance of the VCF for that voice. The routine then
puts the voice into self oscillation and checks the tuning at 50 Hz, 220 Hz,
880 Hz and 10 kHz to ensure the VCF is performing as expected. The test is
repeated for all voices.
VCF FINE
- This routine tests the scale and offset for all voices.
OSC
- This routine adjusts the slope of the sawtooth at octave intervals. This
ensures the precision of the slope so that it performs as designed. The test is
repeated for all voices.
PW
- This routine adjusts the pulse width (mark to space ratio) of the
pulsewave. This ensures the precision of the ratio so that it performs as
designed. The test is repeated for all voices.
VCA
- The Voltage Controlled Amplifier (VCA) uses a bias voltage to set its
operating level. This bias voltage is balanced so that the VCA responds as
designed. The test is repeated for all voices.
To start the calibration routine, please follow the procedure below:
1.
In order to start the calibration routine, make sure that the '<' symbol is
on the appropriate CALIBRATE line and highlighted, and press the +/YES
switch.
Note:
The calibration run time is shown on the bottom of the screen so that
you can plan your work around any of the calibration phases.
2.
The calibration routine will then start. Throughout the tests you will see
various waveforms being played. It is safe to turn down the volume while
the calibration routine is running.
Note:
While the calibration is running, you can mute the signal using the
BANK/DOWN switch and un-mute using the BANK/UP switch.
3.
When the calibration routine is complete, you will see a summary of the test
results as shown below. The 1st column is Voice 1, 2nd is Voice 2, and so on:
Note:
During the calibration, the GLOBAL and -/NO switches will be
flashing. If at any time you want to cancel the calibration routine, you can
press the -/NO switch. No previous calibration data will be changed if you
cancel the routine.
CAL MOD WHEEL
To calibrate the MOD WHEEL, please use the following procedure:
Note:
During the calibration the GLOBAL, -/NO and +/YES switches will be
flashing. If at any time you want to cancel the calibration routine, you can press
the -/NO switch. No previous calibration data will be changed if you do cancel the
routine. To confirm the calibration at each stage press +/YES as described below.
1.
First move the MOD WHEEL to its minimum position (shown on the panel).
2.
In order to start the calibration routine make sure that the '<' symbol on the
CAL MOD WHEEL line is highlighted and press +/YES.
3.
You will see the following display showing a bar representing the MOD
WHEEL value. Also on this screen you can see the stored calibration data
above the bar and the current value below the bar.
4.
Then move the MOD WHEEL to its maximum position (shown on the panel).
5.
You will see the following display showing the new position of the MOD
WHEEL and the associated values:
Note:
To cancel the routine you can press the -/NO switch.
6.
To confirm the CALIBRATION of the MOD WHEEL, press the +/YES switch:
The calibration data will then be stored for the MOD-WHEEL and you will
be returned to the CALIBRATE menu. From here you can perform another
calibration from the menu, or press the GLOBAL switch again to return to the
SYSTEM SETTINGS menu.