Behringer DEEPMIND 12 Manual - Page 53
STEP INDICATORS, VELOCITY, LENGTH, BANK/UP or BANK/DOWN switches, or the DATA ENTRY fader.
 |
View all Behringer DEEPMIND 12 manuals
Add to My Manuals
Save this manual to your list of manuals |
Page 53 highlights
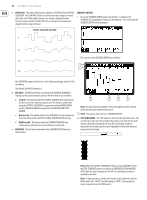
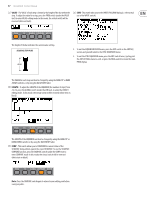
53 DeepMind 12 User Manual (2) STEP INDICATORS - The STEP numbers are shown at the top of the screen. The current step can be selected using the rotary knob, and each click will move the selection forward or backward one step. The current step is highlighted in black and indicated using a dotted rectangle. The GATE TIME for each step can then be changed by using the BANK/UP or BANK/DOWN switches, or the DATA ENTRY fader. PATTERN STEP GATE TIME GATE TIME Note: When the ARPEGGIATOR is ON and running, you will see the PATTERN POSITION POINTER (PPP) under the step being played. The PPP is a small black bar which is updated in real-time. Note: To duplicate steps in a User pattern, start by selecting the step to duplicate, hold the PROG switch (the "VEL" text will change to "DUP"), and navigate with the rotary knob to the target step in the same PATTERN and release the PROG switch. This can be done in User Presets only. (3) VELOCITY - The VELOCITY of each step is shown by the height of the bar within the step. To adjust the velocity for a step in a User pattern, press the PROG switch (under the VEL text) to enter VELOCITY editing mode. When you are in VELOCITY editing mode, the virtual switch will be reversed (white text on black). Note: To TIE steps, start by selecting the step you want to tie to the next one, hold the FX switch, then turn rotary knob clockwise. "TIE" will appear below the GATE text, for all steps that are tied. You can tie several steps together by continuing to rotate the rotary knob while still holding the FX switch. To remove the tie, select the note that is tied, hold the FX switch, and turn the rotary knob anti-clockwise. You can also do this with several steps in the same way as creating a tie. Note: The GATE TIME fader on the front panel, and this GATE TIME parameter in the PATTERN EDITOR both affect the length of the notes. When the physical GATE TIME fader is at maximum, the note length matches the full length of the PATTERN GATE TIME. When the GATE TIME fader is in the middle, then the note length is half of the PATTERN GATE TIME. (5) LENGTH - To adjust the LENGTH of the pattern (the number of steps), press the GLOBAL switch (under the LEN text) to enter LENGTH editing mode. When you are in LENGTH editing mode, the virtual switch will be reversed (white on black). The height of the bar indicates the current velocity setting. PATTERN STEP VELOCITY VELOCITY The VELOCITY for each step can then be changed by using the BANK/UP or BANK/DOWN switches, or the DATA ENTRY fader. (4) GATE - The GATE TIME of each step is shown by the width of the bar. To adjust the GATE TIME for a step, press the FX switch (under the GATE text) to enter GATE TIME editing mode. When you are in GATE TIME editing mode the virtual switch will be reversed (white text on black). The LENGTH of the PATTERN can then be changed from 1 to 32, by using the BANK/UP or BANK/DOWN switches, or the DATA ENTRY fader. (6) COMP - This switch allows you to COMPARE the current status of the PATTERN being edited against the stored PATTERN. To use the PATTERN COMPARE function, press the COMPARE switch (under the COMP text) to enter COMPARE mode. When you are in COMPARE mode, the virtual switch will be reversed (white text on black). Note: The COMP switch will only work when a USER PATTERN is selected, and only if it has been changed (it will have a * after it, such as User-2*). In this example, pressing COMP will compare User-2* with its saved version, User-2.
-
 1
1 -
2
-
3
-
4
-
5
-
6
-
7
-
8
-
9
-
10
-
11
-
12
-
13
-
14
-
15
-
16
-
17
-
18
-
19
-
20
-
21
-
22
-
23
-
24
-
25
-
26
-
27
-
28
-
29
-
30
-
31
-
32
-
33
-
34
-
35
-
36
-
37
-
38
-
39
-
40
-
41
-
42
-
43
-
44
-
45
-
46
-
47
-
 48
48 -
 49
49 -
 50
50 -
 51
51 -
 52
52 -
 53
53 -
 54
54 -
 55
55 -
 56
56 -
 57
57 -
 58
58 -
59
-
60
-
61
-
62
-
63
-
64
-
65
-
66
-
67
-
68
-
69
-
70
-
71
-
72
-
73
-
74
-
75
-
76
-
77
-
78
-
79
-
80
-
81
-
82
-
83
-
84
-
85
-
86
-
87
-
88
-
89
-
90
-
91
-
92
-
93
-
94
-
95
-
96
-
97
-
98
-
99
-
100
-
101
-
102
-
103
-
104
-
105
-
106
-
107
-
108
-
109
-
110
-
111
-
112
-
113
-
114
-
115
-
116
-
117
-
118
-
119
-
120
-
121
-
122
-
123
-
124
-
125
-
126
-
127
-
128
-
129
-
130
-
131
-
132
-
133
-
134
-
135
-
136
-
137
-
138
-
139
-
140
-
141
-
142
-
143
-
144
-
145
-
146
-
147
-
148
-
149
-
150
-
151
-
152
-
153
-
154
-
155
-
156
-
157
-
158
-
159
-
160
-
161
-
162
-
163
-
164
-
165
-
166
 |
 |
