Brother International MFC 9420CN Network Users Manual - English - Page 20
Front Panel Setup
 |
UPC - 012502614074
View all Brother International MFC 9420CN manuals
Add to My Manuals
Save this manual to your list of manuals |
Page 20 highlights
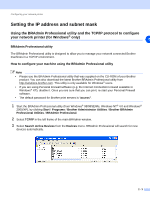
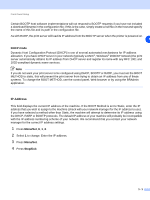
3 Front Panel Setup LAN Main Setup Menu The control panel LAN menu section can be used to configure network settings. 3 Press Menu/Set, then press number, 6 for LAN and then proceed to the menu selection you wish to configure. Please note that the machine is supplied with the BRAdmin Professional Windows® software, which also can be used to configure network settings. Setup TCP/IP This menu has nine sections: Boot Method, IP Address, Subnet Mask, Gateway, Node Name, WINS Config, WINS Server, DNS Server and APIPA. BOOT Method 1 Press Menu/Set, 6, 1, 1. 2 Press ▲ or ▼ to select Auto, Static, RARP, BOOTP or DHCP. 3 Press Menu/Set. 4 Press Stop/Exit. Static mode In this mode the machine's IP address must be manually assigned. Once entered the IP address is locked to the assigned address. Auto mode In this mode, the machine will scan the network for a DHCP server, if it can find one, and if the DHCP server is configured to allocate an IP address to the machine, then the IP address supplied by the DHCP server will be used. If no DHCP server is available, the machine will scan for a BOOTP server. If a BOOTP server is available, and it is configured correctly, the machine will take its IP address from the BOOTP server. If a BOOTP server is not available, the machine will scan for a RARP server. If a RARP server also does not answer, the machine will use an APIPA address, see Using APIPA to configure the IP address on page A-3. This whole process can take 2 to 3 minutes so we recommend printing a Network Configuration List to confirm the network settings are set correctly. 3 - 1
-
 1
1 -
2
-
3
-
4
-
5
-
6
-
7
-
8
-
9
-
10
-
11
-
12
-
13
-
14
-
 15
15 -
 16
16 -
 17
17 -
 18
18 -
 19
19 -
 20
20 -
 21
21 -
 22
22 -
 23
23 -
 24
24 -
 25
25 -
26
-
27
-
28
-
29
-
30
-
31
-
32
-
33
-
34
-
35
-
36
-
37
-
38
-
39
-
40
-
41
-
42
-
43
-
44
-
45
-
46
-
47
-
48
-
49
-
50
-
51
-
52
-
53
-
54
-
55
-
56
-
57
-
58
-
59
-
60
-
61
-
62
-
63
-
64
-
65
-
66
-
67
-
68
-
69
-
70
-
71
-
72
-
73
-
74
-
75
-
76
-
77
-
78
-
79
-
80
-
81
-
82
-
83
-
84
-
85
-
86
-
87
-
88
-
89
-
90
-
91
-
92
-
93
-
94
 |
 |