Brother International MFC 9420CN Network Users Manual - English - Page 51
If the printer driver has already been installed, If the printer driver has NOT been installed, Add
 |
UPC - 012502614074
View all Brother International MFC 9420CN manuals
Add to My Manuals
Save this manual to your list of manuals |
Page 51 highlights
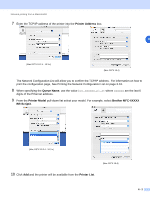
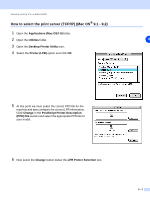
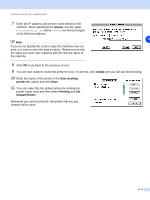
Internet printing for Windows® Note If you have edited the hosts file on your computer or are using Domain Name System, you can also enter the DNS name of the print server. As the print server supports TCP/IP and NetBIOS names, you can also enter the NetBIOS name of the print server. The NetBIOS name can be seen in the Network Configuration List. The NetBIOS name assigned is the first 15 characters of the node name and by default it will appear as 5 BRN_xxxxxx where xxxxxx is the last six digits of the Ethernet address. 7 When you click Next, Windows® 2000/XP will make a connection with the URL that you specified. If the printer driver has already been installed: If the appropriate printer driver is already installed on your PC, Windows® 2000/XP will automatically use that driver for use. In this case, you will simply be asked if you wish to make the driver the default driver, after which the Driver installation Wizard will complete. You are now ready to print. If the printer driver has NOT been installed: One of the benefits of the IPP printing protocol is that it establishes the model name of the printer when you communicate with it. After successful communication you will see the model name of the printer automatically. This means that you do not need to inform Windows® 2000 the type of printer driver to be used. 8 Click OK. You will then see the printer selection screen in the Add Printer Wizard. 9 If your printer is not in the list of supported printers, click Have Disk. You will then be asked to insert the driver disk. 10 Click Browse and select the CD-ROM or network share that contains the appropriate Brother printer driver. 11 Now specify the model name of the printer. 12 If the printer driver that you are installing does not have a Digital Certificate you will see a warning message. Click Yes to continue with the installation. The Add Printer Wizard will then complete. 13 Click the Finish button and the printer is now configured and ready to print. To test the printer connection, print a test page. 5 - 8
-
 1
1 -
2
-
3
-
4
-
5
-
6
-
7
-
8
-
9
-
10
-
11
-
12
-
13
-
14
-
15
-
16
-
17
-
18
-
19
-
20
-
21
-
22
-
23
-
24
-
25
-
26
-
27
-
28
-
29
-
30
-
31
-
32
-
33
-
34
-
35
-
36
-
37
-
38
-
39
-
40
-
41
-
42
-
43
-
44
-
45
-
 46
46 -
 47
47 -
 48
48 -
 49
49 -
 50
50 -
 51
51 -
 52
52 -
 53
53 -
 54
54 -
 55
55 -
 56
56 -
57
-
58
-
59
-
60
-
61
-
62
-
63
-
64
-
65
-
66
-
67
-
68
-
69
-
70
-
71
-
72
-
73
-
74
-
75
-
76
-
77
-
78
-
79
-
80
-
81
-
82
-
83
-
84
-
85
-
86
-
87
-
88
-
89
-
90
-
91
-
92
-
93
-
94
 |
 |