Brother International MFC 9420CN Network Users Manual - English - Page 56
Queue, Create, Save desktop, printer As, Printing, Default Printer
 |
UPC - 012502614074
View all Brother International MFC 9420CN manuals
Add to My Manuals
Save this manual to your list of manuals |
Page 56 highlights
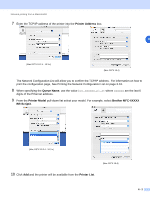
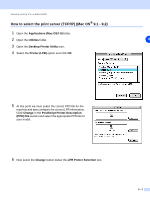
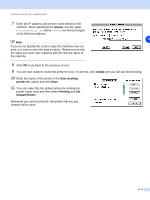
Network printing from a Macintosh® 7 Enter the IP address and service name details of the machine. When specifying the Queue, use the value brn_xxxxxx_p1_at where xxxxxx are the last 6 digits of the Ethernet address. 6 Note If you do not specify the correct value the machine may not print, or it may not print the data correctly. Please ensure that the value you enter here matches with the Service name of the machine. 8 Click OK to go back to the previous screen. 9 You are now ready to create the printer for use. To do that, click Create and you will see the following: 10 Enter the name of the printer in the Save desktop printer As: option and click Save. 11 You can make this the default printer by clicking the printer name once and then select Printing and Set Default Printer. Whenever you send a print job, the printer that you just created will be used. 6 - 4
-
 1
1 -
2
-
3
-
4
-
5
-
6
-
7
-
8
-
9
-
10
-
11
-
12
-
13
-
14
-
15
-
16
-
17
-
18
-
19
-
20
-
21
-
22
-
23
-
24
-
25
-
26
-
27
-
28
-
29
-
30
-
31
-
32
-
33
-
34
-
35
-
36
-
37
-
38
-
39
-
40
-
41
-
42
-
43
-
44
-
45
-
46
-
47
-
48
-
49
-
50
-
 51
51 -
 52
52 -
 53
53 -
 54
54 -
 55
55 -
 56
56 -
 57
57 -
 58
58 -
 59
59 -
 60
60 -
 61
61 -
62
-
63
-
64
-
65
-
66
-
67
-
68
-
69
-
70
-
71
-
72
-
73
-
74
-
75
-
76
-
77
-
78
-
79
-
80
-
81
-
82
-
83
-
84
-
85
-
86
-
87
-
88
-
89
-
90
-
91
-
92
-
93
-
94
 |
 |
