Brother International MFC 9420CN Network Users Manual - English - Page 46
Brother Internet Print: Using the BRAdmin Professional utility to Con the, Print Server
 |
UPC - 012502614074
View all Brother International MFC 9420CN manuals
Add to My Manuals
Save this manual to your list of manuals |
Page 46 highlights
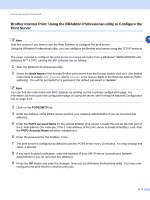
Internet printing for Windows® Brother Internet Print: Using the BRAdmin Professional utility to Configure the Print Server Note 5 Skip this section if you wish to use the Web Browser to configure the print server. Using the BRAdmin Professional utility, you can configure the Brother print server using the TCP/IP protocol. The steps required to configure the print server to receive print jobs from a Windows® 98/Me/2000/XP and Windows NT® 4.0 PC running the BIP software are as follows. 1 Start the BRAdmin Professional utility. 2 Select the Node Name of the desired Brother print server from the list and double click on it. (the default node name is usually BRN_xxxxxx, where xxxxxx is the last six digits of the Ethernet address (MAC address)). You will be prompted for a password; the default password is "access". Note You can find the node name and MAC address by printing out the machine configuration page. For information on how to print the configuration page on your print server, see Printing the Network Configuration List on page 3-16. 3 Click on the POP3/SMTP tab. 4 Enter the address of the POP3 server (consult your Network Administrator if you do not know this address). 5 Enter the POP3 Account Name for the remote Brother print server. Usually this will be the first part of the E-mail address (for example, if the E-mail address of the print server is [email protected], then the POP3 Account Name would be emailprinter). 6 Enter the password for the mailbox, if any. 7 The print server is configured by default to poll the POP3 server every 10 minutes. You may change this value, if desired. 8 If you have enabled notification, enter the address of your SMTP server (consult your Network Administrator if you do not know this address). 9 Press the OK button and save the changes. Now exit the BRAdmin Professional utility. You have now configured the print server to receive print jobs. 5 - 3
-
 1
1 -
2
-
3
-
4
-
5
-
6
-
7
-
8
-
9
-
10
-
11
-
12
-
13
-
14
-
15
-
16
-
17
-
18
-
19
-
20
-
21
-
22
-
23
-
24
-
25
-
26
-
27
-
28
-
29
-
30
-
31
-
32
-
33
-
34
-
35
-
36
-
37
-
38
-
39
-
40
-
 41
41 -
 42
42 -
 43
43 -
 44
44 -
 45
45 -
 46
46 -
 47
47 -
 48
48 -
 49
49 -
 50
50 -
 51
51 -
52
-
53
-
54
-
55
-
56
-
57
-
58
-
59
-
60
-
61
-
62
-
63
-
64
-
65
-
66
-
67
-
68
-
69
-
70
-
71
-
72
-
73
-
74
-
75
-
76
-
77
-
78
-
79
-
80
-
81
-
82
-
83
-
84
-
85
-
86
-
87
-
88
-
89
-
90
-
91
-
92
-
93
-
94
 |
 |