Brother International MFC490CW Users Manual - English - Page 168
Checking the ink volume, Machine Information, Checking the serial number
 |
UPC - 012502620495
View all Brother International MFC490CW manuals
Add to My Manuals
Save this manual to your list of manuals |
Page 168 highlights
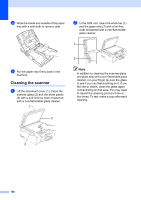
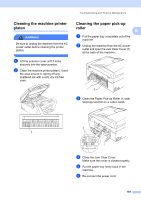
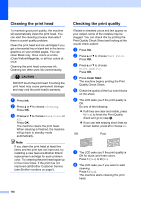
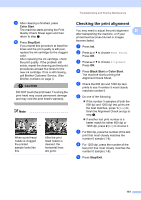
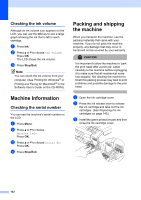
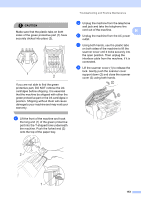
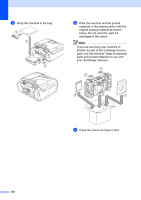
Checking the ink volume B Although an ink volume icon appears on the LCD, you can use the Ink key to see a large graph showing the ink that is left in each cartridge. a Press Ink. b Press a or b to choose Ink Volume. Press OK. The LCD shows the ink volume. c Press Stop/Exit. Note You can check the ink volume from your computer. (See Printing for Windows® or Printing and Faxing for Macintosh® in the Software User's Guide on the CD-ROM.) Machine Information B Checking the serial number B You can see the machine's serial number on the LCD. a Press Menu. b Press a or b to choose Machine Info. Press OK. c Press a or b to choose Serial No. Press OK. d Press Stop/Exit. Packing and shipping the machine B When you transport the machine, use the packing materials that came with your machine. If you do not pack the machine properly, any damage that may occur in transit will not be covered by your warranty. CAUTION It is important to allow the machine to 'park' the print head after a print job. Listen carefully to the machine before unplugging it to make sure that all mechanical noise has stopped. Not allowing the machine to finish this parking process may lead to print problems and possible damage to the print head. a Open the ink cartridge cover. b Press the ink release lever to release the ink cartridge and take out the ink cartridges. (See Replacing the ink cartridges on page 145.) c Install the green protective part and then close the ink cartridge cover. 152
-
 1
1 -
2
-
3
-
4
-
5
-
6
-
7
-
8
-
9
-
10
-
11
-
12
-
13
-
14
-
15
-
16
-
17
-
18
-
19
-
20
-
21
-
22
-
23
-
24
-
25
-
26
-
27
-
28
-
29
-
30
-
31
-
32
-
33
-
34
-
35
-
36
-
37
-
38
-
39
-
40
-
41
-
42
-
43
-
44
-
45
-
46
-
47
-
48
-
49
-
50
-
51
-
52
-
53
-
54
-
55
-
56
-
57
-
58
-
59
-
60
-
61
-
62
-
63
-
64
-
65
-
66
-
67
-
68
-
69
-
70
-
71
-
72
-
73
-
74
-
75
-
76
-
77
-
78
-
79
-
80
-
81
-
82
-
83
-
84
-
85
-
86
-
87
-
88
-
89
-
90
-
91
-
92
-
93
-
94
-
95
-
96
-
97
-
98
-
99
-
100
-
101
-
102
-
103
-
104
-
105
-
106
-
107
-
108
-
109
-
110
-
111
-
112
-
113
-
114
-
115
-
116
-
117
-
118
-
119
-
120
-
121
-
122
-
123
-
124
-
125
-
126
-
127
-
128
-
129
-
130
-
131
-
132
-
133
-
134
-
135
-
136
-
137
-
138
-
139
-
140
-
141
-
142
-
143
-
144
-
145
-
146
-
147
-
148
-
149
-
150
-
151
-
152
-
153
-
154
-
155
-
156
-
157
-
158
-
159
-
160
-
161
-
162
-
 163
163 -
 164
164 -
 165
165 -
 166
166 -
 167
167 -
 168
168 -
 169
169 -
 170
170 -
 171
171 -
 172
172 -
 173
173 -
174
-
175
-
176
-
177
-
178
-
179
-
180
-
181
-
182
-
183
-
184
-
185
-
186
-
187
-
188
-
189
-
190
-
191
-
192
-
193
-
194
-
195
-
196
-
197
-
198
-
199
-
200
-
201
-
202
-
203
-
204
-
205
-
206
-
207
-
208
-
209
-
210
-
211
-
212
-
213
-
214
-
215
-
216
 |
 |