Brother International MFC490CW Users Manual - English - Page 169
BCAUTION, on both sides of the machine to lift
 |
UPC - 012502620495
View all Brother International MFC490CW manuals
Add to My Manuals
Save this manual to your list of manuals |
Page 169 highlights
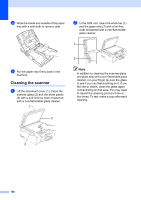
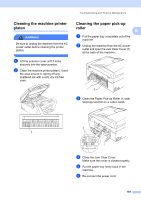
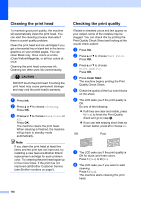
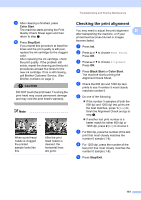
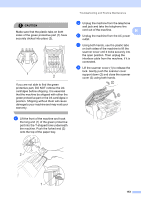
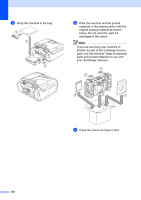
CAUTION Make sure that the plastic tabs on both sides of the green protective part (1) have securely clicked into place (2). 1 2 If you are not able to find the green protective part, DO NOT remove the ink cartridges before shipping. It is essential that the machine be shipped with either the green protective part or the ink cartridges in position. Shipping without them will cause damage to your machine and may void your warranty. d Lift the front of the machine and hook the long end (1) of the green protective part into the T-shaped hole underneath the machine. Push the forked end (2) onto the top of the paper tray. Troubleshooting and Routine Maintenance e Unplug the machine from the telephone wall jack and take the telephone line cord out of the machine. B f Unplug the machine from the AC power outlet. g Using both hands, use the plastic tabs on both sides of the machine to lift the scanner cover until it locks securely into the open position. Then unplug the interface cable from the machine, if it is connected. h Lift the scanner cover (1) to release the lock. Gently push the scanner cover support down (2) and close the scanner cover (3) using both hands. 1 2 3 2 1 153
-
 1
1 -
2
-
3
-
4
-
5
-
6
-
7
-
8
-
9
-
10
-
11
-
12
-
13
-
14
-
15
-
16
-
17
-
18
-
19
-
20
-
21
-
22
-
23
-
24
-
25
-
26
-
27
-
28
-
29
-
30
-
31
-
32
-
33
-
34
-
35
-
36
-
37
-
38
-
39
-
40
-
41
-
42
-
43
-
44
-
45
-
46
-
47
-
48
-
49
-
50
-
51
-
52
-
53
-
54
-
55
-
56
-
57
-
58
-
59
-
60
-
61
-
62
-
63
-
64
-
65
-
66
-
67
-
68
-
69
-
70
-
71
-
72
-
73
-
74
-
75
-
76
-
77
-
78
-
79
-
80
-
81
-
82
-
83
-
84
-
85
-
86
-
87
-
88
-
89
-
90
-
91
-
92
-
93
-
94
-
95
-
96
-
97
-
98
-
99
-
100
-
101
-
102
-
103
-
104
-
105
-
106
-
107
-
108
-
109
-
110
-
111
-
112
-
113
-
114
-
115
-
116
-
117
-
118
-
119
-
120
-
121
-
122
-
123
-
124
-
125
-
126
-
127
-
128
-
129
-
130
-
131
-
132
-
133
-
134
-
135
-
136
-
137
-
138
-
139
-
140
-
141
-
142
-
143
-
144
-
145
-
146
-
147
-
148
-
149
-
150
-
151
-
152
-
153
-
154
-
155
-
156
-
157
-
158
-
159
-
160
-
161
-
162
-
163
-
 164
164 -
 165
165 -
 166
166 -
 167
167 -
 168
168 -
 169
169 -
 170
170 -
 171
171 -
 172
172 -
 173
173 -
 174
174 -
175
-
176
-
177
-
178
-
179
-
180
-
181
-
182
-
183
-
184
-
185
-
186
-
187
-
188
-
189
-
190
-
191
-
192
-
193
-
194
-
195
-
196
-
197
-
198
-
199
-
200
-
201
-
202
-
203
-
204
-
205
-
206
-
207
-
208
-
209
-
210
-
211
-
212
-
213
-
214
-
215
-
216
 |
 |
