Brother International MFC490CW Users Manual - English - Page 29
Loading photo paper - photo printing
 |
UPC - 012502620495
View all Brother International MFC490CW manuals
Add to My Manuals
Save this manual to your list of manuals |
Page 29 highlights
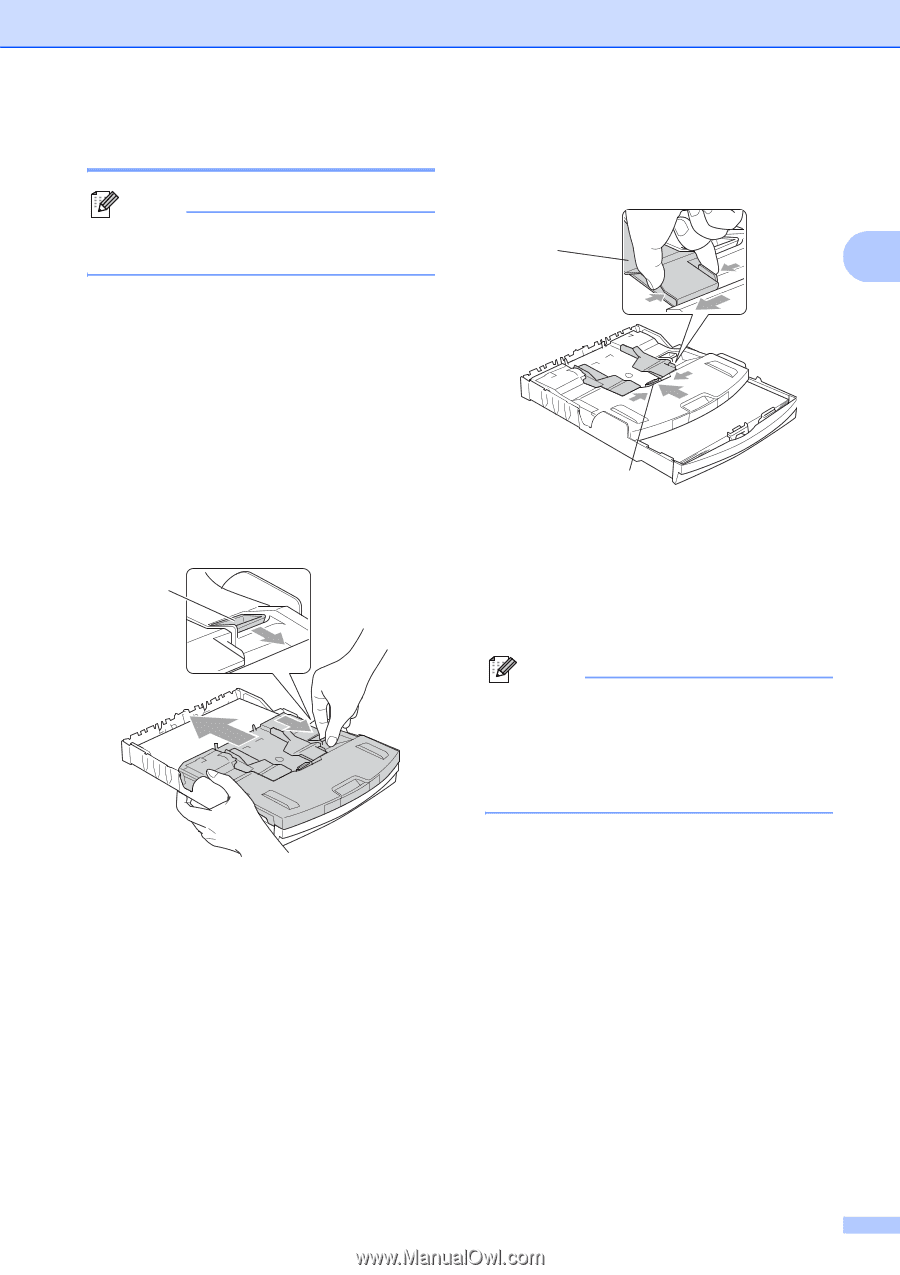
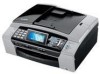
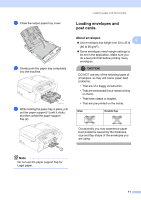
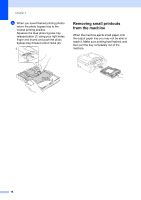
Loading photo paper 2 Note In Canada, the photo bypass tray is called the photo paper tray. Use the photo bypass tray, which is located on the top of the output paper tray cover, to print on Photo (4" × 6") and Photo L (3.5" × 5") size paper. When you use the photo bypass tray, you do not have to take out the paper that is in the tray beneath it. a Squeeze the blue photo bypass tray release button (1) using your right index finger and thumb and push the photo bypass tray forward until it clicks into the photo printing position (2). 1 2 Loading paper and documents b Press and slide the paper side guides (1) and paper length guide (2) to fit the paper size. 1 2 2 c Put the photo paper into the photo bypass tray and gently adjust the paper side guides to the paper. Make sure the paper side guides touch the sides of the paper. Check that the paper is flat in the tray. Note • Be careful that you do not push the paper in too far; it may lift at the back of the tray and cause feed problems. • Always make sure that the paper is not curled or wrinkled. Photo Bypass Tray 13
-
 1
1 -
2
-
3
-
4
-
5
-
6
-
7
-
8
-
9
-
10
-
11
-
12
-
13
-
14
-
15
-
16
-
17
-
18
-
19
-
20
-
21
-
22
-
23
-
 24
24 -
 25
25 -
 26
26 -
 27
27 -
 28
28 -
 29
29 -
 30
30 -
 31
31 -
 32
32 -
 33
33 -
 34
34 -
35
-
36
-
37
-
38
-
39
-
40
-
41
-
42
-
43
-
44
-
45
-
46
-
47
-
48
-
49
-
50
-
51
-
52
-
53
-
54
-
55
-
56
-
57
-
58
-
59
-
60
-
61
-
62
-
63
-
64
-
65
-
66
-
67
-
68
-
69
-
70
-
71
-
72
-
73
-
74
-
75
-
76
-
77
-
78
-
79
-
80
-
81
-
82
-
83
-
84
-
85
-
86
-
87
-
88
-
89
-
90
-
91
-
92
-
93
-
94
-
95
-
96
-
97
-
98
-
99
-
100
-
101
-
102
-
103
-
104
-
105
-
106
-
107
-
108
-
109
-
110
-
111
-
112
-
113
-
114
-
115
-
116
-
117
-
118
-
119
-
120
-
121
-
122
-
123
-
124
-
125
-
126
-
127
-
128
-
129
-
130
-
131
-
132
-
133
-
134
-
135
-
136
-
137
-
138
-
139
-
140
-
141
-
142
-
143
-
144
-
145
-
146
-
147
-
148
-
149
-
150
-
151
-
152
-
153
-
154
-
155
-
156
-
157
-
158
-
159
-
160
-
161
-
162
-
163
-
164
-
165
-
166
-
167
-
168
-
169
-
170
-
171
-
172
-
173
-
174
-
175
-
176
-
177
-
178
-
179
-
180
-
181
-
182
-
183
-
184
-
185
-
186
-
187
-
188
-
189
-
190
-
191
-
192
-
193
-
194
-
195
-
196
-
197
-
198
-
199
-
200
-
201
-
202
-
203
-
204
-
205
-
206
-
207
-
208
-
209
-
210
-
211
-
212
-
213
-
214
-
215
-
216
 |
 |