Campbell Scientific CSAT3B CSAT3B Three-Dimensional Sonic Anemometer - Page 36
CSAT3B Three-Dimensional Sonic Anemometer, CM210 mounting kit with CM20X crossarm
 |
View all Campbell Scientific CSAT3B manuals
Add to My Manuals
Save this manual to your list of manuals |
Page 36 highlights
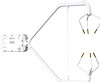
CSAT3B Three-Dimensional Sonic Anemometer CAUTION FIGURE 7-3. CM210 mounting kit with CM20X crossarm 2. Point the horizontal arm into the direction of the prevailing wind and tighten the nuts and bolts of the mounting hardware. 3. Attach the CM250 leveling mount (pn 26559; included with the CSAT3B) to the crossarm by tightening the set screws on the boom adapter with a 3/16-in hex socket head wrench. Refer to FIGURE 7-4. 4. Attach the CSAT3B to the leveling mount by inserting the bolt on the mount into the threaded hole on the bottom of the CSAT3B block as shown in FIGURE 7-4. 5. Lightly tighten the bolt and then proceed to the leveling steps. Do not carry the CSAT3B by the arms or the strut between the arms. Always hold the CSAT3B by the block, where the upper and lower arms connect. CAUTION Over-tightening bolts will damage the screw threads in the CSAT3B block. 26
-
 1
1 -
2
-
3
-
4
-
5
-
6
-
7
-
8
-
9
-
10
-
11
-
12
-
13
-
14
-
15
-
16
-
17
-
18
-
19
-
20
-
21
-
22
-
23
-
24
-
25
-
26
-
27
-
28
-
29
-
30
-
 31
31 -
 32
32 -
 33
33 -
 34
34 -
 35
35 -
 36
36 -
 37
37 -
 38
38 -
 39
39 -
 40
40 -
 41
41 -
42
-
43
-
44
-
45
-
46
-
47
-
48
-
49
-
50
-
51
-
52
-
53
-
54
-
55
-
56
-
57
-
58
-
59
-
60
-
61
-
62
-
63
-
64
-
65
-
66
-
67
-
68
-
69
-
70
-
71
-
72
-
73
-
74
-
75
-
76
-
77
-
78
-
79
-
80
-
81
-
82
-
83
-
84
-
85
-
86
-
87
-
88
 |
 |
