Canon CanoScan D660U Canon Plug-in Module CS-U3.9 User's Guide - Page 30
Setting the Scan Area
 |
View all Canon CanoScan D660U manuals
Add to My Manuals
Save this manual to your list of manuals |
Page 30 highlights
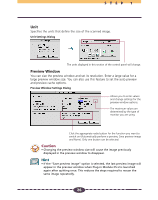
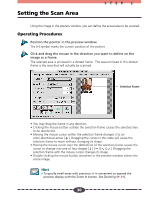
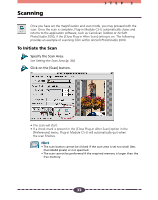
Setting the Scan Area STEP 2 Using the image in the preview window, you can define the actual area to be scanned. Operating Procedures Position the pointer in the preview window. The [+] symbol marks the current position of the pointer. Click and drag the mouse in the direction you want to define on the image as a frame. The selected area is enclosed in a dotted frame. The area enclosed in this dotted frame is the area that will actually be scanned. Selection Frame • You may drag the frame in any direction. • Clicking the mouse button outside the selection frame causes the selected area to be deselected. • Moving the mouse cursor within the selection frame changes it to an omni-directional arrow [ ]. Dragging the cursor in this state will cause the selection frame to move without changing its shape. • Placing the mouse cursor over the dotted line of the selection frame causes the cursor to change into one of four shapes Dragging the selection frame with the mouse cursor changes its shape. • Double-clicking the mouse button anywhere in the preview window selects the entire image. Hint • To specify small areas with precision, it is convenient to expand the preview display with the Zoom In button. See Zooming (P. 31). 30
-
 1
1 -
2
-
3
-
4
-
5
-
6
-
7
-
8
-
9
-
10
-
11
-
12
-
13
-
14
-
15
-
16
-
17
-
18
-
19
-
20
-
21
-
22
-
23
-
24
-
 25
25 -
 26
26 -
 27
27 -
 28
28 -
 29
29 -
 30
30 -
 31
31 -
 32
32 -
 33
33 -
 34
34 -
 35
35 -
36
-
37
-
38
-
39
-
40
-
41
-
42
-
43
-
44
-
45
-
46
-
47
-
48
-
49
-
50
-
51
-
52
-
53
-
54
-
55
-
56
-
57
-
58
-
59
-
60
-
61
-
62
-
63
-
64
-
65
-
66
-
67
-
68
-
69
-
70
-
71
 |
 |
