Canon CanoScan D660U Canon Plug-in Module CS-U3.9 User's Guide - Page 47
Adjusting the Color Balance, Operating Procedure
 |
View all Canon CanoScan D660U manuals
Add to My Manuals
Save this manual to your list of manuals |
Page 47 highlights
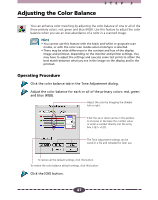
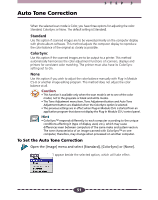
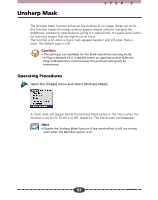
STEP 3 Adjusting the Color Balance You can enhance color matching by adjusting the color balance of one or all of the three primary colors: red, green and blue (RGB). Use this feature to adjust the color balance when you see an over-abundance of a color in a scanned image. Hint • You cannot use this feature with the black and white or grayscale scan modes, or with the color scan modes when ColorSync is selected. • There may be wide differences in the contrast and hue of the display image and printout, depending on the monitor and printer settings. You may have to adjust the settings and execute some test prints to attain the best match between what you see in the image on the display and in the printout. Operating Procedure Click the color balance tab in the Tone Adjustment dialog. Adjust the color balance for each or all of the primary colors: red, green and blue (RGB). Adjust the color by dragging the slidebar left or right. Click the up or down arrow in the spinbox to increase or decrease the number value or enter a number directly into the entry box (-127~+127). The Tone Adjustment settings can be saved in a file and reloaded for later use. To restore all the default settings, click this button. To restore the color balance default settings, click this button. Click the [OK] button. 47
-
 1
1 -
2
-
3
-
4
-
5
-
6
-
7
-
8
-
9
-
10
-
11
-
12
-
13
-
14
-
15
-
16
-
17
-
18
-
19
-
20
-
21
-
22
-
23
-
24
-
25
-
26
-
27
-
28
-
29
-
30
-
31
-
32
-
33
-
34
-
35
-
36
-
37
-
38
-
39
-
40
-
41
-
 42
42 -
 43
43 -
 44
44 -
 45
45 -
 46
46 -
 47
47 -
 48
48 -
 49
49 -
 50
50 -
 51
51 -
 52
52 -
53
-
54
-
55
-
56
-
57
-
58
-
59
-
60
-
61
-
62
-
63
-
64
-
65
-
66
-
67
-
68
-
69
-
70
-
71
 |
 |