Canon CanoScan D660U Canon Plug-in Module CS-U3.9 User's Guide - Page 41
Click on the [OK] button., Highlight Mark, Shadow Mark, Black Eyedropper Button, Auto Button
 |
View all Canon CanoScan D660U manuals
Add to My Manuals
Save this manual to your list of manuals |
Page 41 highlights
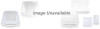
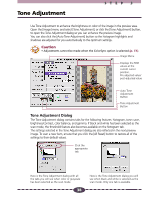
STEP 3 The histogram settings can be adjusted for all channels (Master) or for individual channels (R, G, B). The selectors are displayed to the left of the histogram graph (Master, R, G, B). The Master selection is unavailable if Grayscale has been selected as the scan mode. Shadow Mark All of the data to the left of this mark is set to the shadow (0) value. Drag the mark to the right or left. Displays the current level at the shadow mark. Click the up or down arrows in the spinbox to increase or decrease the setting or enter a number directly into the entry box (0~254). To restore the histogram settings, click this [Reset] button. To restore all settings to their defaults, click the [All Reset] button. Clicking directly on this bar causes the shadow or highlight mark, whichever is closest, to advance to that position. Highlight Mark All of the data to the right of this mark is set to the highlight (255) value. Drag the mark to the right or left. Displays the current level at the highlight mark. Click the up or down arrows in the spinbox to increase or decrease the setting or enter a number directly into the entry box (1~255). The Tone Adjustment settings can be saved in a file and reloaded for later use. Black Eyedropper Button Click the Black Eyedropper and click the position in the preview image you want to set to black (0). Auto Button Automatically sets the highlight and shadow settings for optimum effects. White Eyedropper Button Click the White Eyedropper and click the position in the preview image you want to set to white (255). Click on the [OK] button. The preview image will change according to the values specified with the histogram. Hint • The histogram dialog can also be displayed by selecting [Tone Adjustment] from the [Image] menu. 41
-
 1
1 -
2
-
3
-
4
-
5
-
6
-
7
-
8
-
9
-
10
-
11
-
12
-
13
-
14
-
15
-
16
-
17
-
18
-
19
-
20
-
21
-
22
-
23
-
24
-
25
-
26
-
27
-
28
-
29
-
30
-
31
-
32
-
33
-
34
-
35
-
 36
36 -
 37
37 -
 38
38 -
 39
39 -
 40
40 -
 41
41 -
 42
42 -
 43
43 -
 44
44 -
 45
45 -
 46
46 -
47
-
48
-
49
-
50
-
51
-
52
-
53
-
54
-
55
-
56
-
57
-
58
-
59
-
60
-
61
-
62
-
63
-
64
-
65
-
66
-
67
-
68
-
69
-
70
-
71
 |
 |