Canon EOS-1D X EOS-1D Instructions - Page 118
Image with Shooting Information - samples
 |
View all Canon EOS-1D X manuals
Add to My Manuals
Save this manual to your list of manuals |
Page 118 highlights
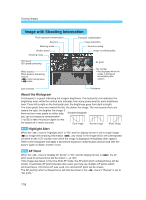
Viewing Images Image with Shooting Information Flash exposure compensation Aperture Metering mode Shutter speed Shooting mode Exposure compensation Image protection Sound recording Image-recording quality ISO speed ISO speed bracketing AF point White balance White balance bracketing amount < > Color temperature in mode File number ∗ Not displayed when the image is displayed immediately after capture. Date and time Histogram About the Histogram A histogram is a graph indicating the image's brightness. The horizontal axis indicates the brightness level, while the vertical axis indicates how many pixels exist for each brightness level. From left to right on the horizontal axis, the brightness goes from dark to bright. The more pixels there are toward the left, the darker the image. The more pixels there are toward the right, the brighter the image. If there are too many pixels on either side, Sample histogram you can set exposure compensation (→p.92) to take the picture again so that the exposure is more accurate. Dark image Normal image Bright image MENU Highlight Alert When the < > menu's "Highlight alert" is "On" and the display format is set to single image ( ) or image with shooting information ( ), any areas in the image which are overexposed will blink on the LCD monitor even when the image is displayed immediately after capture. Refer to the histogram and apply a decreased exposure compensation amount and take the picture again to obtain a better result. MENU AF Point When the < > menu's "Display AF points" is "On" and the display format is ( ), the AF point used to achieve focus will be shown. (→p.129) If the image was taken in the One-Shot AF mode, the AF point which achieved focus will be shown. If automatic AF point selection was used, you may see multiple AF points which achieved focus. If AI Servo AF was used, the selected AF point will be shown. The AF point(s) which achieved focus will also be shown if the < > menu's "Review" is set to "On (Info)." 118
-
 1
1 -
2
-
3
-
4
-
5
-
6
-
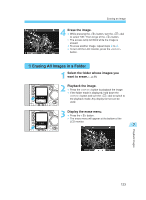
7
-
8
-
9
-
10
-
11
-
12
-
13
-
14
-
15
-
16
-
17
-
18
-
19
-
20
-
21
-
22
-
23
-
24
-
25
-
26
-
27
-
28
-
29
-
30
-
31
-
32
-
33
-
34
-
35
-
36
-
37
-
38
-
39
-
40
-
41
-
42
-
43
-
44
-
45
-
46
-
47
-
48
-
49
-
50
-
51
-
52
-
53
-
54
-
55
-
56
-
57
-
58
-
59
-
60
-
61
-
62
-
63
-
64
-
65
-
66
-
67
-
68
-
69
-
70
-
71
-
72
-
73
-
74
-
75
-
76
-
77
-
78
-
79
-
80
-
81
-
82
-
83
-
84
-
85
-
86
-
87
-
88
-
89
-
90
-
91
-
92
-
93
-
94
-
95
-
96
-
97
-
98
-
99
-
100
-
101
-
102
-
103
-
104
-
105
-
106
-
107
-
108
-
109
-
110
-
111
-
112
-
 113
113 -
 114
114 -
 115
115 -
 116
116 -
 117
117 -
 118
118 -
 119
119 -
 120
120 -
 121
121 -
 122
122 -
 123
123 -
124
-
125
-
126
-
127
-
128
-
129
-
130
-
131
-
132
-
133
-
134
-
135
-
136
-
137
-
138
-
139
-
140
-
141
-
142
-
143
-
144
-
145
-
146
-
147
-
148
-
149
-
150
-
151
-
152
-
153
-
154
-
155
-
156
-
157
-
158
-
159
-
160
-
161
-
162
-
163
-
164
-
165
-
166
-
167
-
168
-
169
-
170
-
171
-
172
-
173
-
174
-
175
-
176
 |
 |
