Canon EOS-1D X EOS-1D Instructions - Page 35
Dioptric Adjustment, Holding the Camera
 |
View all Canon EOS-1D X manuals
Add to My Manuals
Save this manual to your list of manuals |
Page 35 highlights
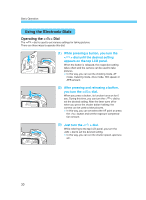
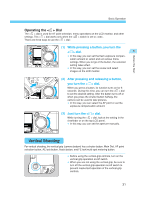
Before You Start Dioptric Adjustment By adjusting the diopter to suit your eyesight (with or without eyeglasses), the viewfinder image will look clearer. The camera's adjustable dioptric range is -3 to +1 dpt. 1 •Remove the eyecup. While grasping both sides of the eyecup, slide it upward to remove. 1 2 •Turn the dioptric adjustment knob. Turn the knob to the right or left until the AF point or the center spot metering circle looks sharp in the viewfinder. 3 Reattach the eyecup. If the camera's dioptric adjustment still cannot provide a clear viewfinder image, using Dioptric Adjustment Lens E (10 types) is recommended. (→p.167) Holding the Camera To obtain sharp pictures, hold the camera still to minimize camera shake. Horizontal shooting Vertical shooting • Firmly grasp the camera grip with your right hand, and press your both elbows lightly against your body. Hold the lens at the bottom with your left hand. • Press the camera against your face and look through the viewfinder. •• To maintain a stable stance, place one foot in front of the other instead of lining up both feet. 35
-
 1
1 -
2
-
3
-
4
-
5
-
6
-
7
-
8
-
9
-
10
-
11
-
12
-
13
-
14
-
15
-
16
-
17
-
18
-
19
-
20
-
21
-
22
-
23
-
24
-
25
-
26
-
27
-
28
-
29
-
 30
30 -
 31
31 -
 32
32 -
 33
33 -
 34
34 -
 35
35 -
 36
36 -
 37
37 -
 38
38 -
 39
39 -
 40
40 -
41
-
42
-
43
-
44
-
45
-
46
-
47
-
48
-
49
-
50
-
51
-
52
-
53
-
54
-
55
-
56
-
57
-
58
-
59
-
60
-
61
-
62
-
63
-
64
-
65
-
66
-
67
-
68
-
69
-
70
-
71
-
72
-
73
-
74
-
75
-
76
-
77
-
78
-
79
-
80
-
81
-
82
-
83
-
84
-
85
-
86
-
87
-
88
-
89
-
90
-
91
-
92
-
93
-
94
-
95
-
96
-
97
-
98
-
99
-
100
-
101
-
102
-
103
-
104
-
105
-
106
-
107
-
108
-
109
-
110
-
111
-
112
-
113
-
114
-
115
-
116
-
117
-
118
-
119
-
120
-
121
-
122
-
123
-
124
-
125
-
126
-
127
-
128
-
129
-
130
-
131
-
132
-
133
-
134
-
135
-
136
-
137
-
138
-
139
-
140
-
141
-
142
-
143
-
144
-
145
-
146
-
147
-
148
-
149
-
150
-
151
-
152
-
153
-
154
-
155
-
156
-
157
-
158
-
159
-
160
-
161
-
162
-
163
-
164
-
165
-
166
-
167
-
168
-
169
-
170
-
171
-
172
-
173
-
174
-
175
-
176
 |
 |
