Canon EOS-1D X EOS-1D Instructions - Page 32
Menu Operations
 |
View all Canon EOS-1D X manuals
Add to My Manuals
Save this manual to your list of manuals |
Page 32 highlights
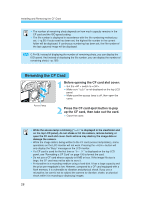
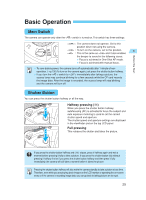
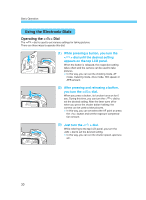
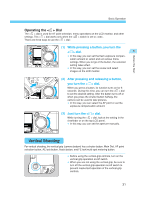
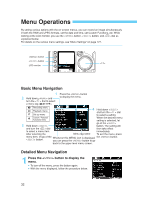
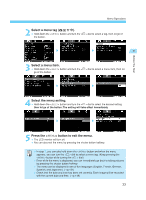
Menu Operations By setting various options with the on-screen menus, you can record an image simultaneously in both the RAW and JPEG formats, set the date and time, set Custom Functions, etc. While looking at the LCD monitor, you use the < > button, < > button, and < > dial as explained below. For details on the various menu settings, see "Menu Settings" on page 127. < > button < > button LCD monitor Basic Menu Navigation 1 Press the < > button 2 Hold down < > and to display the menu. turn the < > dial to select a menu tag ( ). Recording menu Playback menu 4 Hold down < > and turn the < > dial Set-up menu to select a setting. Custom / Personal Functions menu When the desired menu setting is selected, let 3 Hold down < > go of the < > button. The setting will and turn the < > dial then take effect to select a menu item. immediately. After selecting the Menu tag name To exit the menu, press menu item, let go of the Whenever this MENU icon is displayed, the < < > button. you can press the < > button to go > button. back to the upper level menu screen. Detailed Menu Navigation 1 Press the < menu. > button to display the To turn off the menu, press the button again. •• With the menu displayed, follow the procedure below. 32
-
 1
1 -
2
-
3
-
4
-
5
-
6
-
7
-
8
-
9
-
10
-
11
-
12
-
13
-
14
-
15
-
16
-
17
-
18
-
19
-
20
-
21
-
22
-
23
-
24
-
25
-
26
-
 27
27 -
 28
28 -
 29
29 -
 30
30 -
 31
31 -
 32
32 -
 33
33 -
 34
34 -
 35
35 -
 36
36 -
 37
37 -
38
-
39
-
40
-
41
-
42
-
43
-
44
-
45
-
46
-
47
-
48
-
49
-
50
-
51
-
52
-
53
-
54
-
55
-
56
-
57
-
58
-
59
-
60
-
61
-
62
-
63
-
64
-
65
-
66
-
67
-
68
-
69
-
70
-
71
-
72
-
73
-
74
-
75
-
76
-
77
-
78
-
79
-
80
-
81
-
82
-
83
-
84
-
85
-
86
-
87
-
88
-
89
-
90
-
91
-
92
-
93
-
94
-
95
-
96
-
97
-
98
-
99
-
100
-
101
-
102
-
103
-
104
-
105
-
106
-
107
-
108
-
109
-
110
-
111
-
112
-
113
-
114
-
115
-
116
-
117
-
118
-
119
-
120
-
121
-
122
-
123
-
124
-
125
-
126
-
127
-
128
-
129
-
130
-
131
-
132
-
133
-
134
-
135
-
136
-
137
-
138
-
139
-
140
-
141
-
142
-
143
-
144
-
145
-
146
-
147
-
148
-
149
-
150
-
151
-
152
-
153
-
154
-
155
-
156
-
157
-
158
-
159
-
160
-
161
-
162
-
163
-
164
-
165
-
166
-
167
-
168
-
169
-
170
-
171
-
172
-
173
-
174
-
175
-
176
 |
 |
